Cloudflare - Secure Web & SSH Access to Private Infrastructure Using Cloudflare Tunnel (Docker Based)
How to setup Cloudflare Tunnel secure access through your private infrastructure using Docker

#Introduction
Recently, I faced a challenge where I needed to deploy a web application and have SSH access for my CI/CD Pipeline, but I don't want to pay for a Server in the Cloud / Hosting like VPS or dedicated server. I also don't want to use a VPN service, so I decided to use Cloudflare Tunnel to secure access to my private infrastructure. I designed a network topology to implement this on my home lab using Docker.
Tip
You can ignore other devices in this topology image, it's just for illustration how my home network topology implement. You can just focus on the cloudflare tunnel, and the docker container.
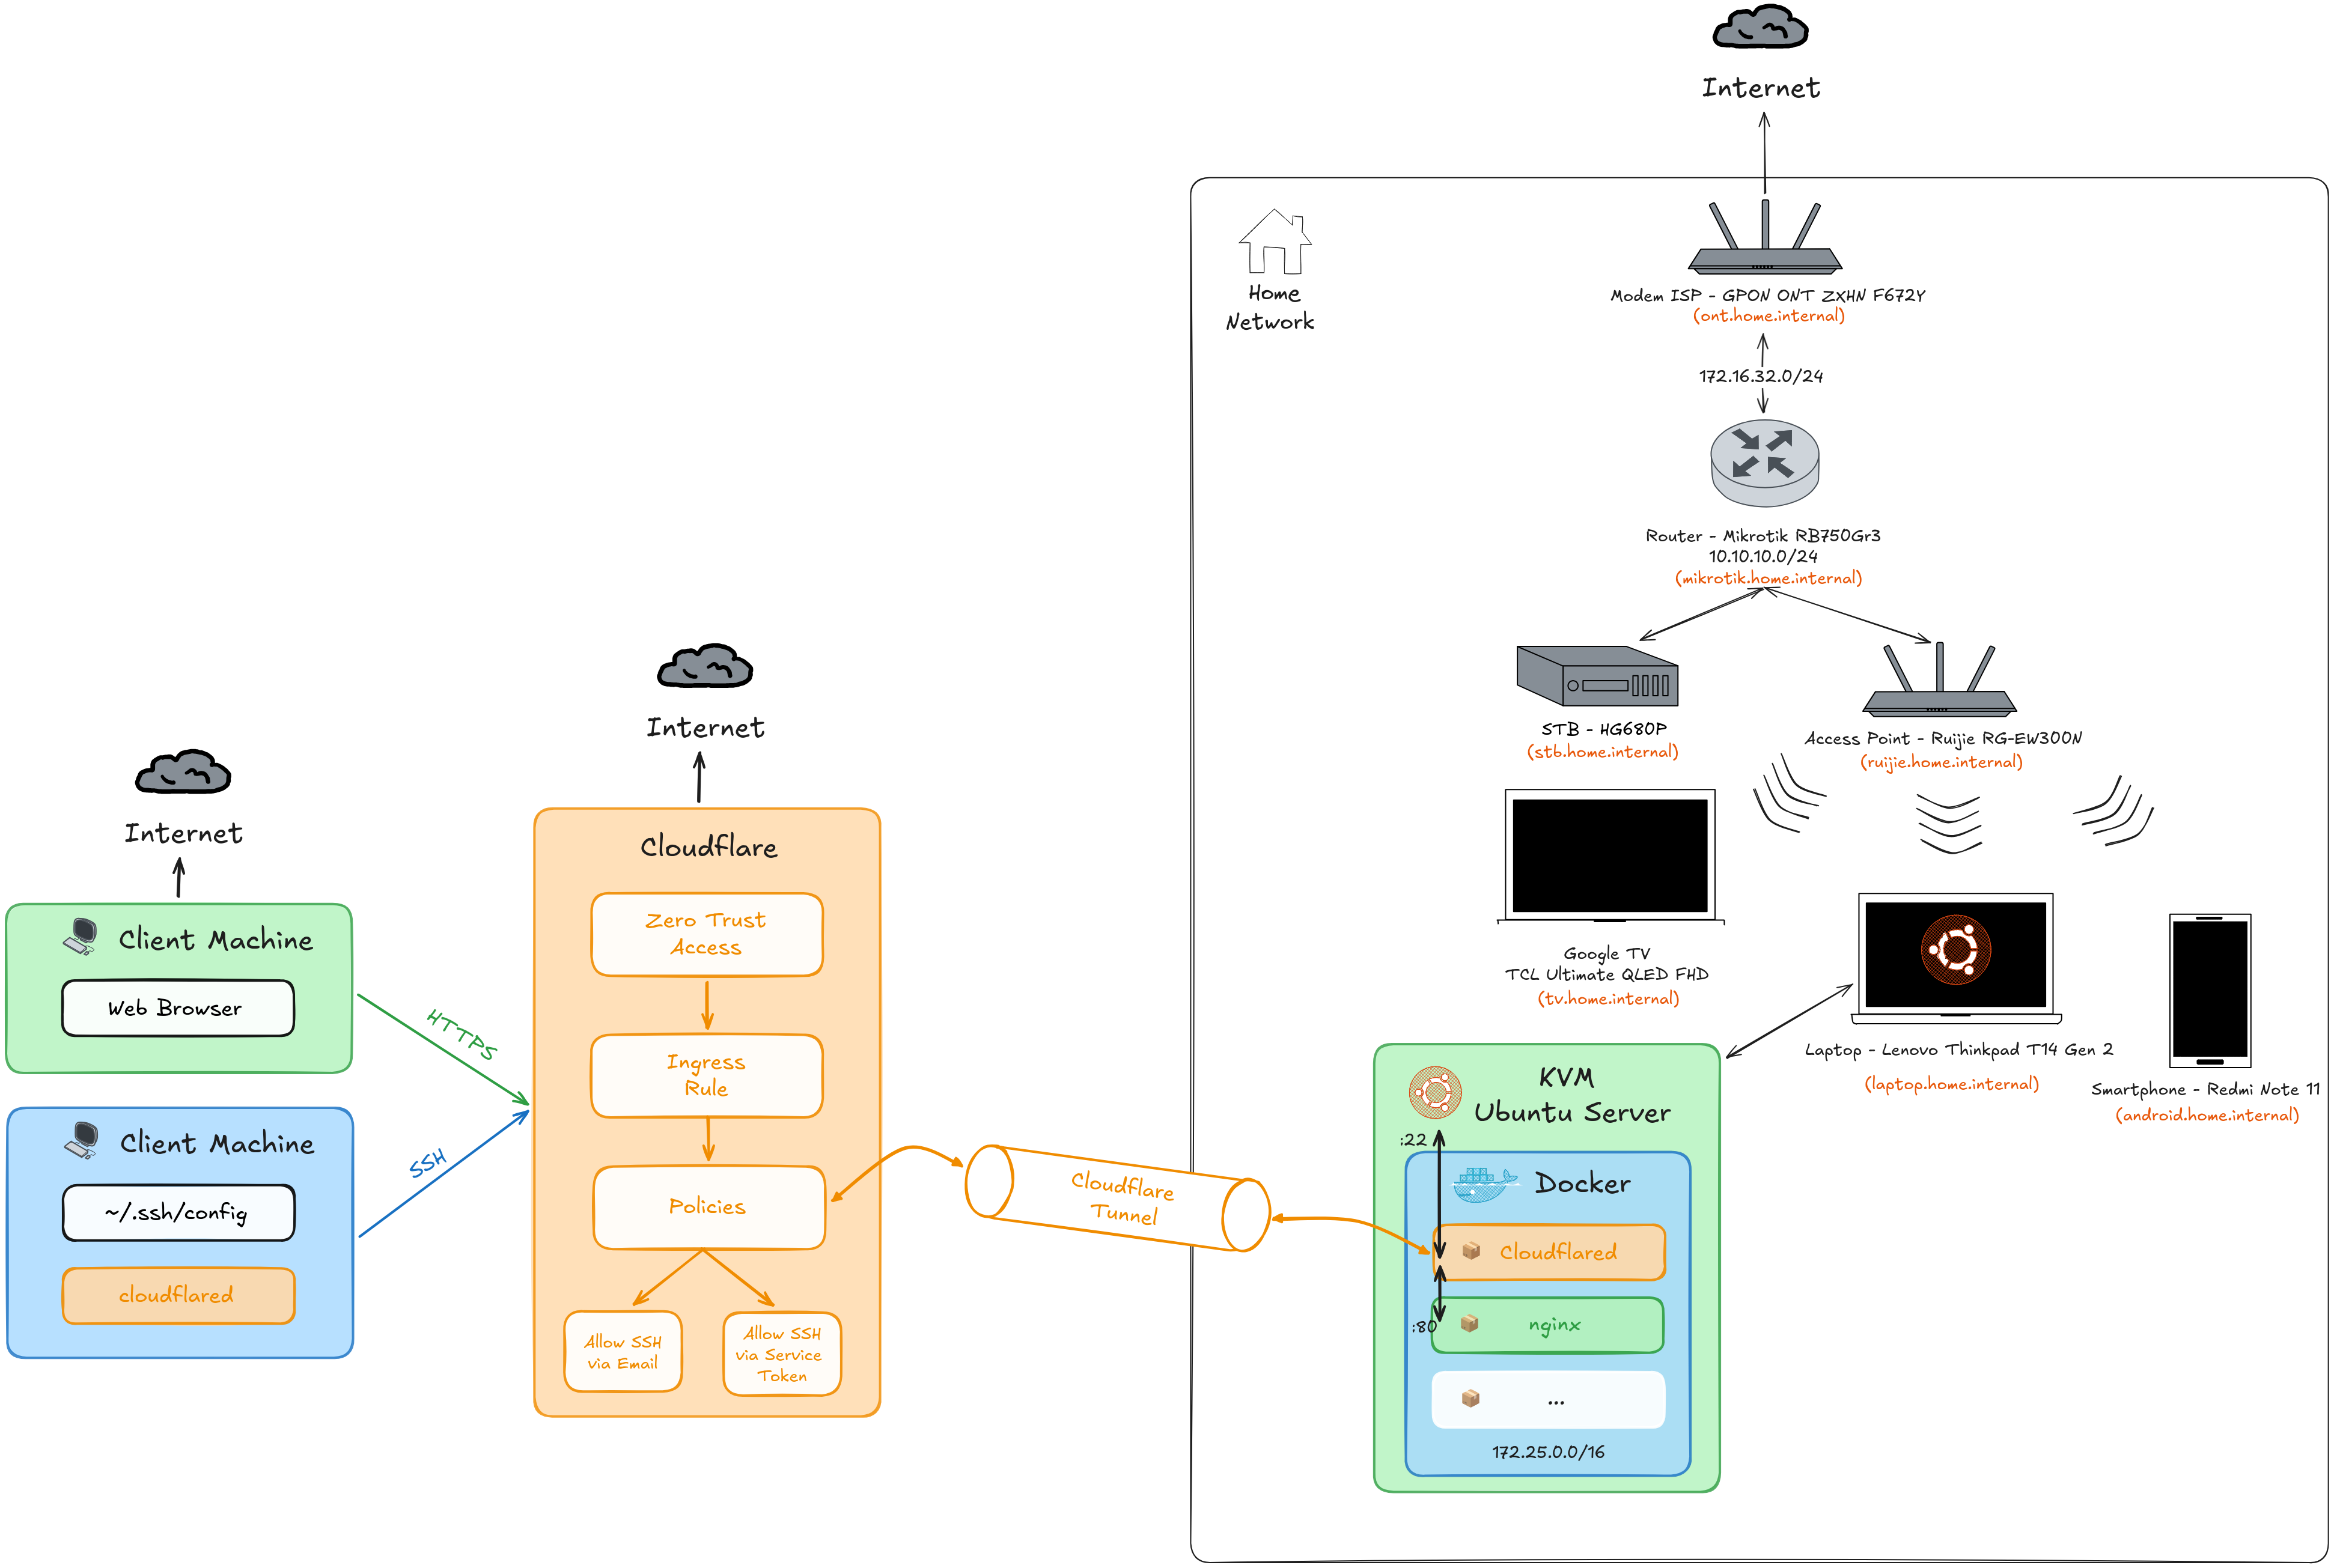 Home Network Topology
So with this setup, we can access out private infrastructure from the internet, we can access the web application, and also have SSH access to KVM server.
#Prerequisites
Before we start, make sure you have the following:
#Domain
You need to have a domain name, you can get it from Domain Registrar like Google Domains, Namecheap, or other domain registrar. Make sure the NS (Name Server) is pointing to Cloudflare DNS.
In my example I will use my own domain devvnull.me, and currently it's already the Name Server pointing to Cloudflare DNS. To verify it, you can use the following command:
dig devvnull.me -t NSThe output should be something like this:
; <<>> DiG 9.18.39-0ubuntu0.24.04.2-Ubuntu <<>> devvnull.me -t NS
;; global options: +cmd
;; Got answer:
;; ->>HEADER<<- opcode: QUERY, status: NOERROR, id: 24249
;; flags: qr rd ra; QUERY: 1, ANSWER: 2, AUTHORITY: 0, ADDITIONAL: 1

;; OPT PSEUDOSECTION:
; EDNS: version: 0, flags:; udp: 65494
;; QUESTION SECTION:
;devvnull.me.                   IN      NS

;; ANSWER SECTION:
devvnull.me.            7198    IN      NS      heidi.ns.cloudflare.com.
devvnull.me.            7198    IN      NS      gordon.ns.cloudflare.com.

;; Query time: 0 msec
;; SERVER: 127.0.0.53#53(127.0.0.53) (UDP)
;; WHEN: Wed Jan 07 15:23:59 WIB 2026
;; MSG SIZE rcvd: 98#Cloudflare Account
Make sure your cloudflare account has a Billing method added / Payment Method, because the Zero Trust feature in free plan is need payment method to activate it (but it will not charge you).
#Server / Machine
Tip
You can install the cloudflare tunnel on any server/machine you want, like Windows, Linux, macOS, Systemd, Docker, etc.
You need to have a server to run the cloudflare tunnel, and also to run the docker container. In this case I will use KVM Ubuntu Server, but you can use any server you want.
#Docker
Important
Run this command inside the shell of the server/machine you want to run the cloudflare tunnel. So you need to remote to the server/machine first. Example in my case using ssh:
ssh devnull@ubuntu.home.internalBecause in this case I will use Docker to run the cloudflare tunnel, so make sure you have Docker installed on your server. If you don't have Docker installed, you can follow the my blog posts to install it: Ubuntu 24.04 - Install Docker.
After installing Docker, we need to create a dedicated container network for all of the container, so we can use the same network for all of the container. This can be done by running the following command:
Note
Make sure the subnet is not overlapping with your local network subnet. In this case i will use IPv4 Class B (172.25.0.0/16) for the container network.
It can have 65536 IP addresses (from 172.25.0.0 to 172.25.255.255), so it can be enough for all of the container.
You can also change the name for container network, so it can be more descriptive for you.
docker network create \
    --driver=bridge \
    --subnet=172.25.0.0/16 \
cloudflared-tunnel#Setup
After all prerequisites are met, we can start setting up the cloudflare tunnel. First, we need to authenticate to cloudflare and create the tunnel.
Important
Run this command inside the shell of the server/machine you want to run the cloudflare tunnel. So you need to remote to the server/machine first. Example in my case using ssh:
ssh devnull@ubuntu.home.internal#Cloudflare Login
Because we will use Docker, so we can just simple command like this to login to cloudflare:
Tip
Change the folder name with your own domain name, in this case i will use devvnull.me.
Make sure the cloudflared dicretory have permission for nonroot or 65532 user, so we can use it in the container.
mkdir -p /opt/docker-app/devvnull.me && \
    cd /opt/docker-app/devvnull.me

mkdir cloudflared && \
sudo chown -R 65532:65532 cloudflareddocker run --rm -it \
-v $PWD/cloudflared:/home/nonroot/.cloudflared \
cloudflare/cloudflared:latest \
tunnel loginAfter running the command, it will show a URL to open in your browser to login to cloudflare. After open in browser choose the zone or domain you want Authorize Cloudflare Tunnel. In this case i will choose devvnull.me > Click Authorize button.
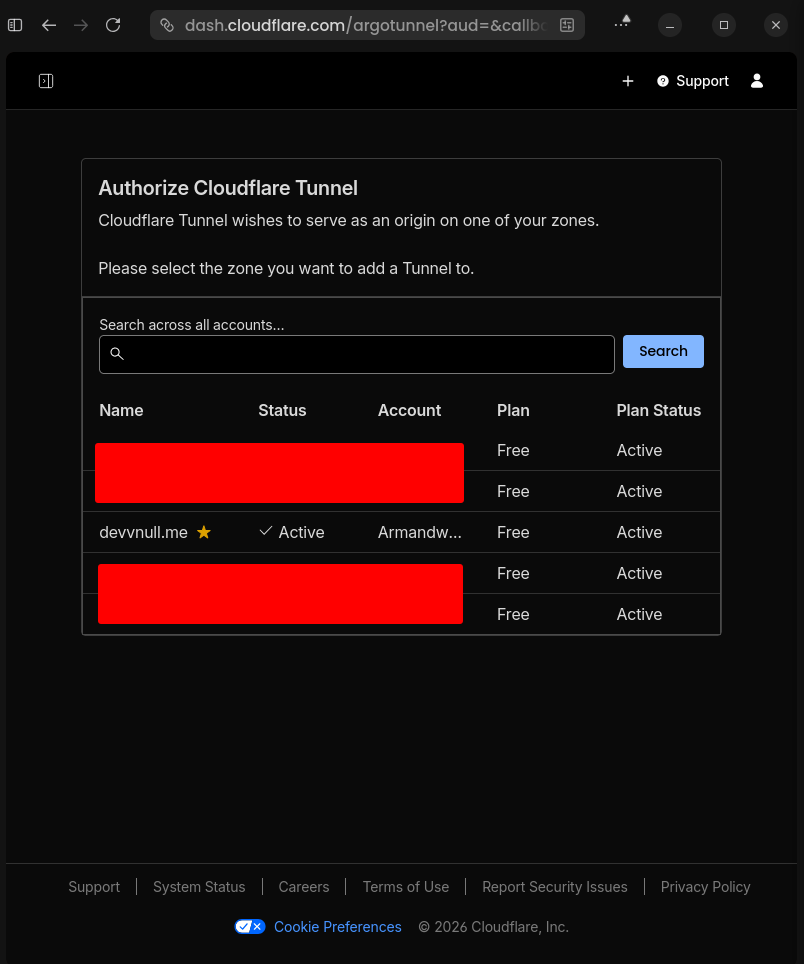 Zone Authorize Cloudflare Tunnel
If the Authorize process is successful, it will show a message like this:
Leave cloudflared running to download the cert automatically.
2026-01-07T09:01:06Z INF You have successfully logged in.
If you wish to copy your credentials to a server, they have been saved to:
/home/nonroot/.cloudflared/cert.pem
And the folder structure should be like this:
devvnull.me
└── cloudflared
└── cert.pem#Create Tunnel
After login to cloudflare, we can create the tunnel using this command:
Tip
Change the tunnel name with your own tunnel name, in this case i will use devvnull-tunnel.
docker run --rm -it \
    -v $PWD/cloudflared:/home/nonroot/.cloudflared \
    cloudflare/cloudflared:latest \
    tunnel create devvnull-tunnel
If the tunnel is created successfully, it will show a message like this:
Tunnel credentials written to /home/nonroot/.cloudflared/6d40d748-1ef2-4899-97f5-a33489ad43fc.json. cloudflared chose this file based on where your origin certificate was found. Keep this file secret. To revoke these credentials, delete the tunnel.

Created tunnel devvnull-tunnel with id 6d40d748-1ef2-4899-97f5-a33489ad43fc
And the folder structure should be like this:
devvnull.me
└── cloudflared
├── 6d40d748-1ef2-4899-97f5-a33489ad43fc.json
└── cert.pem#Create DNS Records for Tunnel
Now we need to create the DNS records for the tunnel, in my case I will mapping this records to devvnull.me domain.
Note
- Value or name
@in this record it means the root domain, it will mapping todevvnull.me, so this record will serve as the web service. - Value or name
sshin this record it means the subdomain, so it will mapping tossh.devvnull.me, so this record will serve as the SSH service.
The unique value is the UUID that will be generated by cloudflare, it will mapping to cfargotunnel.com, so this record will serve as the tunnel service.
| No | Type | Name | Content |
|---|---|---|---|
| 1 | CNAME | @ | <UUID>.cfargotunnel.com |
| 2 | CNAME | ssh | <UUID>.cfargotunnel.com |
To create the DNS records, you can create using this command below:
Tip
You can add more records if you want, for example you can add portainer subdomain for portainer service.
If you got an error message when creating this dns records, like this
Failed to add route: code: 1003, reason: Failed to create record devvnull.me with err An A, AAAA, or CNAME record with that host already exists. For more details, refer to <https://developers.cloudflare.com/dns/manage-dns-records/troubleshooting/records-with-same-name/>.It means the record already exists, so to fix this by either deleting the existing record or using a different subdomain for the record. To delete the existing record you can go to Cloudflare > DNS > Record > Select Record > Delete Record.
docker run --rm -it \
    -v $PWD/cloudflared:/home/nonroot/.cloudflared \
    cloudflare/cloudflared:latest \
tunnel route dns devvnull-tunnel devvnull.meIf the tunnel is created successfully, it will show a message like this:
2026-01-07T15:05:08Z INF Added CNAME devvnull.me which will route to this tunnel tunnelID=6d40d748-1ef2-4899-97f5-a33489ad43fc

2026-01-07T15:05:45Z INF Added CNAME ssh.devvnull.me which will route to this tunnel tunnelID=6d40d748-1ef2-4899-97f5-a33489ad43fc
And if you see in Cloudflare Dashboard, now it will appear the dns record like this:
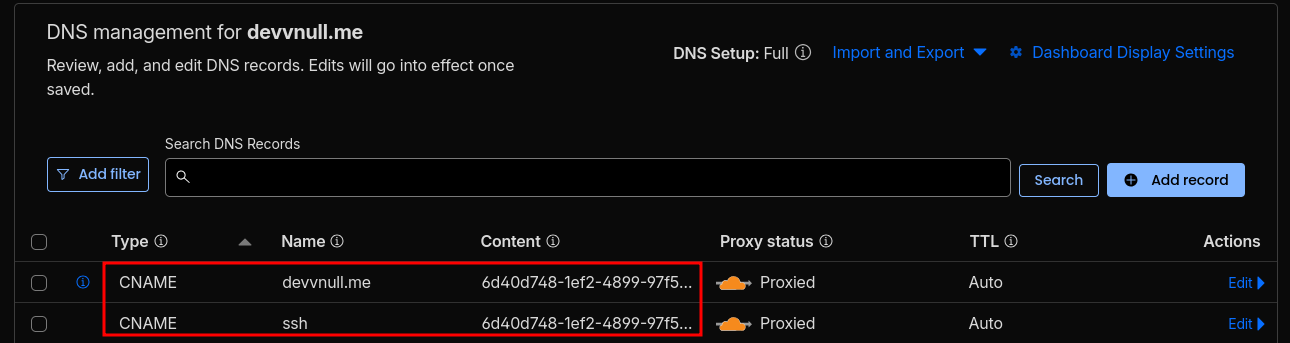 DNS Record
#Create Ingress Rules
After creating the dns record, we need to create the ingress rules for the tunnel. So based on what dns record we created, we need to define the ingress rules to mapping what service should be accessed when the dns record is accessed.
In this case i will create ingress rules for web and ssh service. To create the ingress rules, you can create using this command below:
Tip
You can use any text editor you want like nano, vim, nvim, etc to create the config file. In this case i will use nvim.
sudo nvim cloudflared/config.ymlFill the config file with this content:
Important
Replace <TUNNEL-UUID> with your tunnel uuid, you can see the tunnel uuid in the previous step or in the cloudflared folder.
- For the Web Service, it use container name
docker-welcome-pageto forward the http connection to the Nginx Server inside the Docker Container. - For the SSH Service, it use gateway address
172.25.0.1to forward the ssh connection to the KVM Server or Guest OS.
tunnel: devvnull-tunnel
credentials-file: /etc/cloudflared/<TUNNEL-UUID>.json

ingress:
  # --- Web HTTPS
  - hostname: devvnull.me
    service: http://docker-welcome-page:80

  # --- SSH (host KVM)
  - hostname: ssh.devvnull.me
    service: ssh://172.25.0.1:22

  # --- Fallback
  - service: http_status:404
So now the folder structure should be like this:
devvnull.me
└── cloudflared
├── 6d40d748-1ef2-4899-97f5-a33489ad43fc.json
├── cert.pem
└── config.yml#Create Docker Compose File For Cloudflare Tunnel
Now we need run the cloudflare tunnel as container service to keep it running all the time. To create the docker compose file, you can create using this command below:
sudo nvim docker-compose.ymlImportant
In the web service, I will use image from my GitHub Container Registry ghcr.io/armandwipangestu/docker-welcome-page:1.0.2. It simple image that will serve as a welcome page for the web service.
Feel free to see the repository here armandwipangestu/docker-welcome-page or see the Welcome Page directly here docker-welcome-page.vercel.app.
Here are some important you need consider to make this work:
- Make sure the container name is the same as the service name in the ingress rules definition before.
- Make sure the container
cloudflared_tunnelis accessible to other container in the same network.
As we already created the docker network before, so in this case the container will use dhcp to get the ip address using external network name cloudflared-tunnel.
services:
  cloudflared_tunnel:
    image: cloudflare/cloudflared:latest
    container_name: cloudflared_tunnel
    restart: unless-stopped
    command: tunnel --no-autoupdate run
    volumes:
      - ./cloudflared:/etc/cloudflared:ro
    logging:
      driver: json-file
      options:
        max-size: "10m"
        max-file: "3"
    networks:
      - cloudflared-tunnel

  docker-welcome-page:
    image: ghcr.io/armandwipangestu/docker-welcome-page:1.0.2
    container_name: docker-welcome-page
    ports:
      - "80:80"
    logging:
      driver: json-file
      options:
        max-size: "10m"
        max-file: "3"
    networks:
      - cloudflared-tunnel

networks:
  cloudflared-tunnel:
    external: true
After creating the docker compose file, now we can run the container service using this command below:
docker compose up -d

docker compose ps -a
If the container is running successfully, it will show a message like this:
[+] up 1/3
[+] up 5/5hcr.io/armandwipangestu/docker-welcome-page:1.0.2 [⣿⣿] 132.4kB / 132.4kB Pulling                                                                                                                           3.5s
 ✔ Image ghcr.io/armandwipangestu/docker-welcome-page:1.0.2 Pulled                                                                                                                                                   3.5s
   ✔ 9bc53414cea7                                           Pull complete                                                                                                                                            0.9s
   ✔ e97543ee5c71                                           Pull complete                                                                                                                                            0.6s
 ✔ Container docker-welcome-page                            Created                                                                                                                                                  0.1s
 ✔ Container cloudflared_tunnel                             Created                                                                                                                                                  0.1s

NAME                  IMAGE                                                COMMAND                  SERVICE               CREATED          STATUS          PORTS
cloudflared_tunnel    cloudflare/cloudflared:latest                        "cloudflared --no-au…"   cloudflared_tunnel    31 seconds ago   Up 31 seconds
docker-welcome-page   ghcr.io/armandwipangestu/docker-welcome-page:1.0.2   "/docker-entrypoint.…"   docker-welcome-page   31 seconds ago   Up 31 seconds   0.0.0.0:80->80/tcp, [::]:80->80/tcp
To make sure the cloudflare tunnel is running successfully, you can check the logs using this command below:
docker compose logs -f cloudflared_tunnelIf success it will show a message like this:
cloudflared_tunnel  | 2026-01-07T15:36:26Z INF Starting tunnel tunnelID=6d40d748-1ef2-4899-97f5-a33489ad43fc
cloudflared_tunnel  | 2026-01-07T15:36:26Z INF Version 2025.11.1 (Checksum cf95c90f5f6d6c87296bbab3b5a967ef580b017357353bfc1777ed5451ff9805)
cloudflared_tunnel  | 2026-01-07T15:36:26Z INF GOOS: linux, GOVersion: go1.24.9, GoArch: amd64
cloudflared_tunnel  | 2026-01-07T15:36:26Z INF Settings: map[cred-file:/etc/cloudflared/6d40d748-1ef2-4899-97f5-a33489ad43fc.json credentials-file:/etc/cloudflared/6d40d748-1ef2-4899-97f5-a33489ad43fc.json no-autoupdate:true]
cloudflared_tunnel  | 2026-01-07T15:36:26Z INF Generated Connector ID: 07ea2563-0952-40ac-821a-2d942e066170
cloudflared_tunnel  | 2026-01-07T15:36:26Z INF Initial protocol quic
cloudflared_tunnel  | 2026-01-07T15:36:26Z INF ICMP proxy will use 172.25.0.3 as source for IPv4
cloudflared_tunnel  | 2026-01-07T15:36:26Z INF ICMP proxy will use ::1 in zone lo as source for IPv6
cloudflared_tunnel  | 2026-01-07T15:36:27Z INF ICMP proxy will use 172.25.0.3 as source for IPv4
cloudflared_tunnel  | 2026-01-07T15:36:27Z INF ICMP proxy will use ::1 in zone lo as source for IPv6
cloudflared_tunnel  | 2026-01-07T15:36:27Z INF Starting metrics server on [::]:20241/metrics
cloudflared_tunnel  | 2026-01-07T15:36:27Z INF Tunnel connection curve preferences: [X25519MLKEM768 CurveP256] connIndex=0 event=0 ip=198.41.200.63
cloudflared_tunnel  | 2026/01/07 15:36:27 failed to sufficiently increase receive buffer size (was: 208 kiB, wanted: 7168 kiB, got: 416 kiB). See https://github.com/quic-go/quic-go/wiki/UDP-Buffer-Sizes for details.
cloudflared_tunnel  | 2026-01-07T15:36:27Z INF Registered tunnel connection connIndex=0 connection=d0ea08a2-dc82-412c-b4e5-c7883cbf8c88 event=0 ip=198.41.200.63 location=sin13 protocol=quic
cloudflared_tunnel  | 2026-01-07T15:36:27Z INF Tunnel connection curve preferences: [X25519MLKEM768 CurveP256] connIndex=1 event=0 ip=198.41.192.67
cloudflared_tunnel  | 2026-01-07T15:36:28Z INF Registered tunnel connection connIndex=1 connection=ab21325c-65d0-4ac8-b6de-76c0c3fe76f4 event=0 ip=198.41.192.67 location=sin06 protocol=quic
cloudflared_tunnel  | 2026-01-07T15:36:28Z INF Tunnel connection curve preferences: [X25519MLKEM768 CurveP256] connIndex=2 event=0 ip=198.41.192.57
cloudflared_tunnel  | 2026-01-07T15:36:29Z INF Registered tunnel connection connIndex=2 connection=ca6da423-76c1-4424-9e58-45796454119a event=0 ip=198.41.192.57 location=sin09 protocol=quic
cloudflared_tunnel  | 2026-01-07T15:36:29Z INF Tunnel connection curve preferences: [X25519MLKEM768 CurveP256] connIndex=3 event=0 ip=198.41.200.43
cloudflared_tunnel | 2026-01-07T15:36:30Z INF Registered tunnel connection connIndex=3 connection=dacbabe4-b00c-4ef1-8141-91e40b25620b event=0 ip=198.41.200.43 location=sin11 protocol=quic#Create Service Token
Note
This setup will be useful if you want to access your KVM Server for CI/CD Pipeline, so the SSH Connection will verify by Access and Secret from the Service Token and not using Email verification method (so it will be useful for headless client).
If you're not using CI/CD Pipeline or no needed for headless client, you can skip this step.
Now we need to create a service token for headless client (e.g. CI/CD Pipeline). To create a service token, you can follow the steps below:
- Go to Cloudflare Dashboard
- Click
Zero Trustin the left sidebar - Click
Access controls>Service credentialsin the left sidebar - Click
Create Service Token
Now fill the form with the following data:
Service token name (Required): headless-client
Service Token Duration (Required): 1 year
Click Generate token and save or copy the token to the clipboard.
If success it will show a message like this:
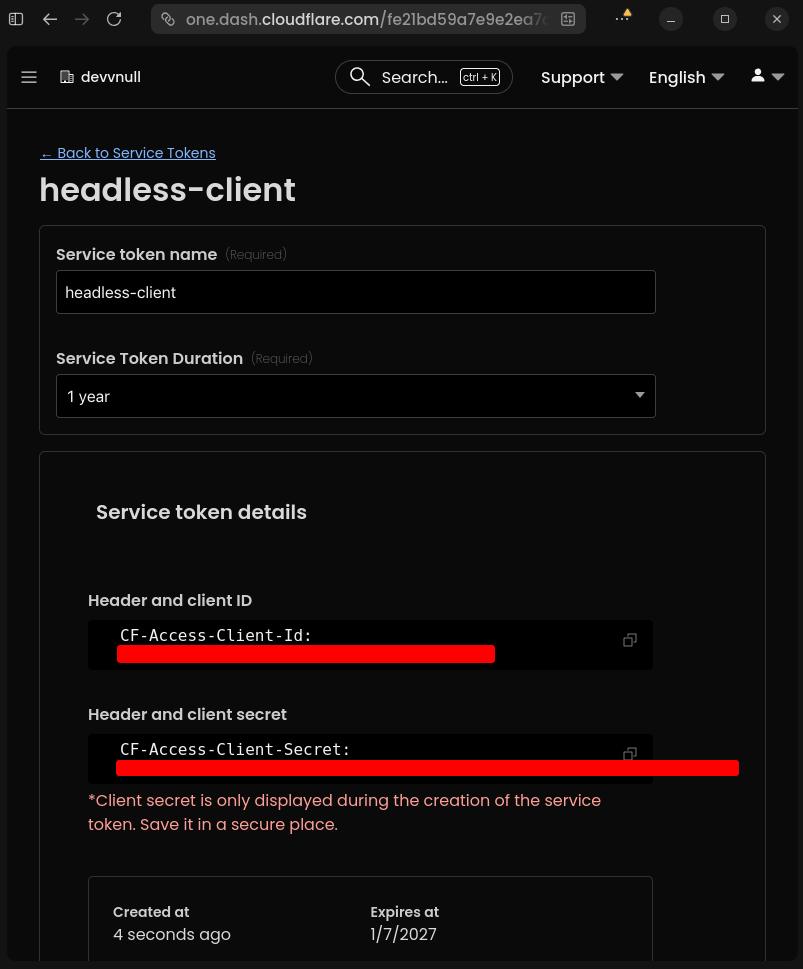 Service Token Generated
#Create Policies Rules
This policies rules will be used to verify the SSH Connection is protected by Service Token or Email Verification method.
To create a policies rules, you can follow the steps below:
- Go to Cloudflare Dashboard
- Click
Zero Trustin the left sidebar - Click
Access controls>Policiesin the left sidebar - Click
Add a policy
#Service Token Policy
Fill the form with the following data:
- Basic Information:
    - Policy name (Required): Allow SSH Connection with Service Token
    - Action (Required): Service Auth
    - Session duration: 24 hours

- Add rules:
    - Selector: Service Token
    - Value: headless-client
The configuration will look like this:
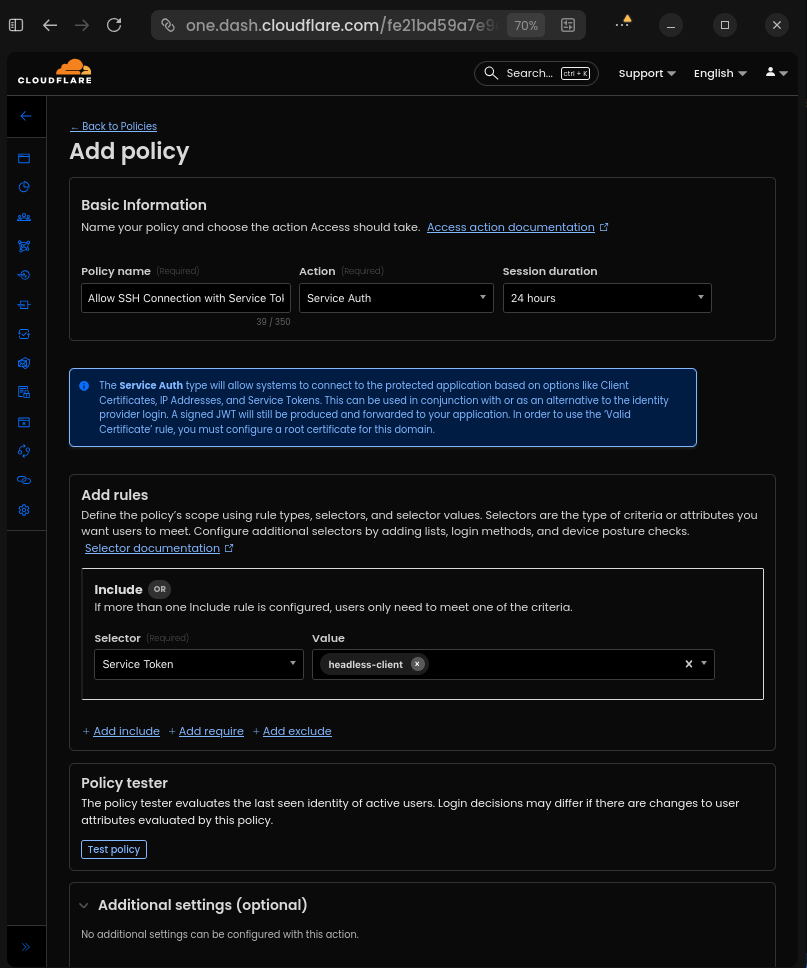 Policy Service Token
Click Save to save the policy.
#Email Verification Policy
Add a new policy with the following data:
- Basic Information:
    - Policy name (Required): Allow SSH Connection with Email Verification
    - Action (Required): Allow
    - Session duration: 24 hours

- Add rules:
    - Selector: Emails
    - Value: your-email@domain.com
The configuration will look like this:
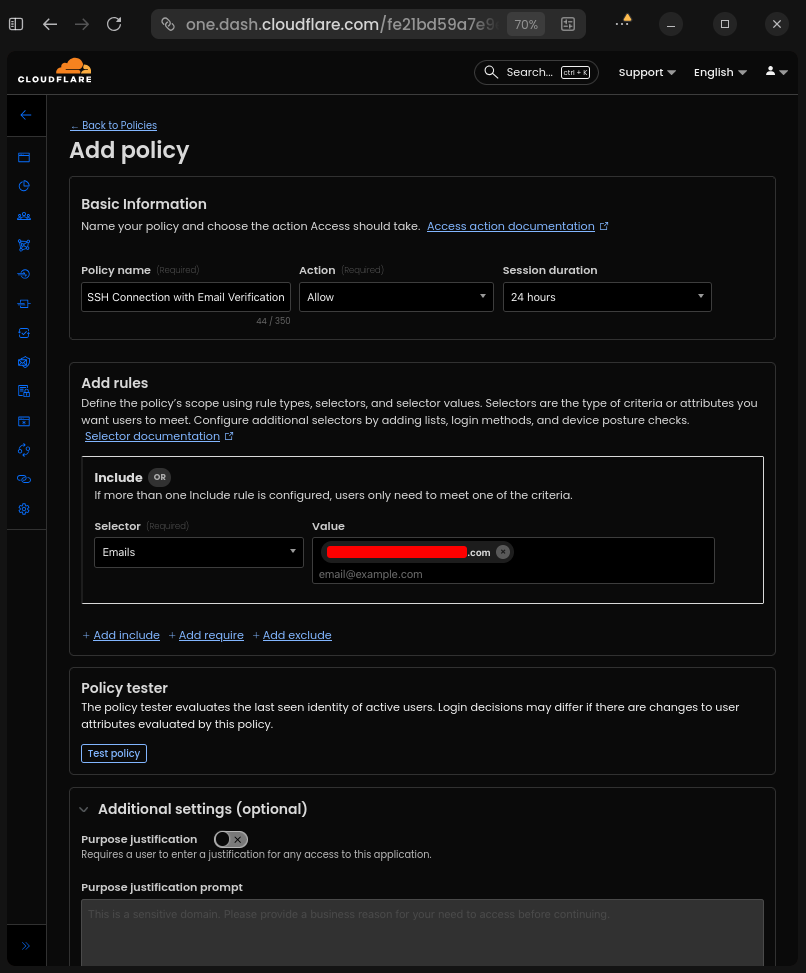 Policy Email Verification
Click Save to save the policy.
So now the Reusable policies list will look like this:
 Reusable Policies List
#Create Zero Trust Access Application
Now we need to create a Zero Trust Access Application to allow SSH Connection to our private infrastructure.
To create a Zero Trust Access Application, you can follow the steps below:
- Go to Cloudflare Dashboard
- Click
Zero Trustin the left sidebar - Click
Access controls>Applicationsin the left sidebar - Click
Add an application - Choose
Self-hostedtype
And fill the form with the following data:
- Basic Information:
    - Application name (Required): devvnull.me SSH
    - Session Duration (Required): 24 hours
    - Public hostname:
        - Input method: Default
        - Subdomain: ssh
        - Domain: devvnull.me
        - Path: empty

- Access policies:
    - Select existing policies:
        - Allow SSH Connection with Service Token
        - Allow SSH Connection with Email Verification
Make other configuration default, so it will look like this:
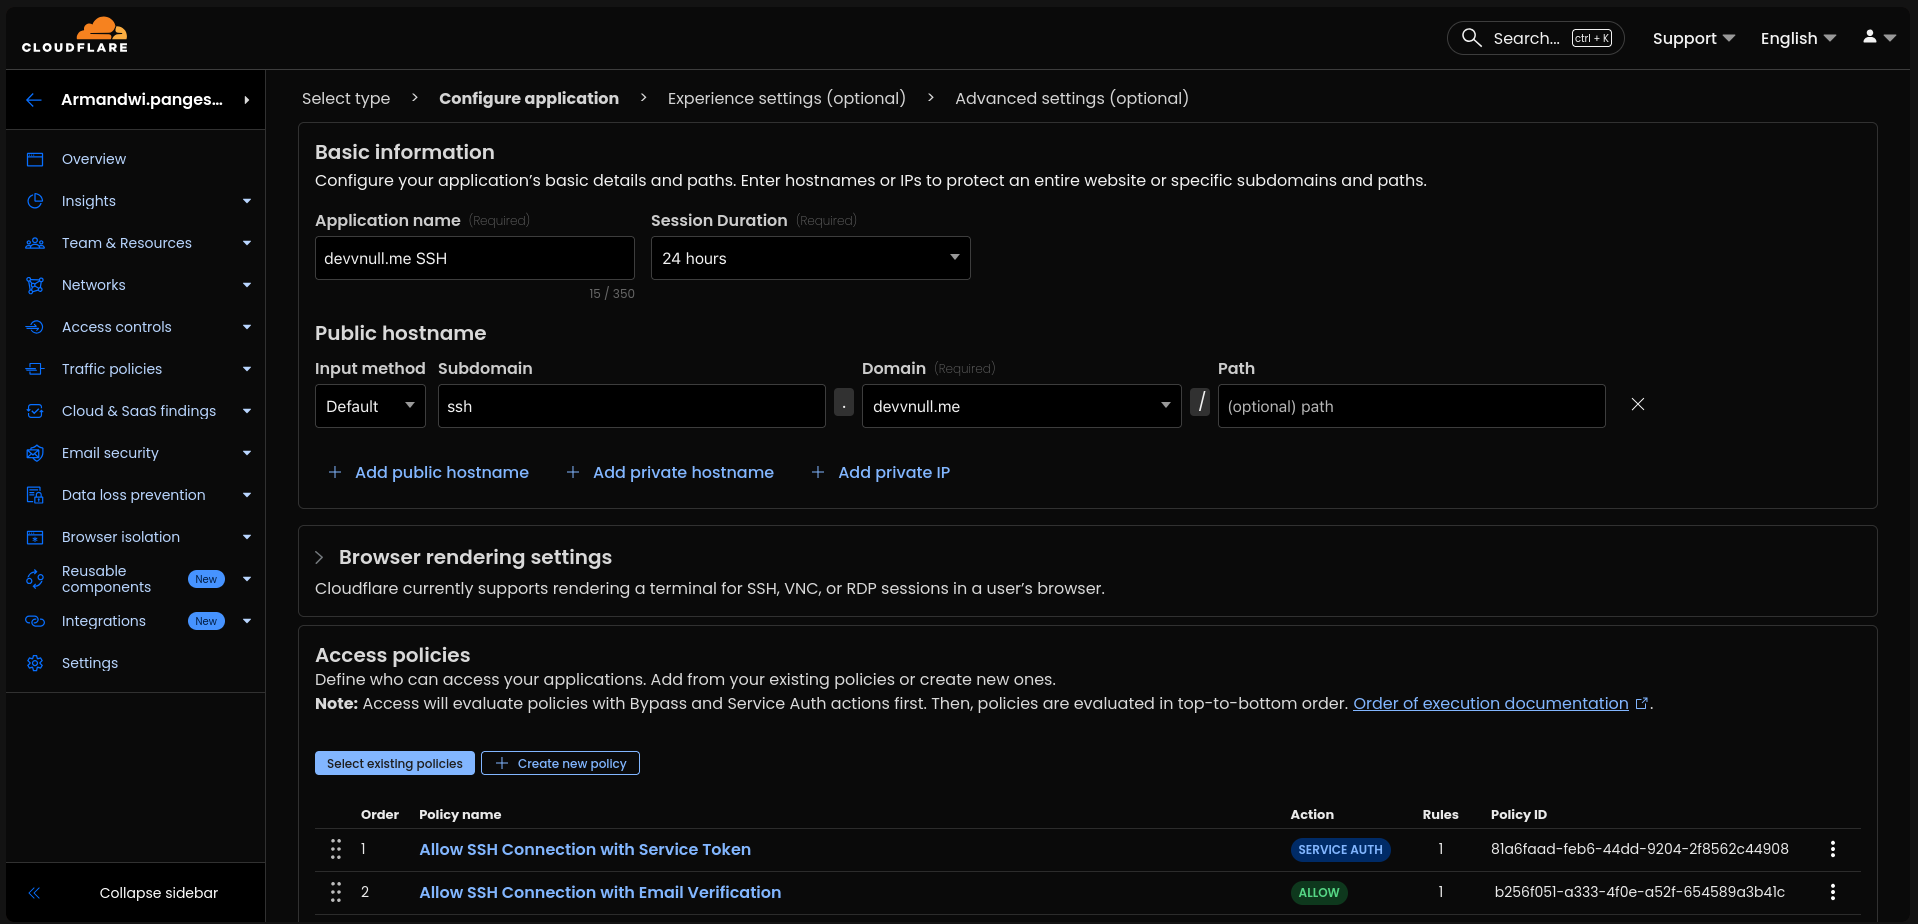 Zero Trust Access Application
Click Next > Next > Save to save the application.
Now the Applications list will look like this:
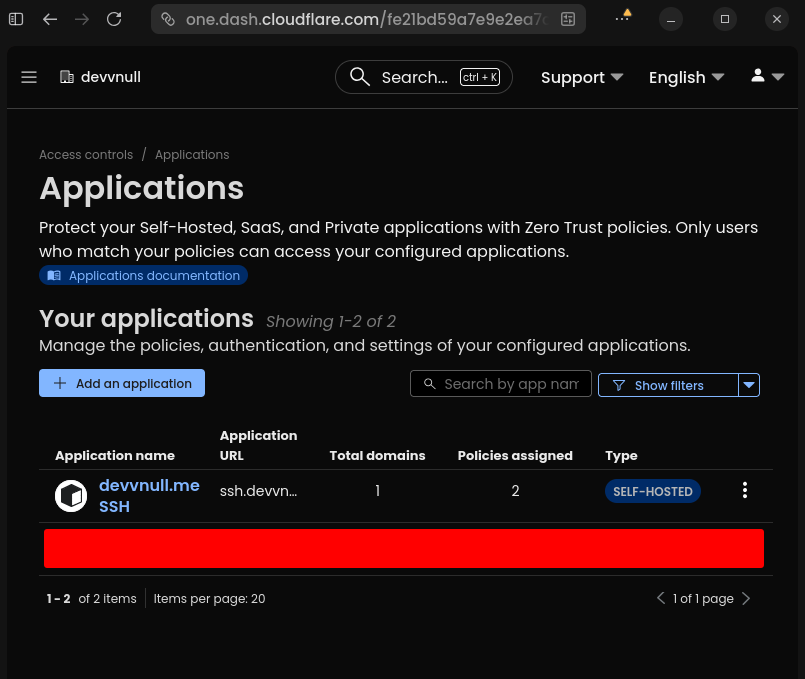 Applications List
#Setup SSH Key Authentication
Important
Run this command inside the shell of the client machine you want to connect to the private infrastructure.
To make SSH Key Authentication, you can follow the steps below:
#Generate SSH Key Pair
You need to generate a new SSH Key Pair if you don't have one. You can generate a new SSH Key Pair using the following command:
ssh-keygen -t ed25519 -f ~/.ssh/devvnull.meSo now the ~/.ssh directory will look like this:
~/.ssh
├── authorized_keys
├── devvnull.me
├── devvnull.me.pub
└── known_hostsAfter that, copy the public key and store it in the authorized_keys file of the KVM Server you want to connect to. So now the authorized_keys file will look like this:
cat ~/.ssh/authorized_keys

ssh-ed25519 AAAAC3NzaC1lZDI1NTE5AAAAICK72PwHf0X9btH2ijYCmlx7jzulr0j5viVqBCm/Y9YA devnull@devnull#Disable Password Auth
Now disable password authentication by editing the sshd_config file.
sudo nvim /etc/ssh/sshd_configAnd set the following configuration:
PermitRootLogin no
PubkeyAuthentication yes
ChallengeResponseAuthentication no
PasswordAuthentication no
PermitEmptyPasswords no
UsePAM no
Caution
Don't logout before test SSH Key Authentication is working.
After that, restart the SSH service.
sudo systemctl restart ssh#Add SSH Config to Client Machine
Now we can add the SSH Config to the client machine to make it easier to connect to the private infrastructure. To add the SSH Config, you can follow the steps below:
nvim ~/.ssh/configAnd add the following configuration:
Tip
If you don't want to use SSH Config, here an example of how to connect to the private infrastructure using the ssh directly command:
export CF_ACCESS_CLIENT_ID="your-client-id"
export CF_ACCESS_CLIENT_SECRET="your-client-secret"

ssh \
    -o ProxyCommand="cloudflared access ssh \
        --hostname ssh.devvnull.me \
        --id $CF_ACCESS_CLIENT_ID \
        --secret $CF_ACCESS_CLIENT_SECRET" \
devnull@ssh.devvnull.meHost devvnull.me
HostName ssh.devvnull.me
User devnull
IdentityFile ~/.ssh/devvnull.me
IdentitiesOnly yes
ProxyCommand cloudflared access ssh --hostname %h --id $CF_ACCESS_CLIENT_ID --secret $CF_ACCESS_CLIENT_SECRET#Add Cloudflared Binary to Client Machine
Now we need to add the Cloudflared binary to the client machine to make it easier to connect to the private infrastructure. To add the Cloudflared binary, you can follow the steps below:
curl -fsSL https://pkg.cloudflare.com/cloudflare-main.gpg | sudo tee /usr/share/keyrings/cloudflare-main.gpg >/dev/null

echo 'deb [signed-by=/usr/share/keyrings/cloudflare-main.gpg] https://pkg.cloudflare.com/cloudflared noble main' | sudo tee /etc/apt/sources.list.d/cloudflared.list

sudo apt update && sudo apt install cloudflared#Test Tunneling Connection
After all that setup already done, now we can test the tunneling connection.
#Access the Web Service
To access the web service, you can open the browser and visit https://devvnull.me. If the connection is successful, you will see the web service page like this:
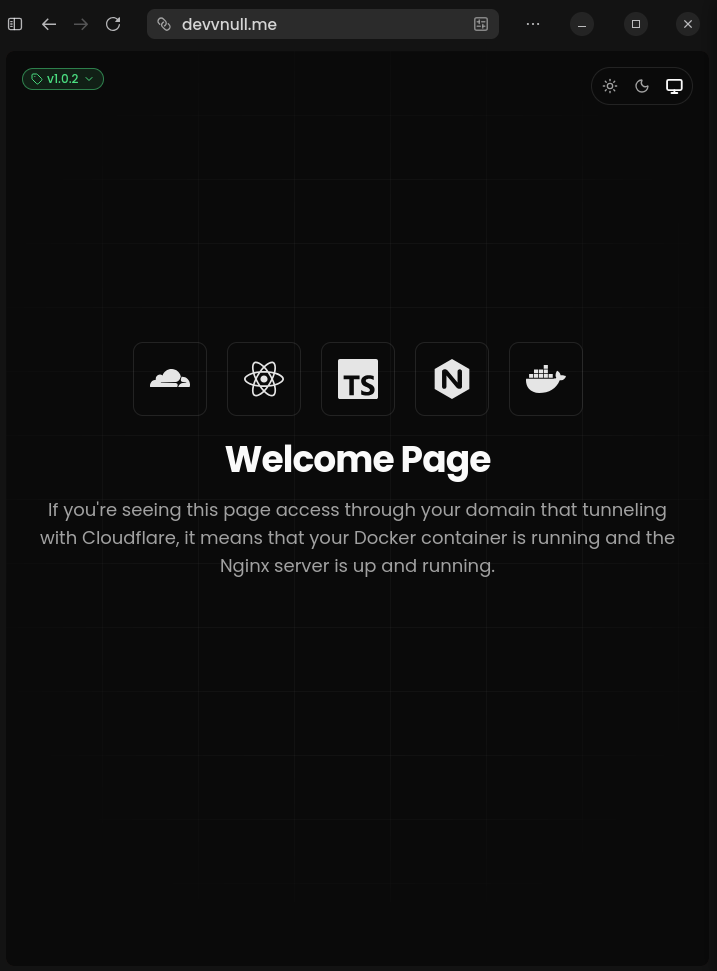 Web Service
#Access the SSH Service using Service Token
To access the SSH Service using Service Token, you can follow the steps below:
export CF_ACCESS_CLIENT_ID="your-client-id"
export CF_ACCESS_CLIENT_SECRET="your-client-secret"

ssh devvnull.me
If the connection is successful, you will see the shell change to like this:
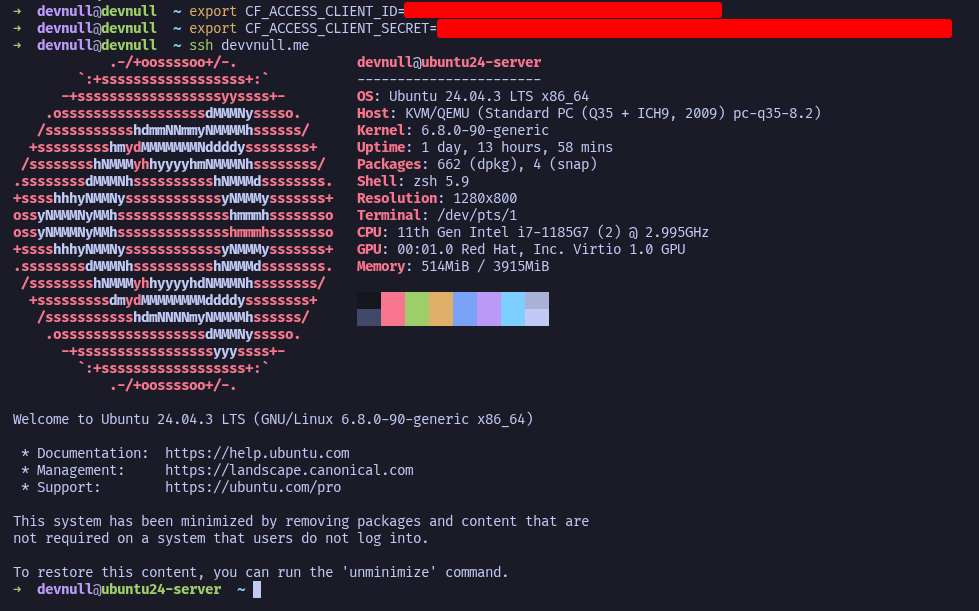 Access SSH Service using Service Token
#Access the SSH Service using Email Verification
To access the SSH Service using Email Verification, you can follow the steps below:
ssh -o ProxyCommand="cloudflared access ssh --hostname ssh.devvnull.me" devnull@ssh.devvnull.meIf the connection is successful, it will show URL to open in the browser like this
A browser window should have opened at the following URL:

https://ssh.devvnull.me/cdn-cgi/access/cli?aud=32cf2e2a14bccd667d8e508a9bfb6fd822399debe130f533ae176ee9f5aa3b7d&edge_token_transfer=true&redirect_url=https%3A%2F%2Fssh.devvnull.me%3Faud%3D32cf2e2a14bccd667d8e508a9bfb6fd822399debe130f533ae176ee9f5aa3b7d%26token%3Dq2l9u_F-OWkOt0hdtaj9zJ7yTG2qeqi2g6laXs1Oqn4%253D&send_org_token=true&token=q2l9u_F-OWkOt0hdtaj9zJ7yTG2qeqi2g6laXs1Oqn4%3D

If the browser failed to open, please visit the URL above directly in your browser.
And after opening the URL, it will show the login page like this:
Note
Fill the email address with the same that listed in the Policy before.
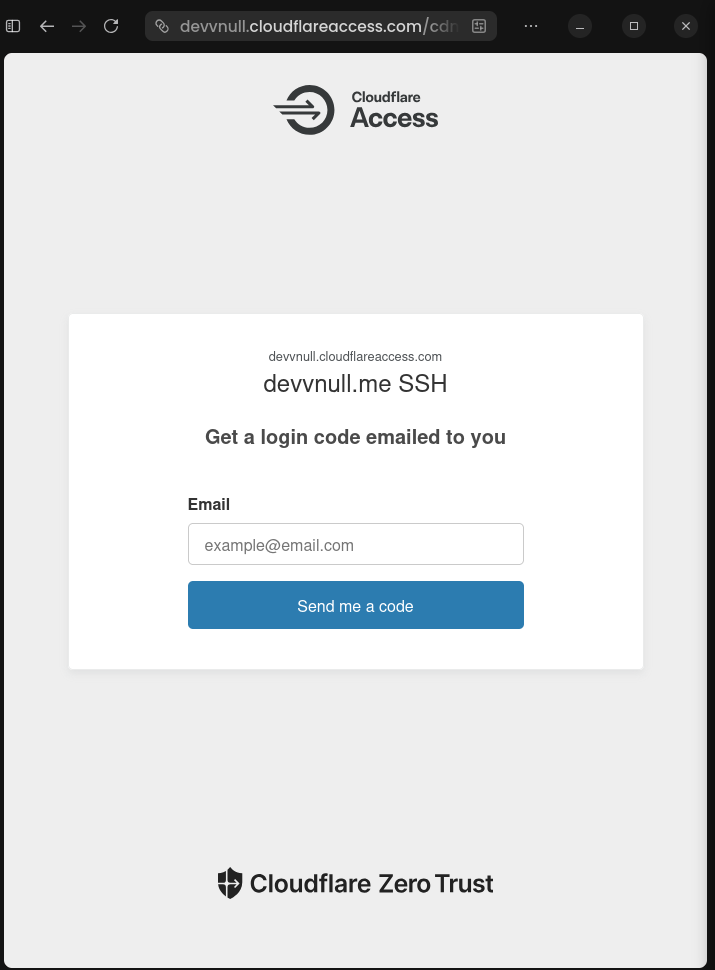 Access SSH Service enter email verification
If you are enter the correct email, it will be receive the Cloudflare Access code like this:
 Access SSH Service receive Cloudflare Access code
After that it will show the button Deny and Approve like this:
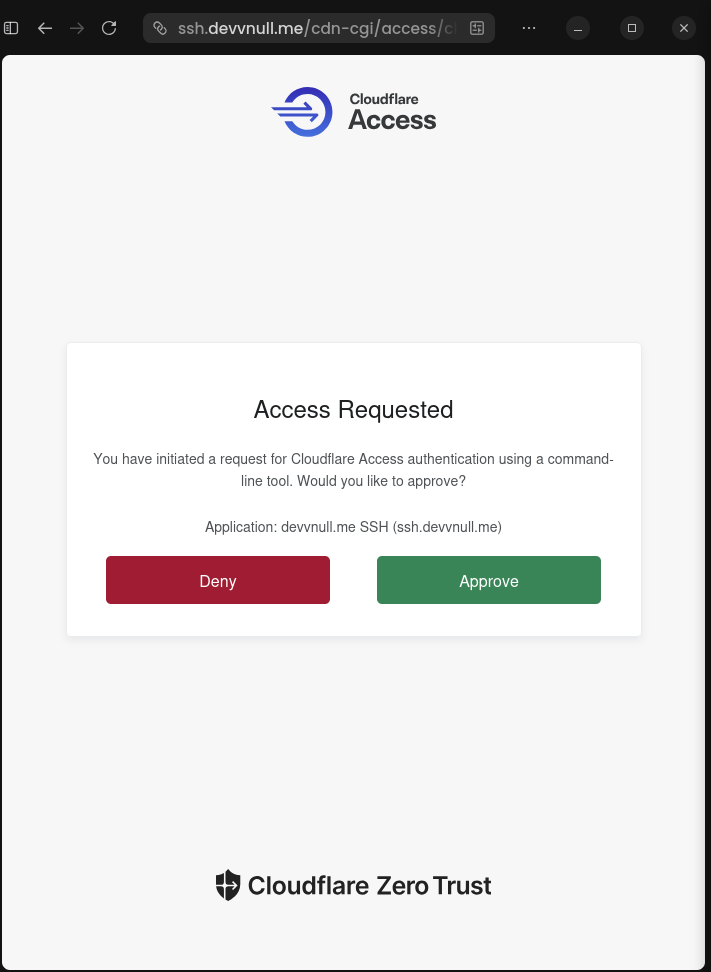 Access SSH Service approve Cloudflare Access code
If you choose Approve, it will show the shell change to like this:
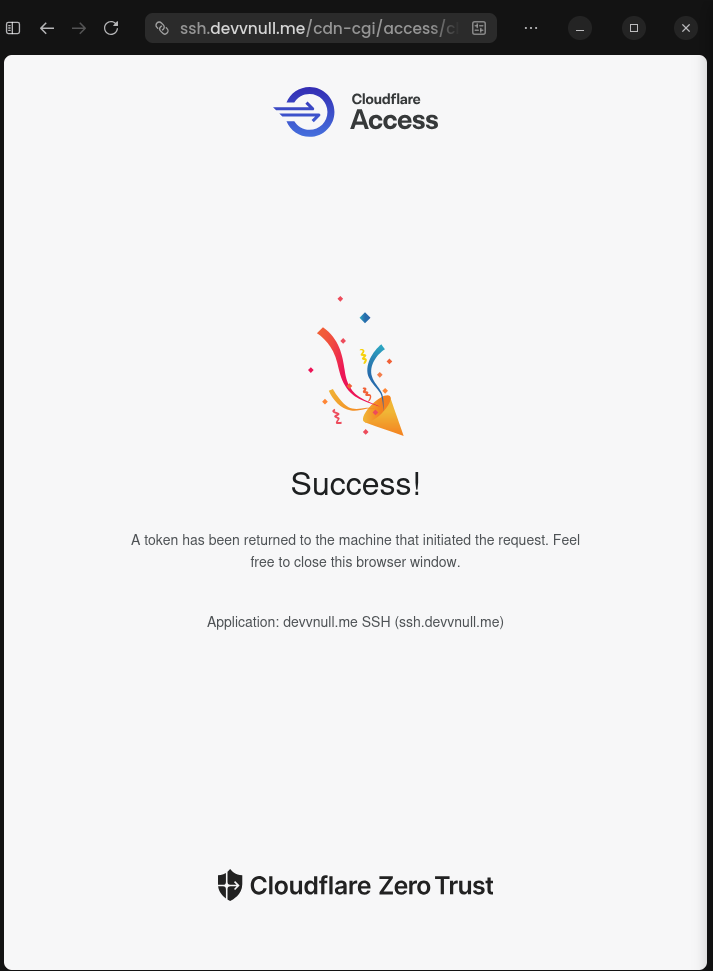 Access SSH Service successful connection
Now go back to the shell, you will see the shell change to like this:
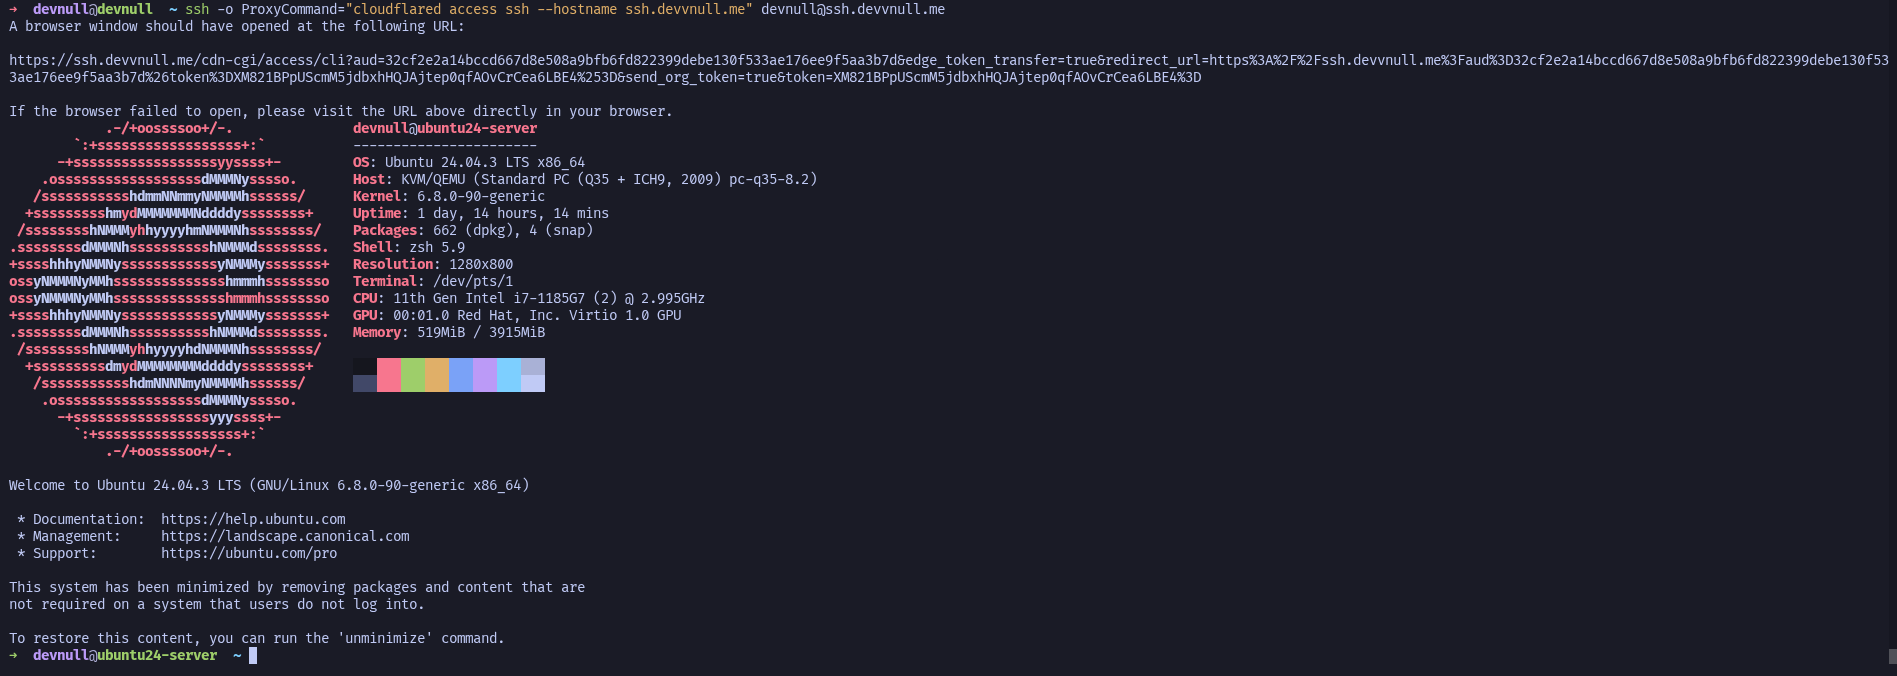 Access SSH Service successful connection 2
#Security Benefits
By using this method, you gain:
- No exposed ports, your server has no public SSH port (no port forwarding required).
- No NAT rules needed, the tunnel creates outbound connections, bypassing router configuration entirely.
- Identity-based access, every connection requires authentication through cloudflare.
- Audit trail, every connection is logged and can be audited.
- Zero trust, no implicit trust based on network location.
- DDoS protection, all traffic goes through Cloudflare's network.
- Easy revocation, disable access instantly by remove the container.
- No firewall holes, your home network stays completely locked down.
#Conclusion
Setting up Cloudflare Tunnel with Docker provides a robust and secure way to access your private infrastructure without exposing any ports to the public internet. By leveraging Cloudflare Zero Trust, you can implement identity-based access control, ensuring that only authorized users can reach your web services and SSH servers.
This setup not only simplifies your network configuration by eliminating the need for complex NAT rules or port forwarding but also significantly enhances your security posture through encrypted tunnels and multi-factor authentication. Whether you are managing a home lab or professional private servers, this approach offers a modern, scalable solution for secure remote access.
The initial setup takes some effort, but the result is a robust, enterprise-grade access solution for your self-hosted infrastructure with all on Cloudflare's free tier.