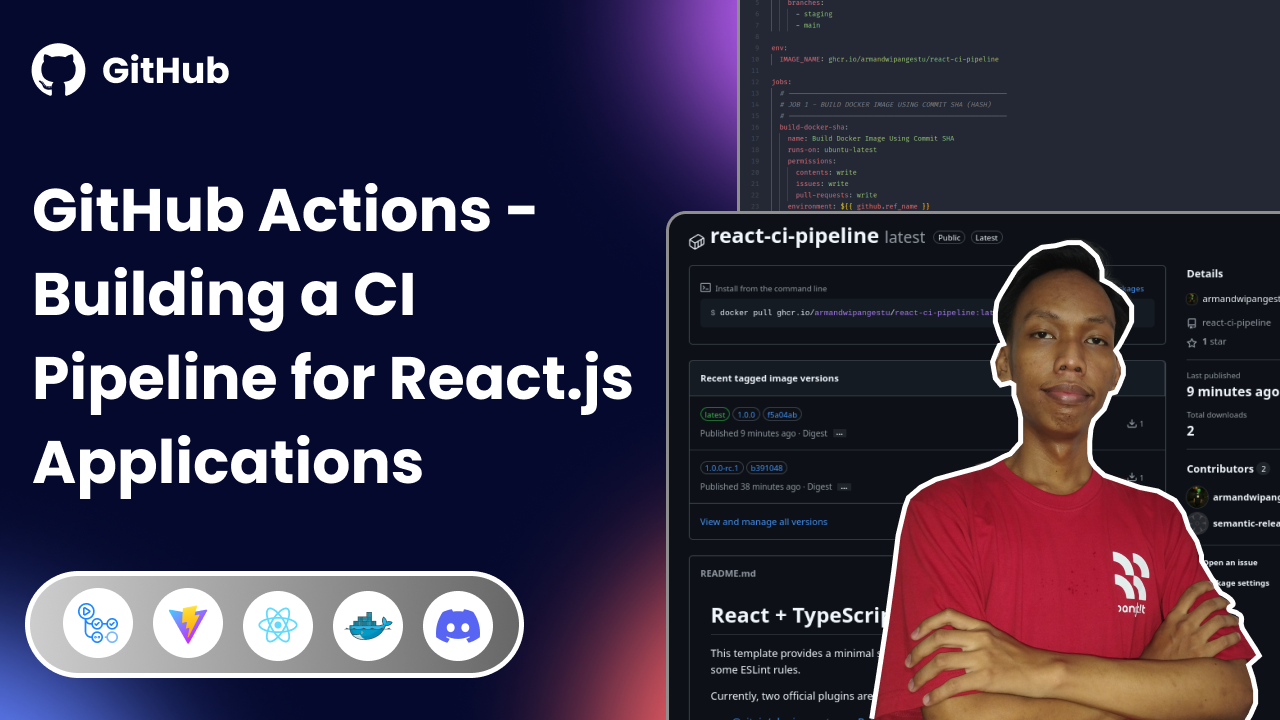
GitHub Actions - Building a CI Pipeline for React.js Applications
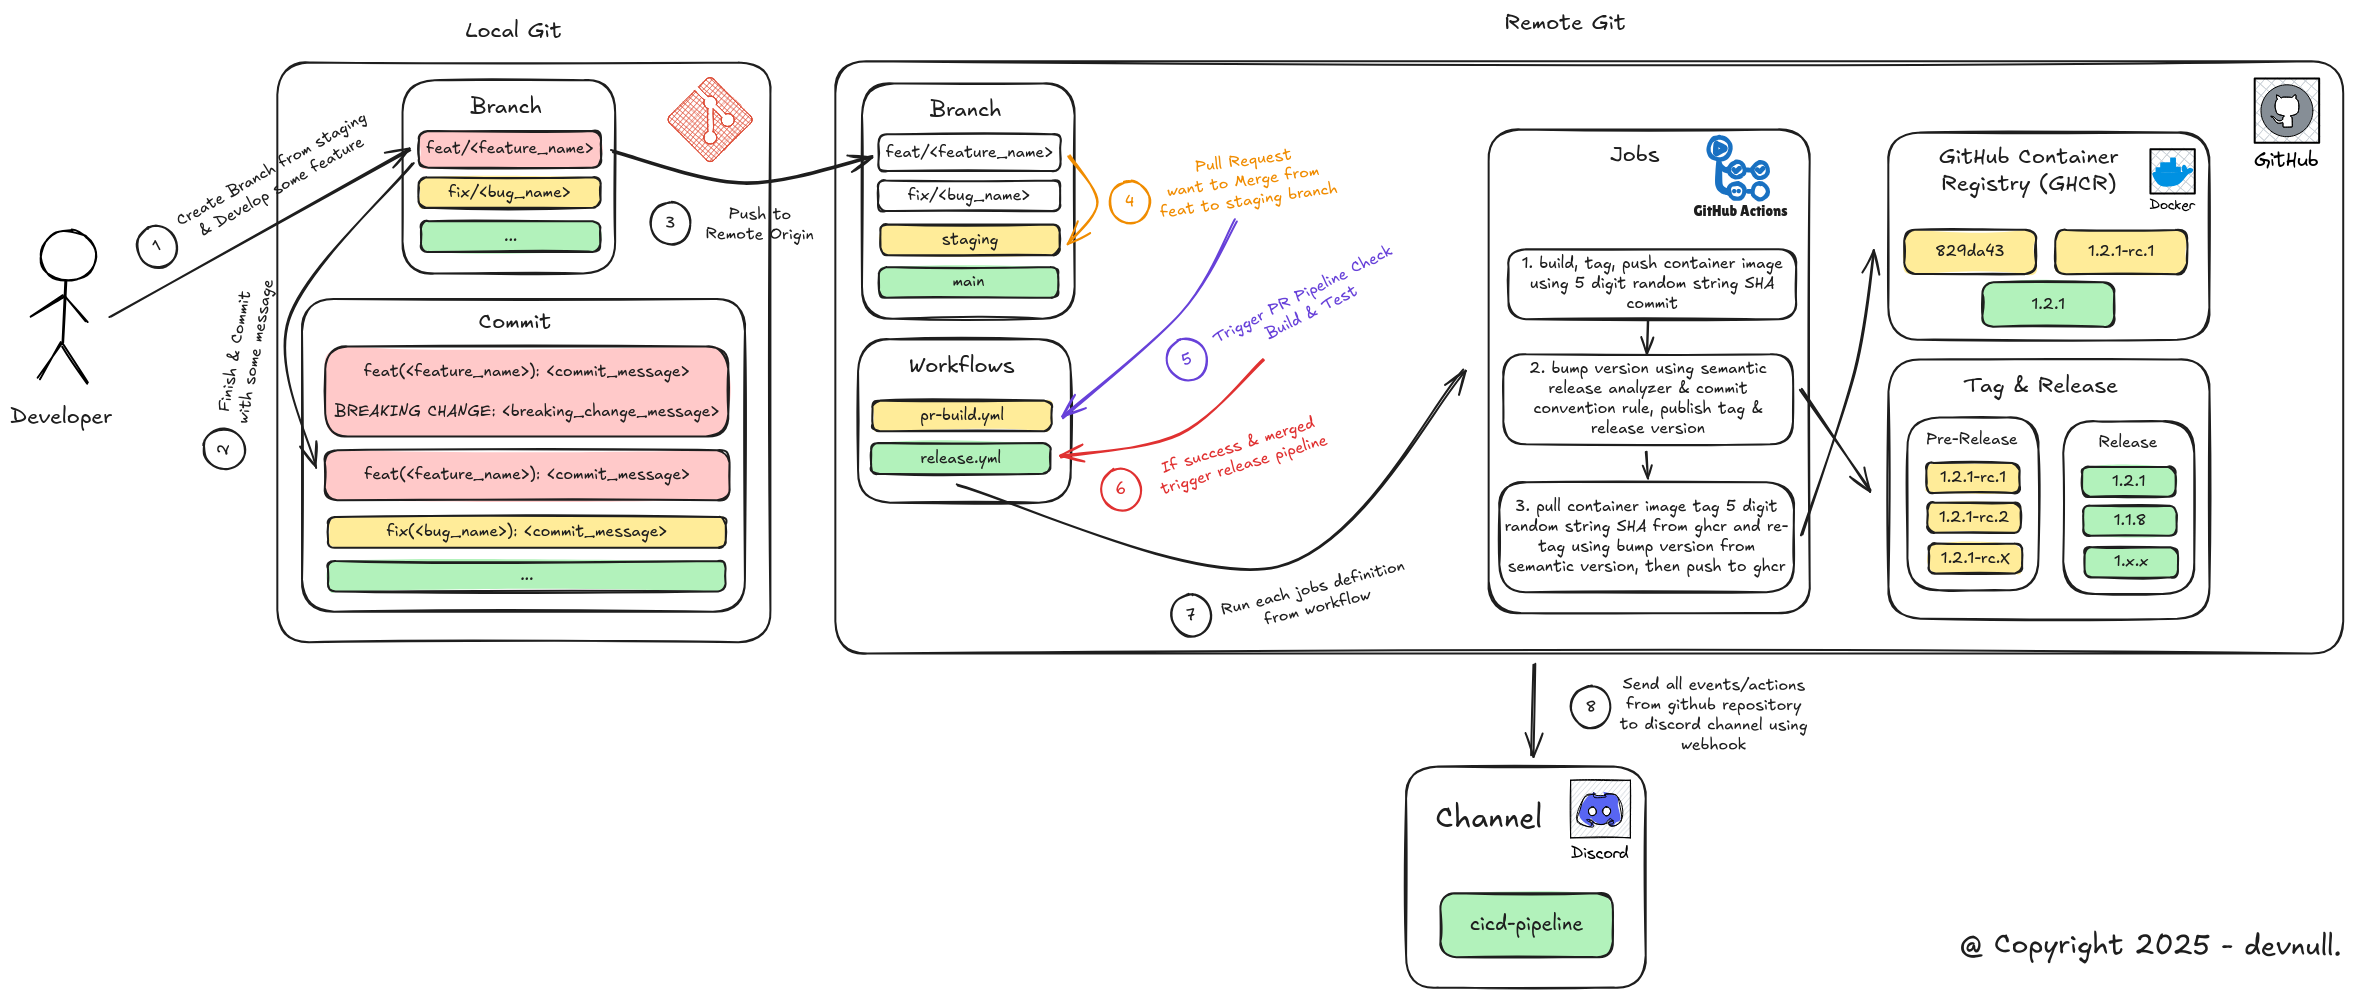
This CI Pipeline will run several workflow jobs such as PR Build Check, Automatic tag & release with semantic versioning, and perform Build and Push Container Image to GitHub Container Registry (GHCR).
In this blog post, we will try to build a CI Pipeline using GitHub Actions for applications created using React.js technology, where the ultimate goal is to run automation starting from:
Build & Test Pull Request Check
Automatic tagging & release using semantic versioning based on conventional commit rules
Build & Push Container Image to GitHub Container Registry (GHCR)
Integrate GitHub Repository with Discord using WebHook
However, before attempting to create one, we will first discuss the definitions of each component that we will build:
CI/CD Pipeline, short for Continuous Integration (CI) and Continuous Delivery/Deployment (CD), is an automation process that streamlines software development from code changes to deployment. This process automates the steps of building, testing, and deployment, allowing developers to release code changes more frequently, reliably, and securely. This pipeline runs automatically every time code is updated in the central repository, and continues through various stages until the code is active in the production environment. The process will stop and notify the team if any stage fails or succeeds.
Note: For reading references related to Semantic Versioning, Conventional Commit, and Git Flow (SDLC), I have posted on LinkedIn and implemented it in GitLab Repository.
Semantic versioning, or SemVer for short, is a software version numbering standard defined at semver.org. Its purpose is to avoid dependency hell and ensure that compatibility between versions can be understood consistently by developers and users alike.
Semantic Versioning is written using this format:
md
MAJOR.MINOR.PATCH
There are three main components in semantic versioning.
Semver Component
MAJOR
This is the first component, where the number increases when there are changes that are not backward compatible, commonly referred to as breaking changes. An example is a version increase from v1.5.7 to v2.0.0.
MINOR
This is the middle component, where the number increases when there are new feature additions that are still backward compatible. An example is a version increase from v1.5.7 to v1.6.0.
PATCH
This is the final component, where the number increases when there are bug fixes or minor changes that are still backward compatible, such as fix, hotfix, and so on. An example is a version increase from v1.5.7 to v1.5.8.
In addition to version numbering standardization, semantic versioning is also closely related to commit standardization. This is because it is based on the commit message that will detect which level should be bumped or upgraded, whether it is MAJOR, MINOR, or PATCH.
Usually, this commit convention refers to development in well-known repositories such as angular, where there are several types of commit message rules, such as:
BREAKING CHANGE
This commit message rule will increase or bump the version to the MAJOR level, where usually the location of this commit message is in the footer or at the bottom of the commit message. An example of a commit message is as follows
Note: The writing format or rules for BREAKING CHANGE are agnostic, so it can be attached to any commit message, as long as it contains the keyword BREAKING CHANGE and is usually located in the commit footer.
# Example of use: 1feat(api-version): change endpoint to api version v2BREAKING CHANGE: THIS FEATURE IS NOT BACKWARD COMPATIBLE
Conventional Commit MAJOR Changes
# Example of use: 2hotfix(api-response): fix wrong response format on user detail endpointBREAKING CHANGE: response structure has been changed, `fullName` field is removedand replaced with `firstName` and `lastName`. This change breaks existing clients.
feat()
This commit message rule will bump the version to the MINOR level, which usually has the prefix feat(). An example of a commit message is as follows:
# Example usagefeat(hooks): add map update (mutation) hook
fix() or hotfix()
This commit message rule will increase or bump the version to the PATCH level, which usually has the prefix fix() or hotfix(). An example of a commit message is as follows
# Example of usage: 1fix(login-validation): resolve incorrect email format validation on login form# Example usage: 2hotfix(api-timeout): fix API timeout error on fetch user profile endpoint
Semantic Versioning is often used in conjunction with Git Flow, a branching model in Git that helps maintain software version consistency in accordance with the stages in the software development life cycle (SDLC).
In Git Flow, there are several commonly used branch names that usually reflect the development environment, including the following:
dev or development
Used by developers or QA before the User Acceptance Testing (UAT) stage. At this stage, the release version is generally labeled beta, for example v1.5.7-beta.N (where N is the number of iterations of merge requests from features or bug fixes that are merged into this branch).
staging
Used when features or bug fixes that have passed the development stage are considered stable and ready to undergo User Acceptance Testing (UAT). At this stage, the release version is usually labeled rc or short for Release Candidate, for example v1.5.7-rc.N (where N is the number of merge request iterations from the dev or development branch that are merged into this branch).
main
Used when a feature or bug fix has passed the UAT stage, its stability is guaranteed, and it will be released to production or used by users. At this stage, the release version does not have any additional labels to indicate that it is a stable version, for example, v1.5.7.
GitHub Container Registry, or GHCR for short, is a storage place for container images. If you are familiar with Docker and often use images from Docker Hub, it is essentially the same thing, except that we store them in the GitHub package repository. This means that container images will have names in the following format
Environments in GitHub Repository are names that represent deployments. Environments are usually used to separate values for secrets and variables that are used.
For example, if a deployment has two environments, such as staging and main (production). Both deployments will certainly use the same secret and variable key names, but what distinguishes them are the values of those secrets and variables.
The following is an example of secrets and variables between staging and main:
Secrets in the GitHub repository are key value variables used to store sensitive data, such as information about tokens, database credentials, service accounts, jwt secrets, iam, and so on. These secrets will be censored if their values appear in the log when the CI/CD pipeline in GitHub Actions is running. For example, there are secrets with keys and values like this
Unlike secrets, variables are key value variables used to store non-sensitive data information, such as information about an application's base url, the application's deployment environment mode, and so on. The values of these variables will not be censored if they appear in the log when the CI/CD pipeline on GitHub Actions is running. An example of the use of key-value variables is as follows
bash
NEXT_PUBLIC_APP_NAME=My Super AppNEXT_PUBLIC_APP_ENV=productionNEXT_PUBLIC_API_VERSION=v1NEXT_PUBLIC_ANALYTICS_ENABLED=false
Note: These variables are commonly used to store variables that are Client Side or Build time in nature.
We can see the values of these variables again once they have been successfully created.
After understanding the explanations of each term in the introduction above, we can now try to build the CI Pipeline. For the first step, we can prepare the following requirements:
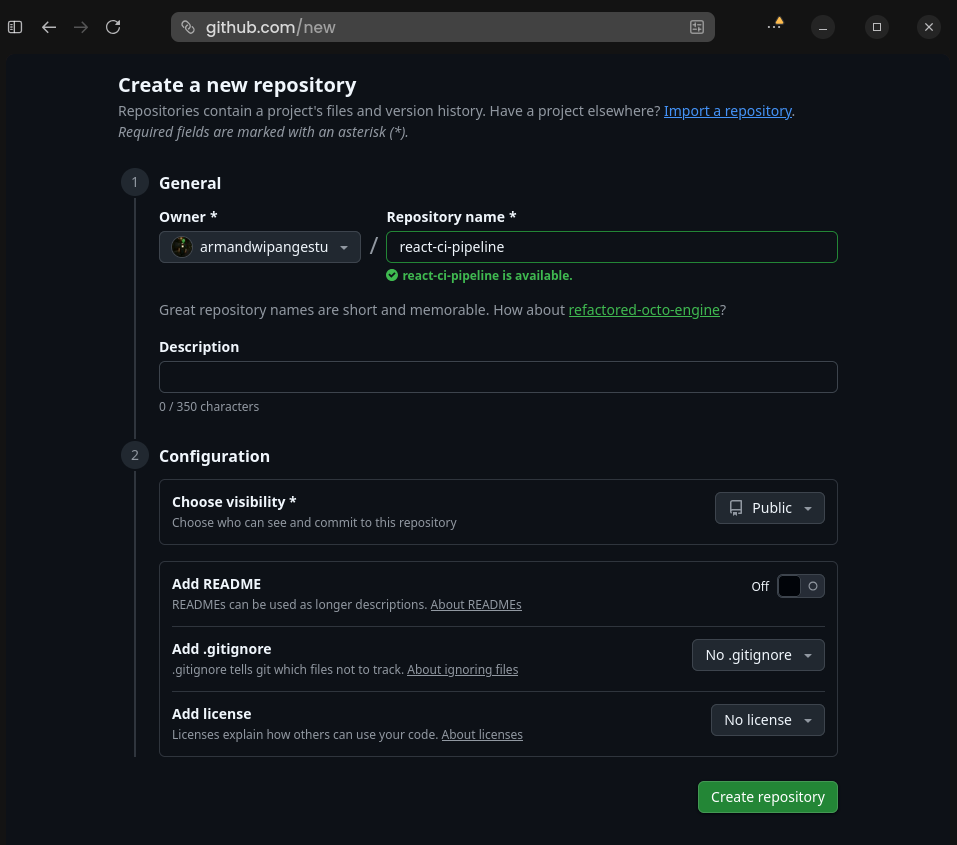
The first step is to create a GitHub repository. To do this, go to GitHub > click the + icon > and select New repository. Then, enter the repository name react-ci-pipeline and leave everything else as default (no README default, .gitignore, license, etc.).
Note: For a faster alternative, you can use gh (GitHub CLI) by running the following command:
Next, install the dependency package and try running the application using the following command
bash
cd react-ci-pipelinenpm installnpm run dev
NPM Install
After the application has been successfully run, we can try accessing it in a web browser with the URL http://localhost:5173, and the following display will appear
After the React Vite Typescript project has been successfully run, the next step is to push it to the GitHub Repository that was created earlier. To do this, you can run the following command
Note: If you are using SSH Key authentication, you can change the remote origin name format as follows
Next, we need to create a staging branch, which will be used as the rc or Release Candidate version later on. This branch will also be used as the base code (where every feature, hotfix, etc. will be taken from the staging branch), while the main branch will be used as the stable version. To create it, run the following command
bash
# checkout staging branch based on main branchgit checkout -b staging# push to remote origingit push -u origin staging
The next step is to generate a Personal Access Token, or PAT for short. This token will be used for authentication to the GitHub Container Registry in the CI Pipeline process. To generate it, go to the Settings menu > Developer Settings > Personal access tokens > Tokens (classic) > Generate new token > Generate new token (classic)
GitHub Developer Settings
Generate PATE
Then fill in the following configuration
Note: Adjust the Note and Expiration as desired
GitHub PAT Configuration
Note: GITHUB_ACTIONSExpiration: No expirationScopes: [repo, write:packages, delete:packages]
GitHub New PAT
After that, click the Generate token button and save the token carefully because we will use it when adding secrets, as the value cannot be viewed again.
If the Generate Personal Access Token process is successful, the next step is to create an environment and secret for the repository. To do this, go to the previously created react-ci-pipeline repository > Settings > Environments > New environment
GitHub Create Env
Next, create two environments named staging and main, so that the result will be as follows
Note: The names of the environments staging and main represent the names of the branches used. You are free to use any name, but to make it easier to understand deployments based on names, we can just use the names of the branches used.
Next, we can add two secrets, namely GH_USERNAME and GH_TOKEN. We will use these two secrets for authentication to ghcr when the CI pipeline is running.
To add them, you can click on the environment name, for example, main first. After that, click the Add environment secret button.
GitHub Add Env Secret
Next, add the following two secrets
Note: Replace the value of GH_USERNAME with the GitHub account username you are using and GH_TOKEN with the Personal Access Token generated earlier.
After successfully creating the environments and secrets, the next step is to set up the Discord server, channel, and GitHub repository integration using webhooks.
And click the Copy button Webhook URL. Next, go to the react-ci-pipeline repository > Settings > Webhooks > Add webhook
GitHub Add Webhook
Then fill in the following configuration.
Note: Match the Payload URL to the Webhook URL you previously copied and add /github at the end of the URL.
Repository Webhook Configuration
Payload URL: <your_discord_webhook_url>/githubContent type: application/jsonSecret: emptySSL verification: Enable SSL verificationWhich events would you like to trigger this webhook?: Send me everything.Active: true
After all the preparations above have been successfully completed, it's time to implement the CI Pipeline for the React.js Vite TypeScript application that we previously pushed to the GitHub Repository.
Next, we need to create a configuration related to semantic versioning. This configuration will include the branch name used, release name suffix, tag format, commit convention (commit rules), changelog, and so on.
To do this, create a new file named .releaserc.yml in the root folder of the project, then enter the following configuration.
Note: Replace <your_username> with the username of the GitHub account you are using.
.releaserc.yml
branches: - name: main - name: staging prerelease: rctagFormat: v${version}plugins: - - "@semantic-release/commit-analyzer" - preset: conventionalcommits releaseRules: # MAJOR changes - breaking: true release: major # MINOR changes - type: feat release: minor # PATCH changes - type: fix release: patch - type: hotfix release: patch - type: perf release: patch - type: refactor release: patch # NO release - type: docs release: false - type: style release: false - type: test release: false - type: ci release: false parserOpts: noteKeywords: - BREAKING CHANGE - "@semantic-release/release-notes-generator" - - "@semantic-release/changelog" - changelogFile: CHANGELOG.md - - "@semantic-release/git" - assets: - CHANGELOG.md - package.json message: "chore(release): ${nextRelease.version} [skip ci]\n\n${nextRelease.notes}" - - "@semantic-release/github" - successComment: | 🎉 This PR is included in version **${nextRelease.version}** 🎉 🔗 **View Release:** [${nextRelease.gitTag}](https://github.com/<your_username>/react-ci-pipeline/releases/tag/${nextRelease.gitTag}) 🤖 *"Kill all humans"* - Your [semantic-release](https://github.com/semantic-release/semantic-release) bot 🚀 failComment: | ❌ **Release Failed** Semantic-release failed to create release for this commit. **Error:** ${error.message} Please check the log CI for more information and fix the problem. labels: - released - - "@semantic-release/exec" - successCmd: 'echo "${nextRelease.version}" > version.txt'
Here is an explanation of each of the configurations above.
.releaserc.yml
branches: - name: main - name: staging prerelease: rc
This configuration relates to the branch used. The branch list will trigger the @semantic-release/commit-analyzer plugin. The staging branch will be marked as prerelease, with the rc suffix indicating that the version on that branch is a Release Candidate.
.releaserc.yml
tagFormat: v${version}
This configuration relates to the name formatting for the tag used. For example, the result in the tag will look like this: v1.3.9.
It is a configuration related to writing commit notes to the release note and CHANGELOG.md file, with a custom commit message.
.releaserc.yml
- - "@semantic-release/github"
  - successComment: |
        🎉 This PR is included in version **${nextRelease.version}** 🎉

        🔗 **View Release:** [${nextRelease.gitTag}](https://github.com/<your_username>/react-ci-pipeline/releases/tag/${nextRelease.gitTag})

        🤖 *"Kill all humans"* - Your [semantic-release](https://github.com/semantic-release/semantic-release) bot 🚀
    failComment: |
        ❌ **Release Failed**

        Semantic-release failed to create release for this commit.

        **Error:** ${error.message}

        Please check the log CI for more information and fix the problem.
    labels:
        - released
This is a configuration related to writing comments and labeling when the pipeline is successfully or fails to run. Later, there will be auto comments and labeling in the pull request that we create.
This is the stdout configuration resulting from bumping the semantic version to the version.txt file, which will later be used as an artifact for re-tagging container images.
Once the .releaserc.yml file is complete, the next step is to add the file and commit it.
Next, we'll move on to creating the workflow configuration that will be executed by GitHub Actions. The first workflow we'll create is for Build and Test PR Check, where the jobs within it will be triggered when a Pull Request is submitted to the staging and main branches.
To create this, create a new file named pr-build.yml in the root folder of your project's .github/workflows folder, then enter the following configuration:
The following is an explanation of each of the configurations above.
.github/workflows/pr-build.yml
name: PR Build & Teston: pull_request: branches: - staging - main types: - opened - synchronize - reopened
This is the name of the workflow used and the rule of the pipeline trigger. Where the trigger rule is based on whether there is an open pull request to the staging or main branch.
.github/workflows/pr-build.yml
jobs:
    build-and-test:
        name: Build and Test
        runs-on: ubuntu-latest
        environment: ${{ github.base_ref }}
It is a configuration related to jobs named build-and-test, where the environment uses a name based on the staging or main branch, so that later these jobs can use the secrets and variables values from the environment used.
This configuration involves using NodeJS version 25, installing dependency libraries, performing lint checks using eslint, building the application to ensure there are no errors, and finally, running semantic-release in dry-run or simulation mode.
Note: Optionally, if your application will include unit testing, you can uncomment the steps to run the unit tests. In addition to the steps above, you can add additional steps to suit your workflow pipeline needs.
After successfully creating the Build and Test PR Check workflow configurations, the next step is to create the Release configuration. This Release workflow will trigger if a Pull Request to the staging branch and the main branch is merged/allowed.
To create this, create a new file named release.yml in the .github/workflows folder, then enter the following configuration:
This is the name of the workflow used and the rule of the pipeline trigger. Where the trigger rule is based on if there is an event/hook push to the staging or main branch, then there is an environment variable definition with the key IMAGE_NAME where the value is the ghcr name format that will be used by the image container.
The jobs above are configurations related to jobs named build-docker-sha. The environment is named based on the staging or main branch, allowing these jobs to use secrets and variables from the environment.
The steps are:
Obtain a 5-digit random commit SHA string
Authenticate Docker to ghcr
Build a Docker image with a tag based on the 5-digit unique commit SHA
Push the container image to ghcr, and finally, output the 5-digit random string to the sha.txt file, which is then uploaded as an artifact to be used by the re-tag job.
The jobs above are configurations related to jobs named release-and-tagging-version. The environment is named based on the staging or main branch, so these jobs can use secrets and variables from the environment.
The following steps are:
Set up NodeJS version 25
Install the semantic-release libraries
Run semantic release using the configuration from the .releaserc.yml file. Finally, the results from stdout bump version to the version.txt file are uploaded to the artifact, which will later be used by ret-tag jobs.
The jobs above are configurations related to jobs named retag-and-push. The environment is named based on the staging or main branch, so that these jobs can use secrets and variables from the environment.
The steps are:
Download the artifacts version.txt and sha.txt
Authenticate by logging into ghcr using Docker.
Pull the container image from ghcr based on the 5-digit random string SHA tag from the sha.txt artifact.
Finally, retag the container image with the semantic versioning from the version.txt artifact and push it to ghcr based on the semantic versioning tag.
Note: If the release.yml pipeline above is running on the main branch, there is an additional final step: tagging the latest container image.
When the creation of the pr-build.yml and release.yml workflow files is complete, the next step is to add the files, commit, and push to the remote origin for the feat/ci branch
Note: If the github repository webhook configuration process to discord is correct, then when pushing the feat/ci branch to the remote origin, it should send events/actions to the discord channel like this.
To test whether the CI Pipeline automation is working, we can try opening a pull request from the source branch feat/ci to the destination branch staging. Then, we can open a pull request from the staging branch to the destination branch main.
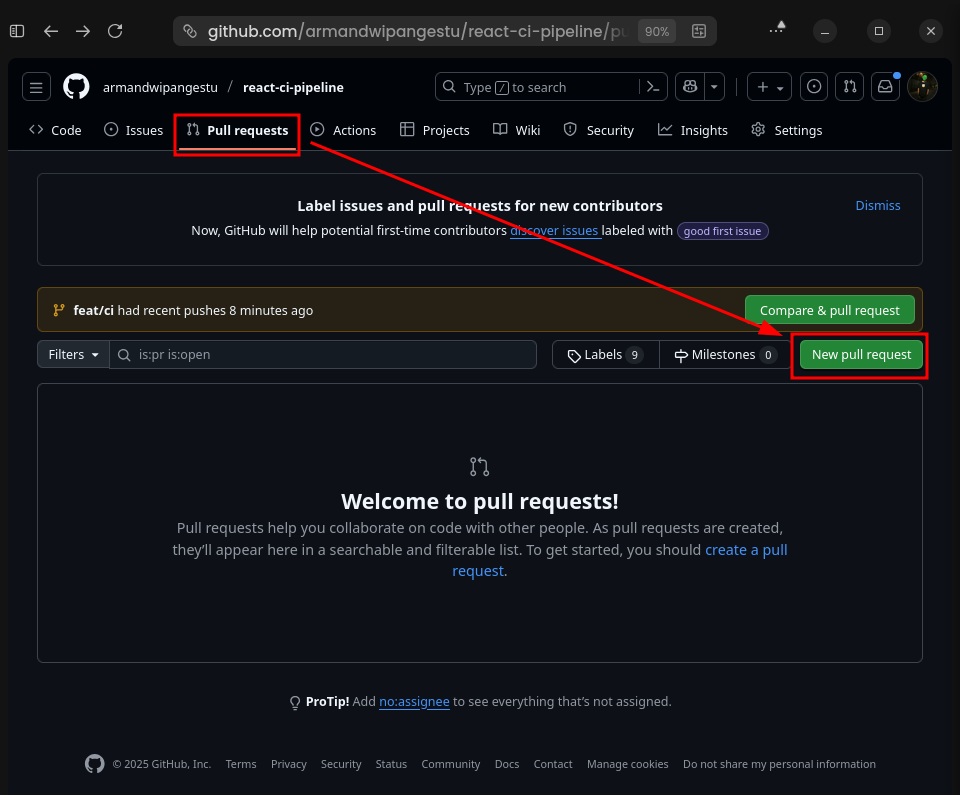
Next, we will try running the CI Pipeline. To test it, we can open a pull request in the GitHub repository by going to the react-ci-pipeline repository > Pull requests > New pull request.
GitHub Open PR
Then select
GitHub Open PR
Source / compare branch: feat/ciDestination / base branch: staging
And click the Create pull request button
GitHub Create PR
For the title, enter feat(ci): add ci pipeline configuration and click the Create pull request button.
GitHub Create PR 2
Because we're making a pull request to the staging branch, and there's a pr-build.yml configuration, there should now be a pipeline check before the merge request can be made. This allows us to ensure the code in the pull request is bug-free and buildable.
GitHub PR Build Check
Wait for the pipeline check to complete. If the status is All checks have passed, we can click the Merge pull request > Confirm merge button.
GitHub All Checks Have Passed
After the merge request is allowed, the release.yml workflow should now be triggered. To see this, you can go to the Actions menu > select the running workflow run.
GitHub All Checks Have Passed
You will see the three jobs defined in the previous release.yml file, as shown below.
GitHub Actions Summary
To check the logs for each job, click on each job, and it will look like this.
GitHub Actions Jobs Logs
Since all pipeline processes have been successfully executed, there should now be several updates like this:
Pull requests auto comment & label
GitHub Auto Comment Label
Tag, Release, and Changelog
GitHub Tag Release
GitHub Changelog
Discord webhook message
Discord New Message
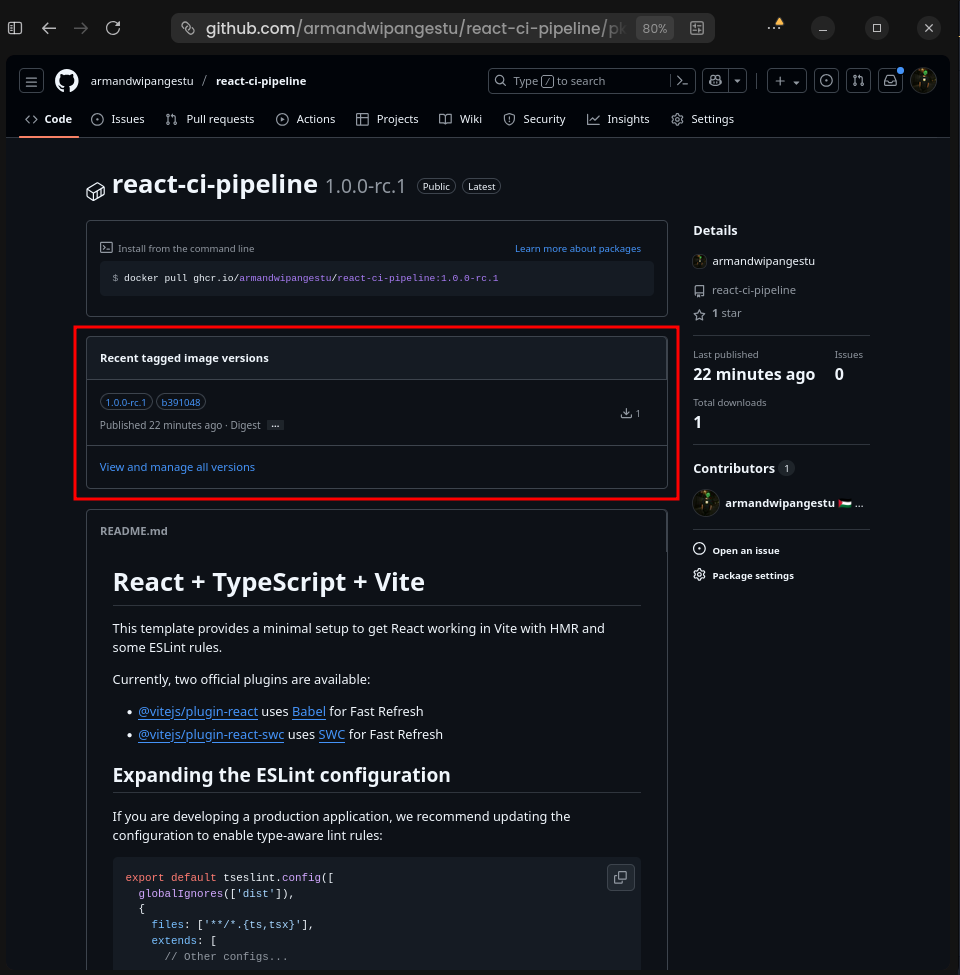
GitHub Container Registry (GHCR)
Note: For GitHub Container Registry (GHCR) we need to connect a package to the react-ci-pipeline repository. To do so go to https://github.com/<username>?tab=packages
GitHub Packages
Click button Connect Repository
GitHub Packages Connect Repository
Select the react-ci-pipeline repository, then change the ghcr visibility setting to public by going to the Package settings menu > Change visibility > Public.
GitHub GHCR Visibility
So now the display in the repository contains a reference to Packages like this
Do the same as the Open Pull Request, but change the source branch to staging and the destination branch to main, with the Open PR title being feat(ci): add ci pipeline configuration.
GitHub Open PR Main
Then the pr-build.yml and release.yml pipeline triggers should be triggered again, but the resulting versioning tag will be without the rc or Release Candidate suffix to indicate a stable version.
After the container has been successfully built and pushed, we can test running the container locally using the following command.
Note: Replace <username> with the GitHub account you are using. If the ghcr used is private, we need to authenticate first using the following command:
bash
docker login ghcr.io -u "<username>"
After that, enter the password using the Personal Access Token (PAT) that was previously generated.
bash
docker run --rm -p 5175:80 ghcr.io/<username>/react-ci-pipeline:1.0.0
If the container is successfully run, you can open the URL http://localhost:5175, and a screen like the following image will appear.
Now that you have successfully implemented the CI Pipeline, the next step is to implement the CD Pipeline for full deployment automation. For example, you can add a special deploy job like this:
release.yml
deploy:
    name: Deploy to Server
    needs: retag-and-push
    runs-on: ubuntu-latest
    permissions:
        actions: read
        contents: read
    environment: ${{ github.ref_name }}
    steps:
        - name: Checkout repository
          uses: actions/checkout@v4

        - name: Download version.txt artifact
          uses: actions/download-artifact@v4
          with:
              name: release-version

        - name: Set VERSION env
          run: echo "VERSION=$(cat version.txt)" >> $GITHUB_ENV

        - name: Setup SSH
          run: |
              mkdir -p ~/.ssh
              echo "${{ secrets.SSH_PRIVATE_KEY }}" > ~/.ssh/id_rsa
              chmod 600 ~/.ssh/id_rsa
              ssh-keyscan -H ${{ secrets.SSH_HOST }} >> ~/.ssh/known_hosts
              chmod 644 ~/.ssh/known_hosts

        - name: Set Docker image name
          id: vars
          run: echo "DOCKER_IMAGE_NAME=${{ env.IMAGE_NAME }}:$VERSION" >> $GITHUB_OUTPUT

        - name: Deploy to Server via SSH
          run: |
              echo "Deploying version $VERSION to ${{ github.ref_name }} environment..."
              ssh -i ~/.ssh/id_rsa -o StrictHostKeyChecking=no ${{ secrets.SSH_USER }}@${{ secrets.SSH_HOST }} << EOF
                set -e
                if [[ "${{ vars.SERVICE_TYPE }}" == "container" ]]; then
                    cd ${{ secrets.APPS_DIR }}

                    cp docker-compose.template.yml docker-compose.yml
                    sed -i "s|__FRONTEND_IMAGE__|${{ steps.vars.outputs.DOCKER_IMAGE_NAME }}|" docker-compose.yml
                    sed -i "s|__FRONTEND_CONTAINER_NAME__|${{ vars.SERVICE_NAME }}|g" docker-compose.yml
                    sed -i "s|__FRONTEND_CONTAINER_NAME__|${{ vars.SERVICE_NAME }}|" docker-compose.yml
                    sed -i "s|__FRONTEND_PORT__|${{ vars.SERVICE_PORT }}:80'|" docker-compose.yml
                    sed -i "s|__FRONTEND_ENVIRONMENT_FILE__|.env.${{ github.ref_name }}|" docker-compose.yml

                    cp .env.${{ github.ref_name }} .env.tmp

                    echo "# App Environment" > .env.${{ github.ref_name }}
                    echo "NODE_ENV=$([[ "${{ github.ref_name }}" == "main" ]] && echo "production" || echo "development")" >> .env.${{ github.ref_name }}
                    echo "BUILD_VERSION=$VERSION" >> .env.${{ github.ref_name }}
                    echo "" >> .env.${{ github.ref_name }}

                    echo "Pulling and deploying new image version: ${{ steps.vars.outputs.DOCKER_IMAGE_NAME }}"
                    docker compose pull
                    docker compose up -d

                    PREVIOUS_VERSION=\$(grep BUILD_VERSION .env.tmp | cut -d '=' -f2)
                    echo "Removing previous image version: ${{ vars.REGISTRY_SERVER }}/${{ vars.REGISTRY_IMAGE_NAME }}:\$PREVIOUS_VERSION"
                    if docker image inspect ${{ vars.REGISTRY_SERVER }}/${{ vars.REGISTRY_IMAGE_NAME }}:\$PREVIOUS_VERSION > /dev/null 2>&1; then
                        docker image rm ${{ vars.REGISTRY_SERVER }}/${{ vars.REGISTRY_IMAGE_NAME }}:\$PREVIOUS_VERSION
                    else
                        echo "Previous image version not found locally. Skipping removal."
                    fi

                    rm .env.tmp
                else
                    echo "Service type unknown"
                    exit 1
                fi
              EOF
If the deployment uses Kubernetes, you can apply modern GitOps such as using ArgoCD or FluxCD, where there will be a special repository that stores Kubernetes manifests and will automatically sync or pull by ArgoCD to the repository if there are changes.
For example, if after the CI pipeline process bump / increase version and push to ghcr, then create additional jobs to change the version of the container image used in the manifest repository which syncs to ArgoCD.
Make sure to use secrets and variables according to your needs, if there is a Server Side (Runtime) environment, you can store them in secrets. However, if there is a Client Side (Build time) environment, then save it in variables.
For Client Side (Build time) environments, make sure to pass arguments in the Dockerfile and option flags in docker build, for example like this
Dockerfile
# Receive VITE_* environment variable when buildARG VITE_BASE_URLENV VITE_BASE_URL=$VITE_BASE_URL
Use a multi-stage build when building container images. The goal is to reduce the size of the container image being built. The Dockerfile above already implements this, so the container image only contains nginx and the static files for the Single Page Application (SPA) from the React Client-Side Rendering (CSR). Therefore, no node_modules are stored, and the size is only 20 MB.
For security, you can implement secret rotation, allowing the secret value to change within a certain timeframe. This is typically done using a specialized tool for centralized secrets, such as HashiCorp's Vault.
By implementing a comprehensive CI Pipeline, as we've discussed, you not only automate the build and deployment process but also create a robust safety net to ensure every code change goes through a rigorous validation process before reaching production. The combination of semantic versioning, conventional commits, and GitHub Actions automation will make your development team more productive and confident in releasing new features. Feel free to adapt this configuration to suit your specific project needs, and continue exploring other possible improvements like the CD Pipeline and modern GitOps to create a truly robust and scalable development workflow.

 Concepts
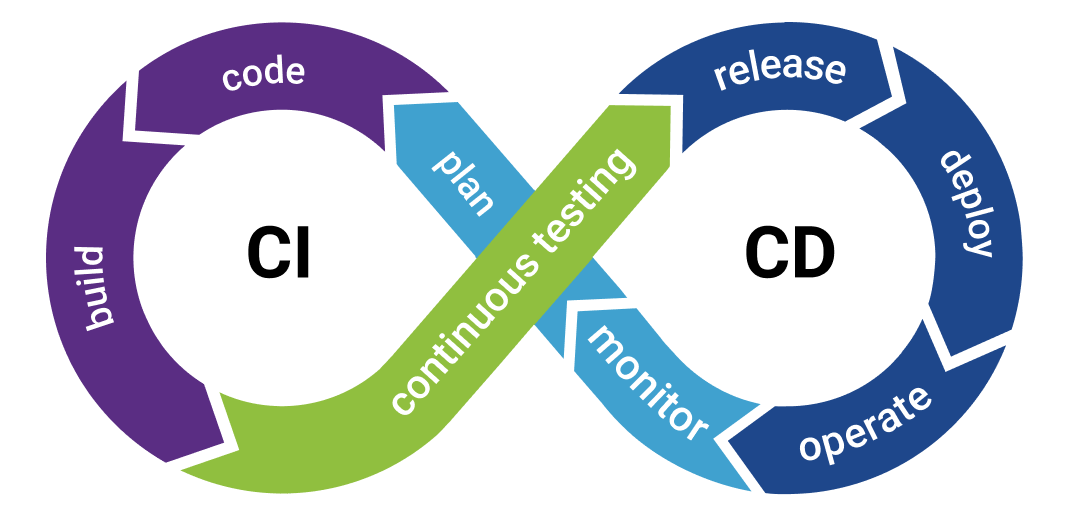 CI/CD
CI/CD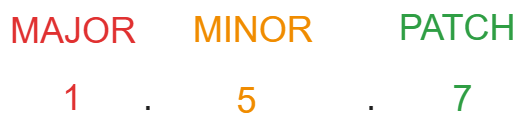 Semver Component
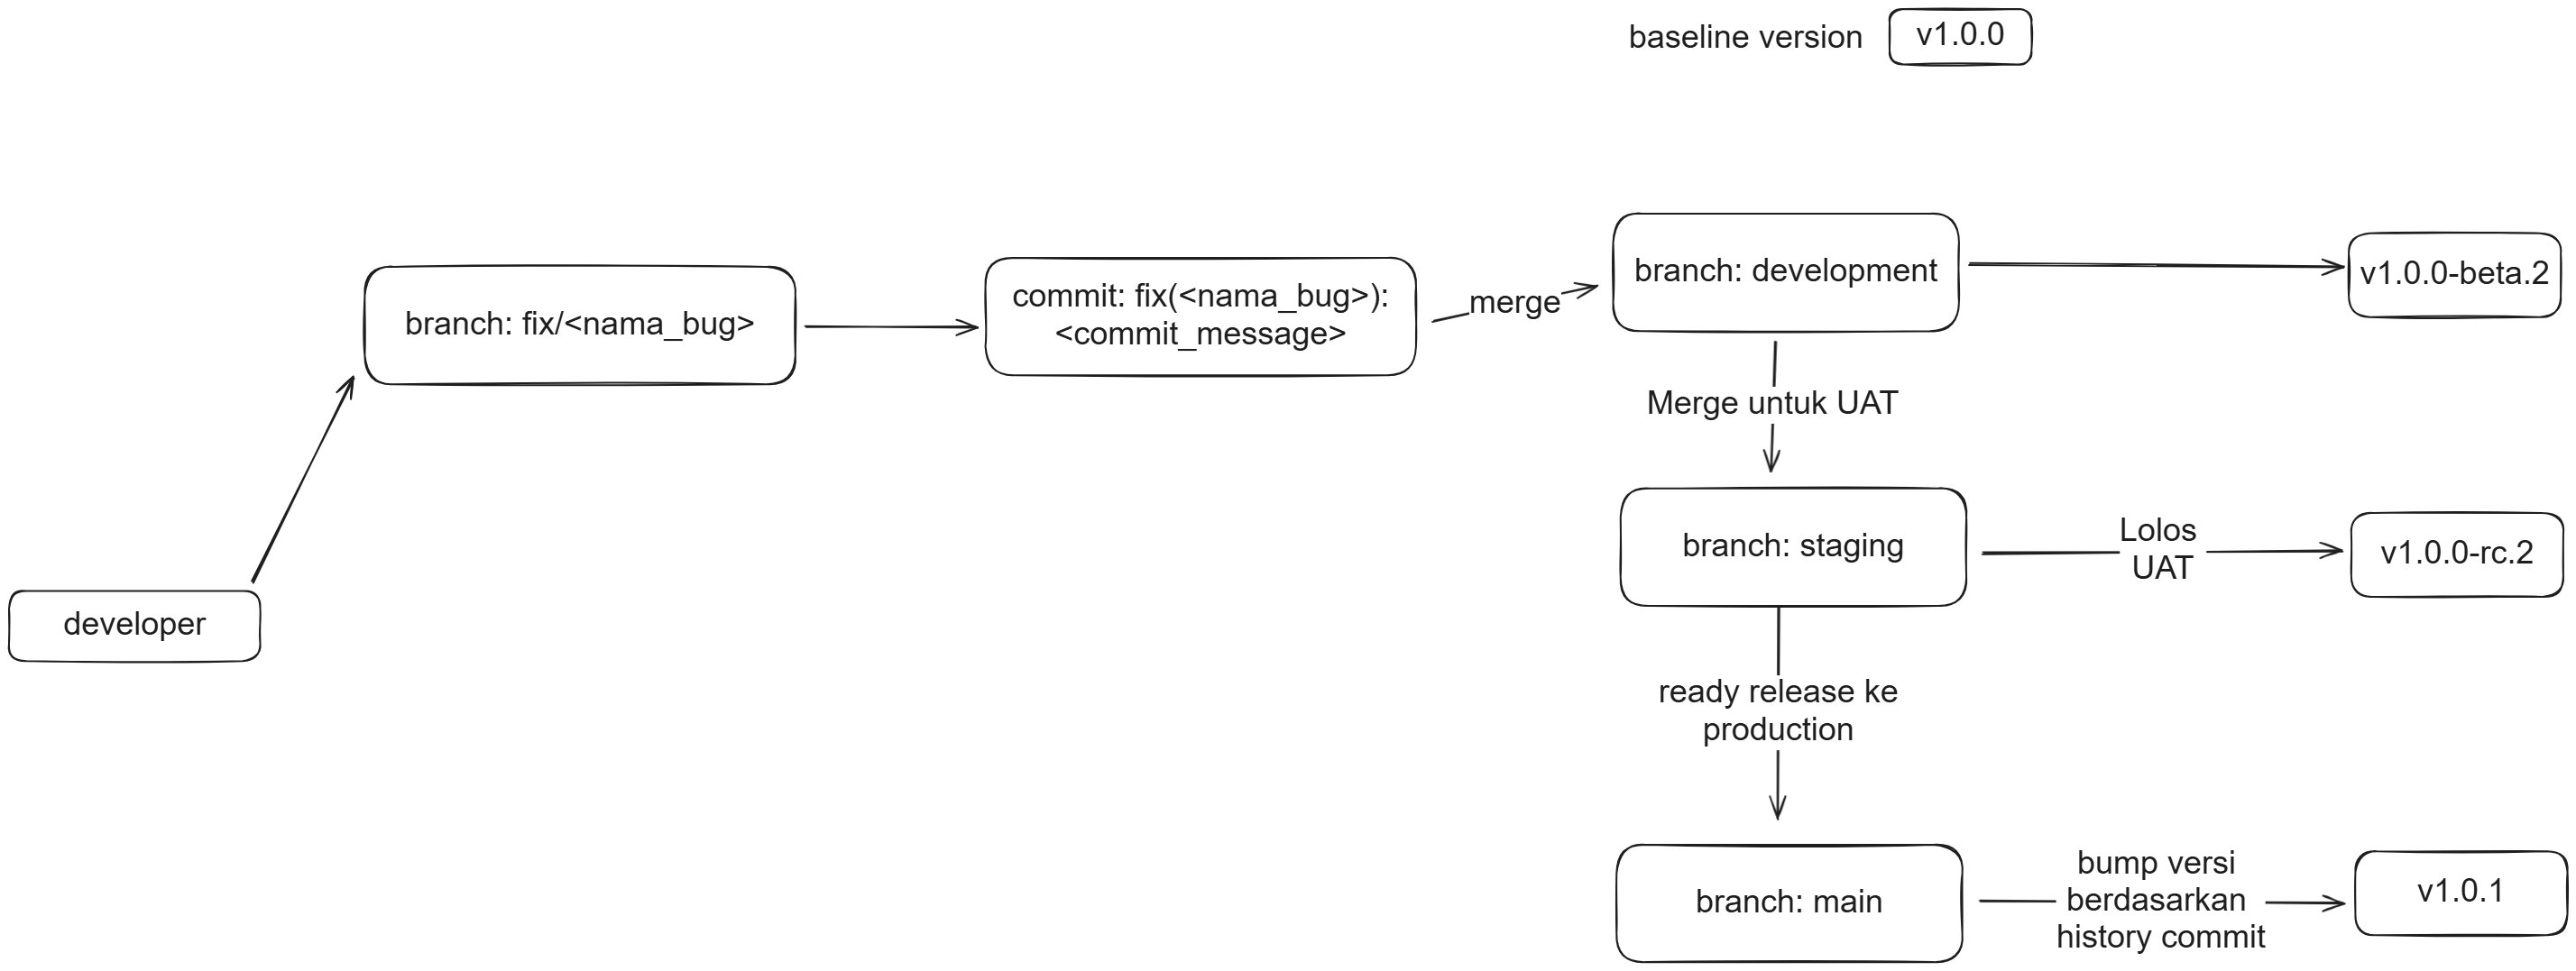 Git Flow Concepts
GH Create Repository
 GitHub Create Repository
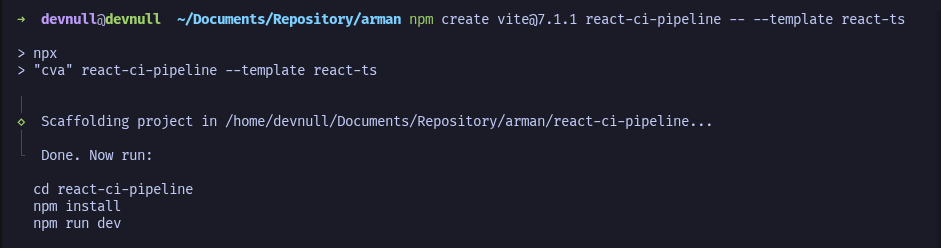 NPM Create Vite React
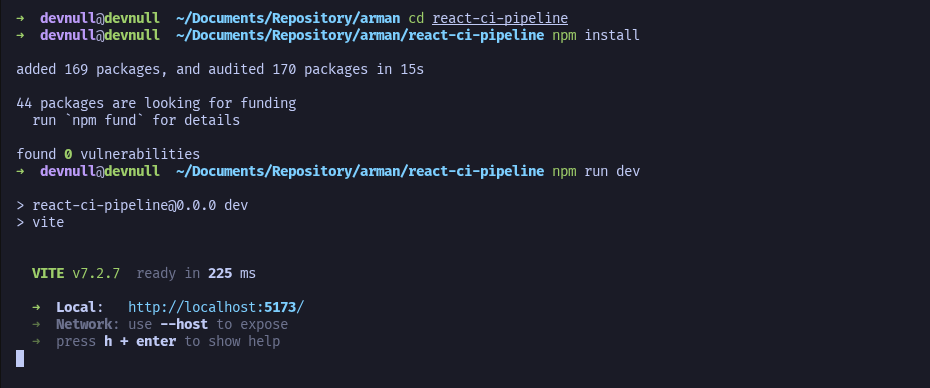 NPM Install
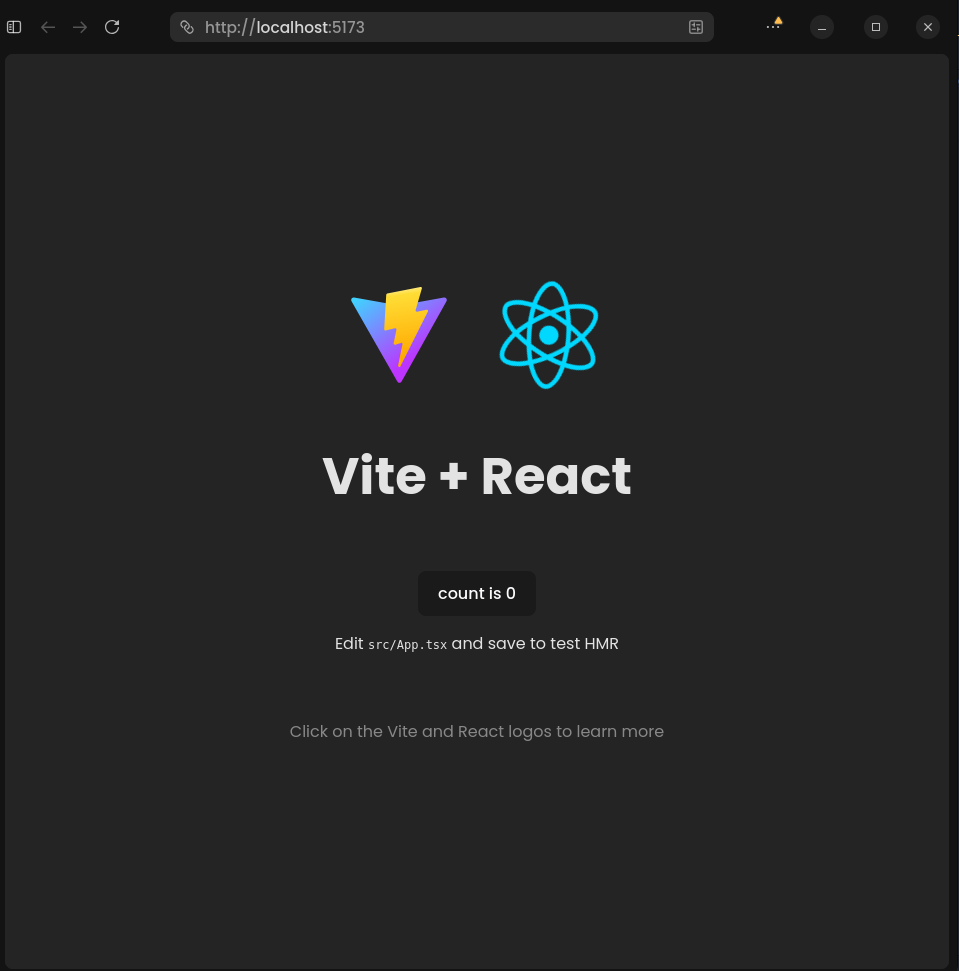 Vite Default Page
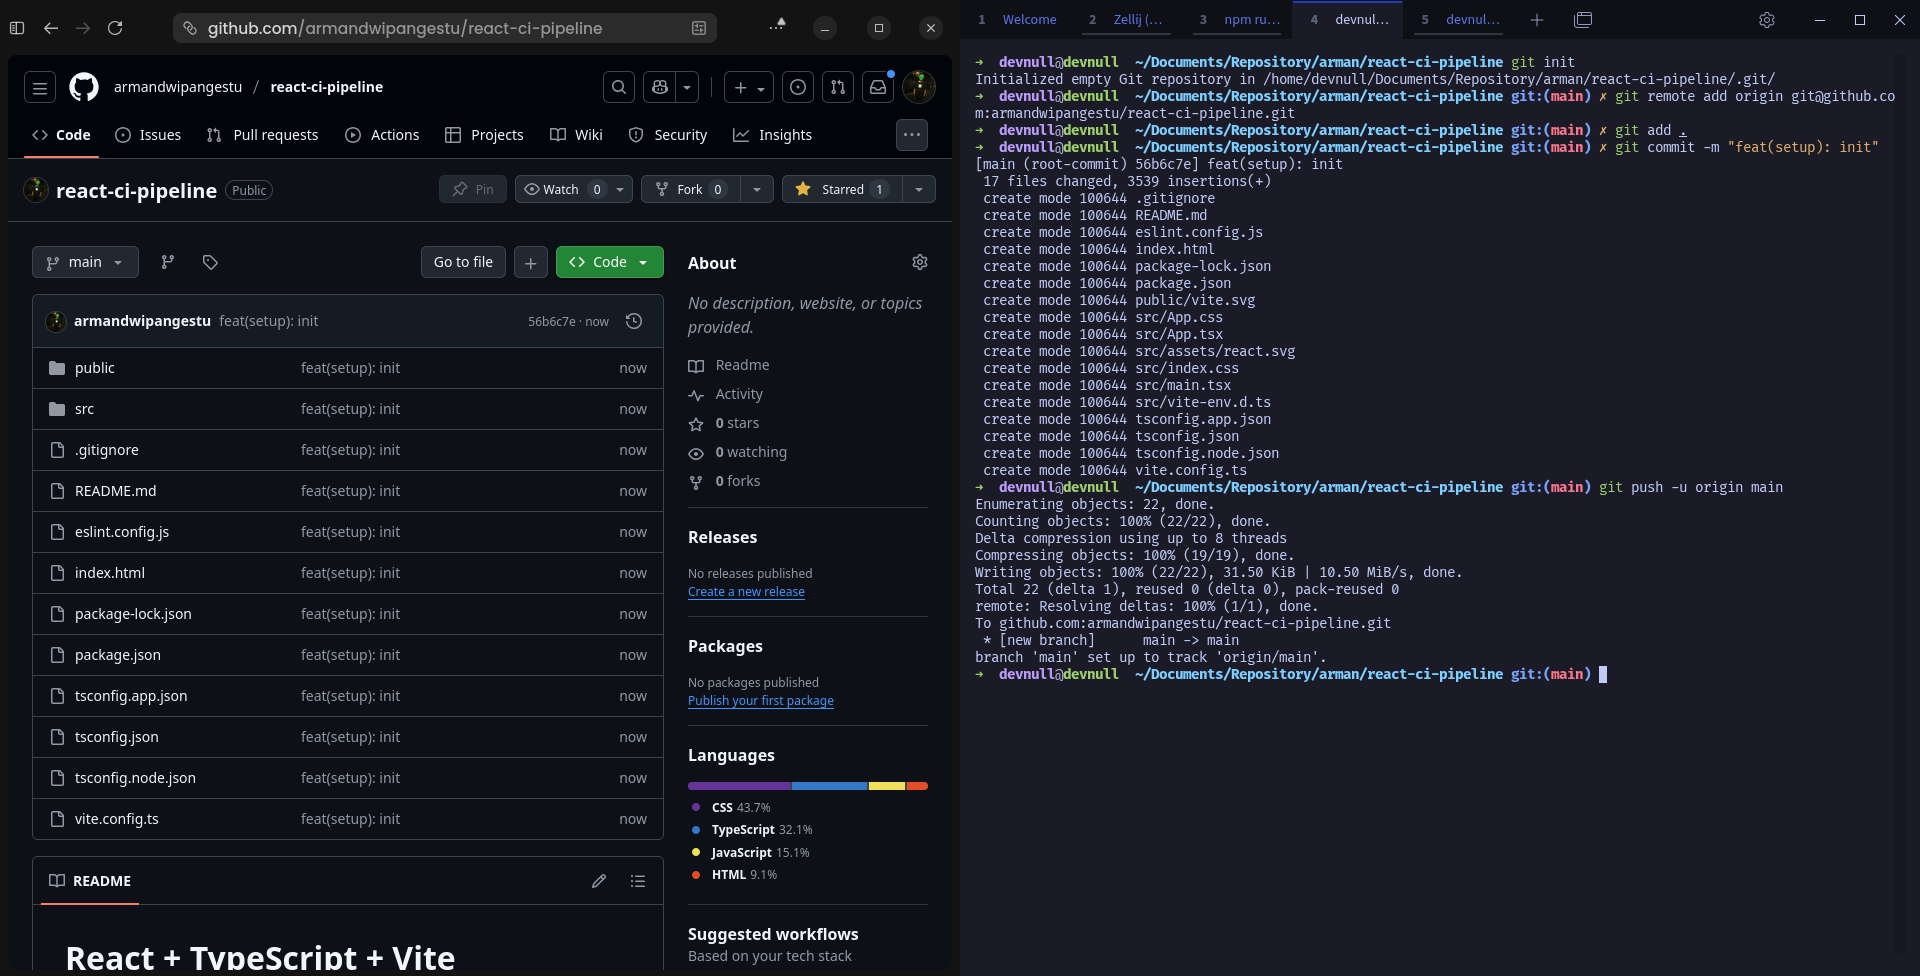 Git Push
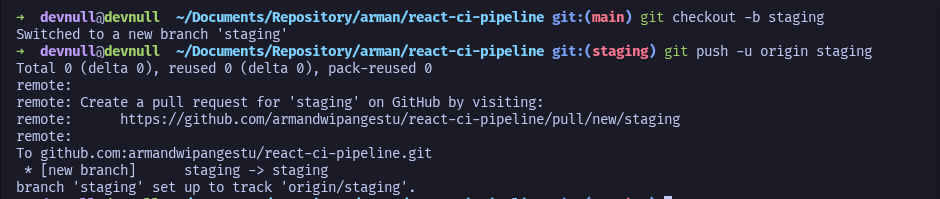 Git Push Staging
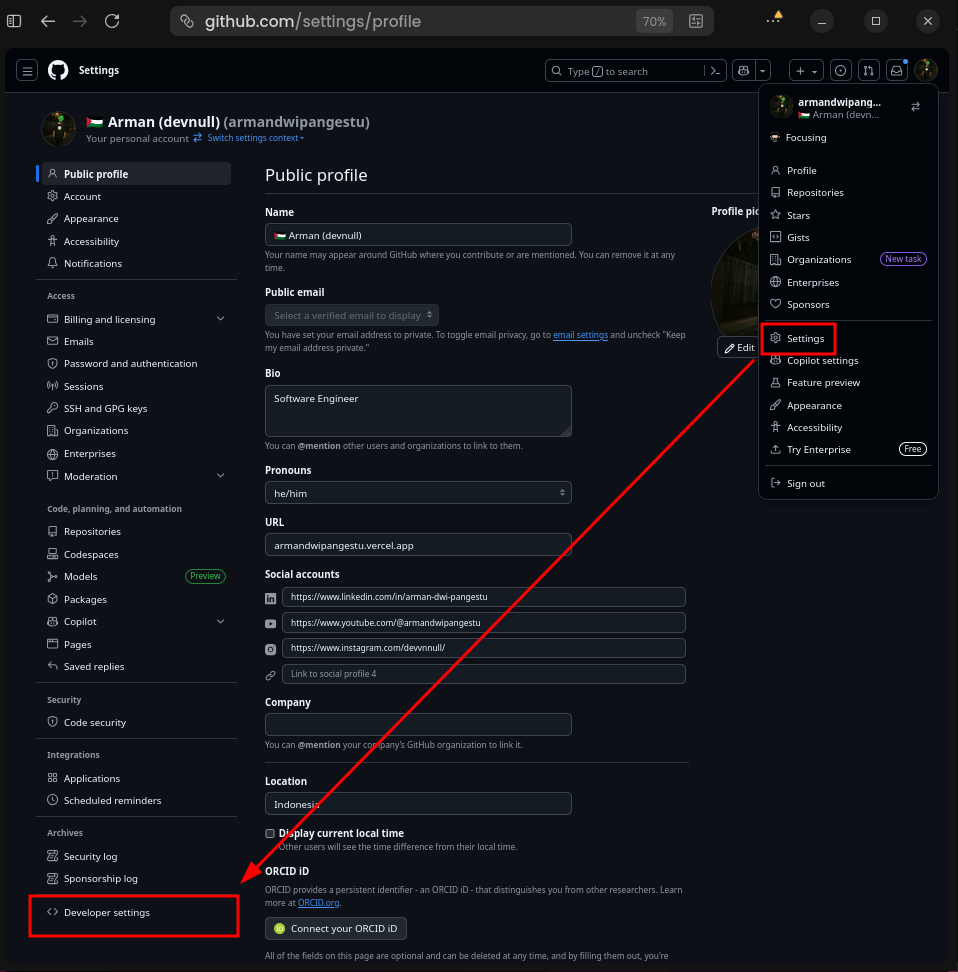 GitHub Developer Settings
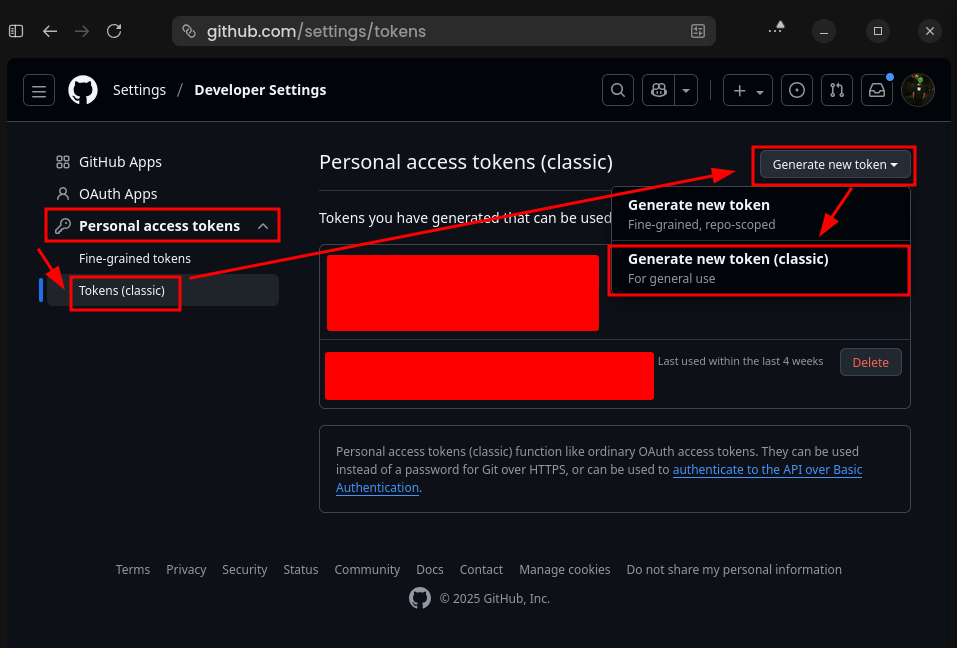 Generate PATE
 GitHub New PAT
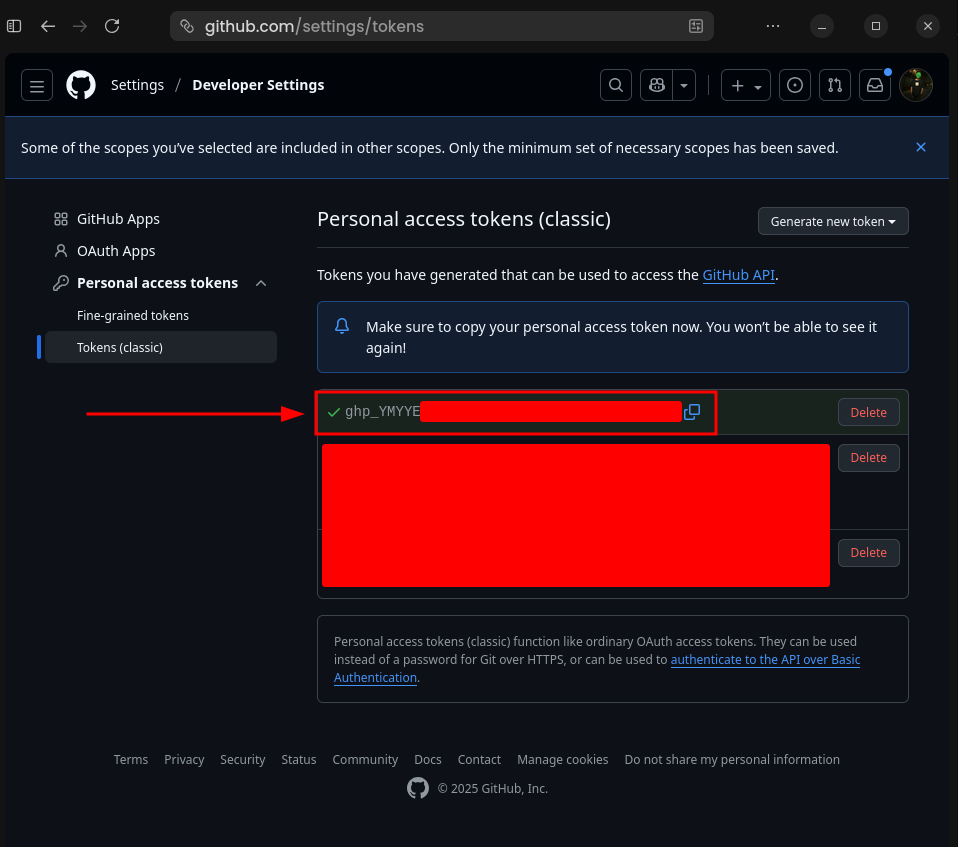 GitHub Token PAT
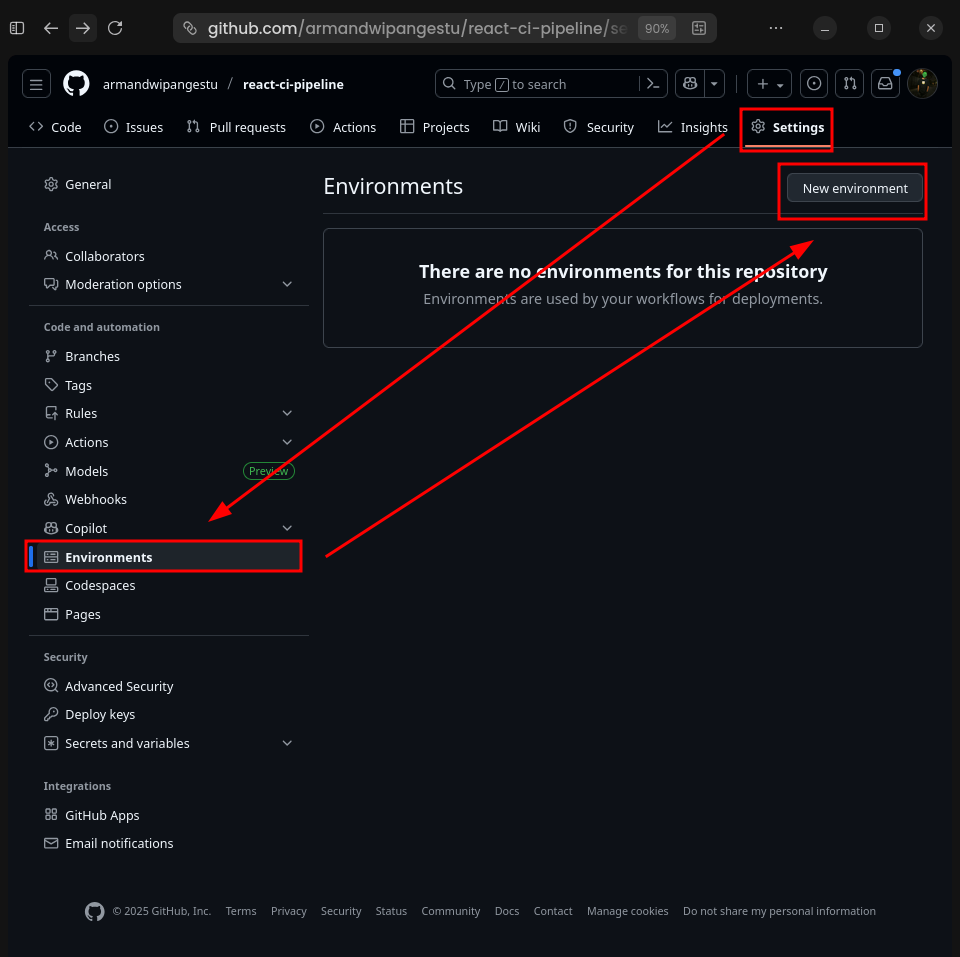 GitHub Create Env
 GitHub Created Env
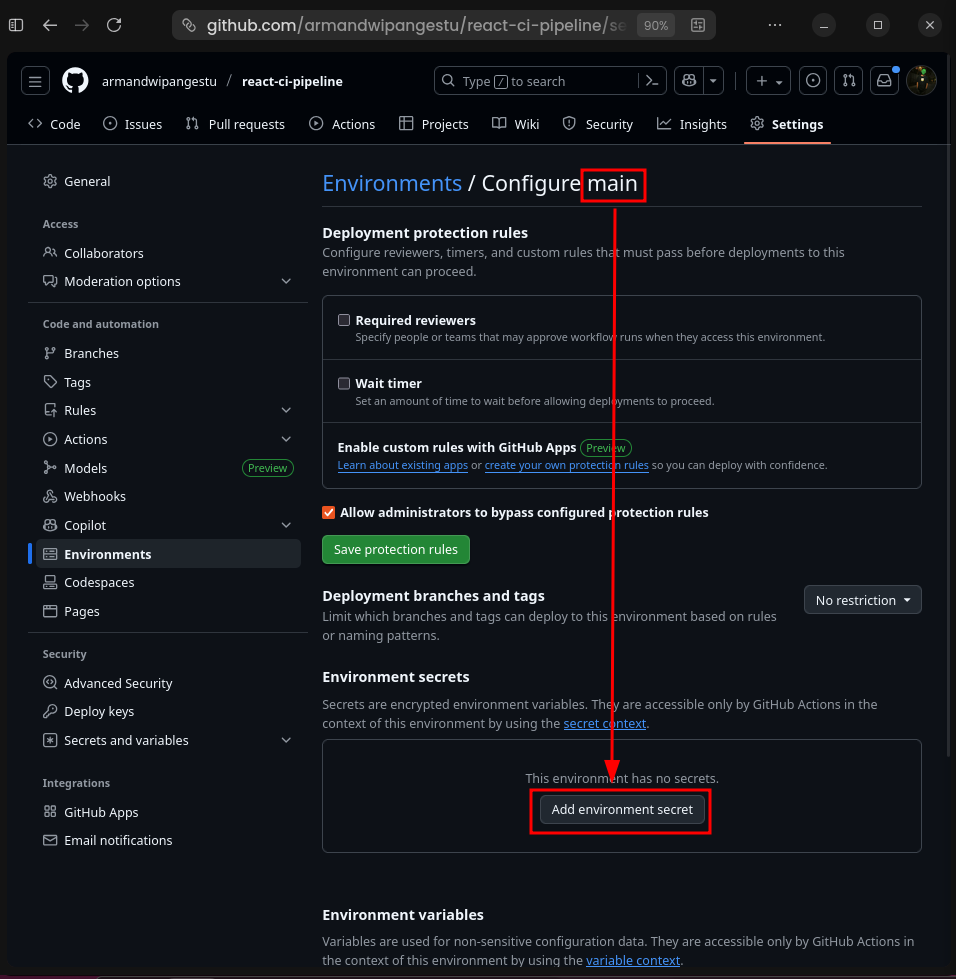 GitHub Add Env Secret
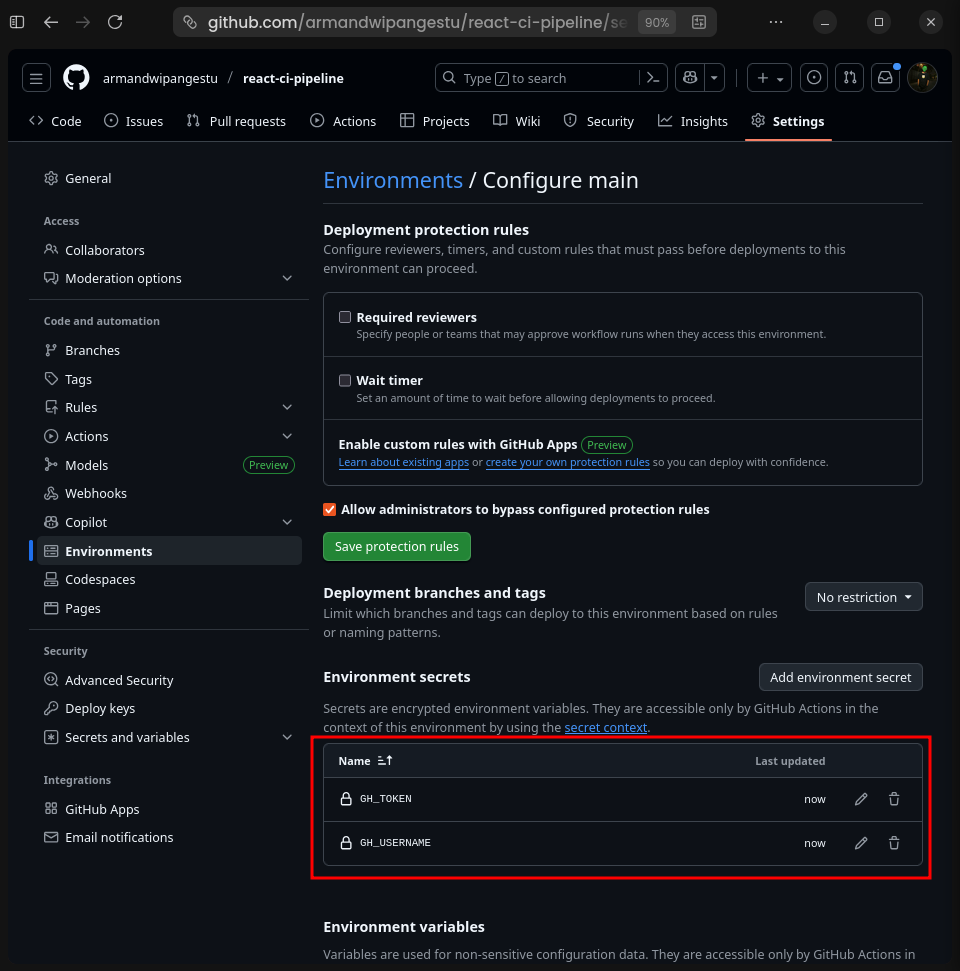 GitHub Added Secrets
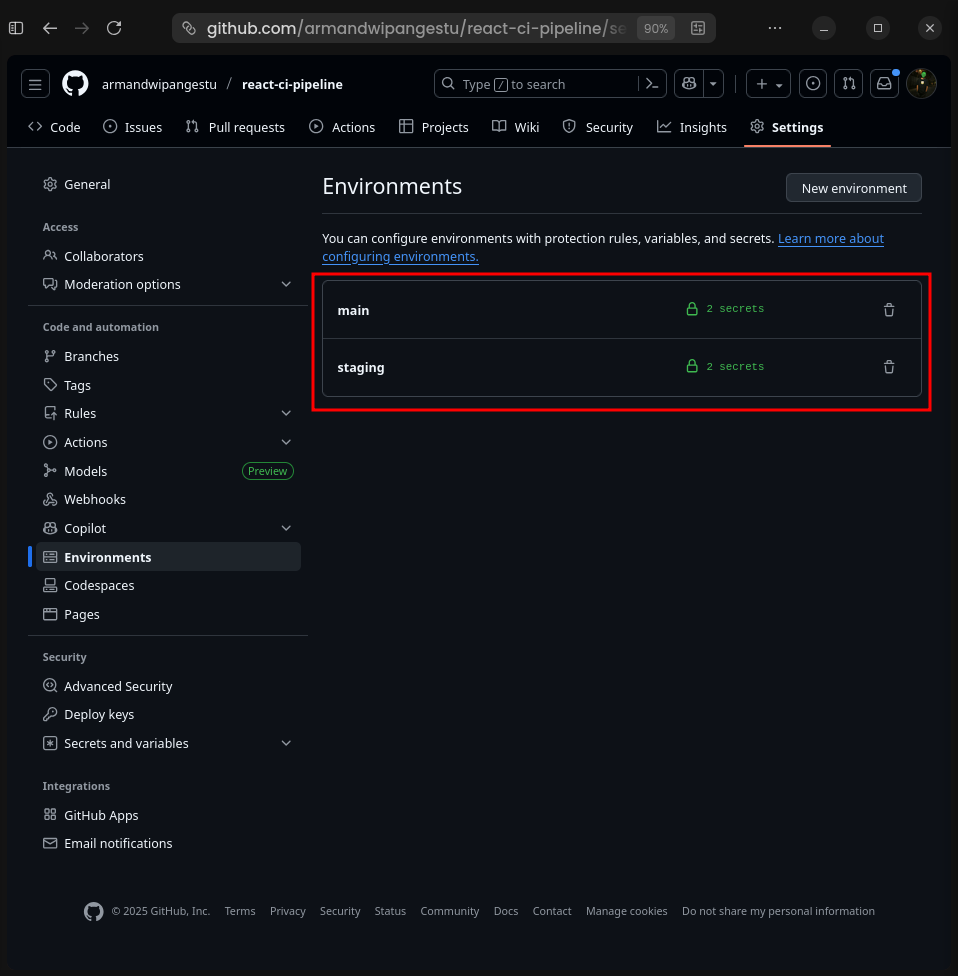 GitHub Env Info
 Discord Create Server
 Discord Create Channel
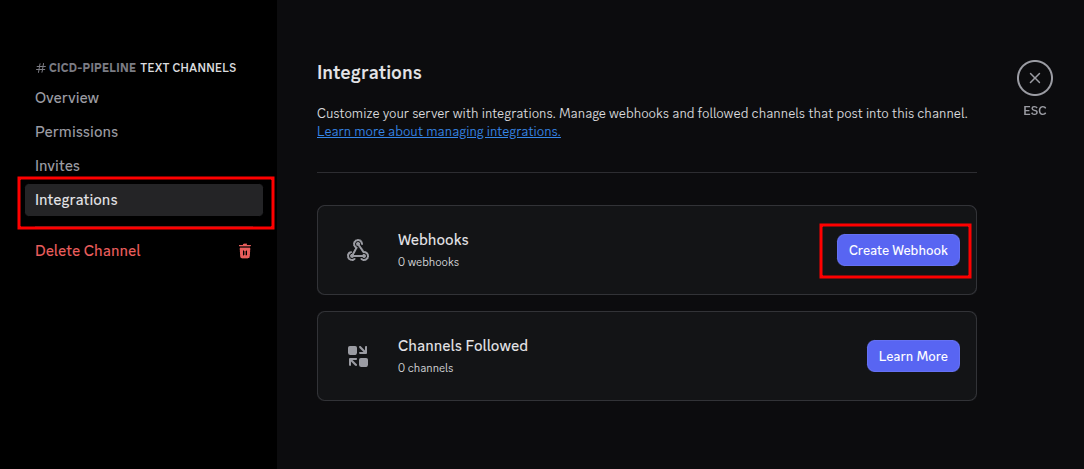 Discord Create Webhook
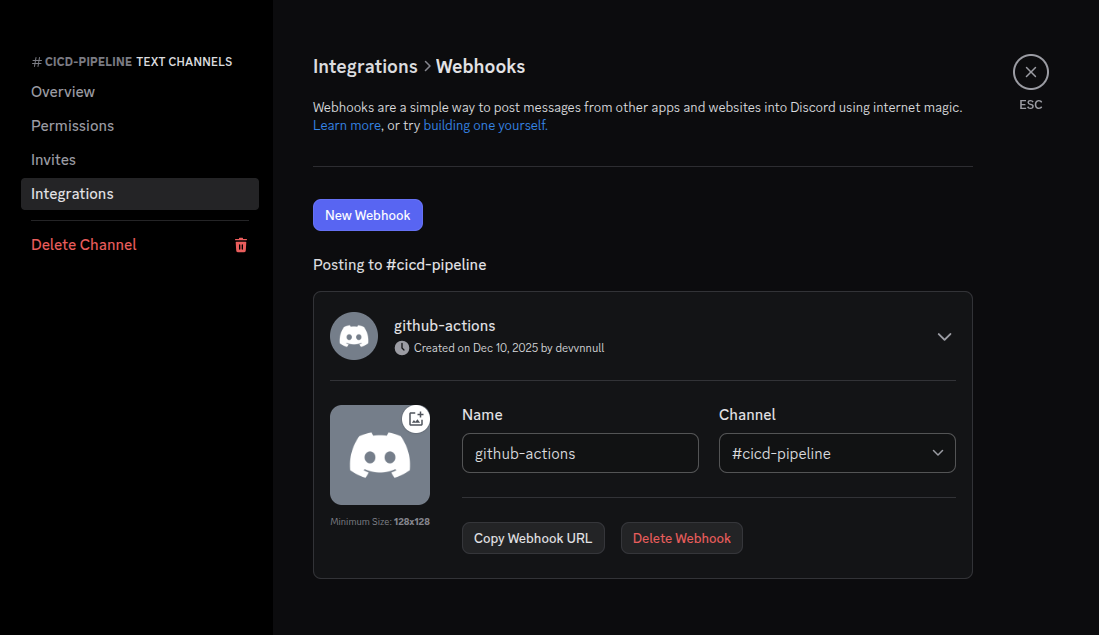 Discord Webhook
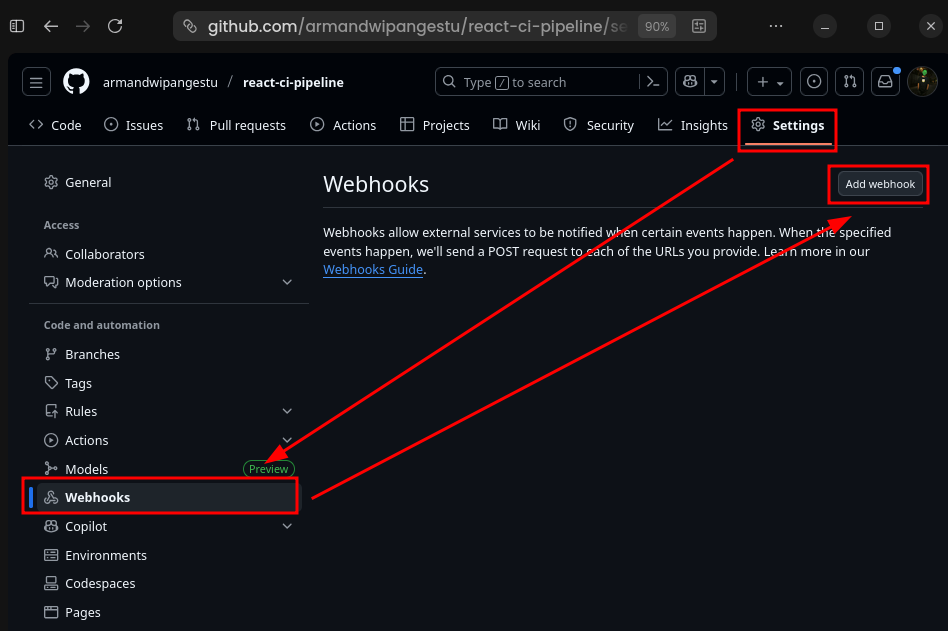 GitHub Add Webhook
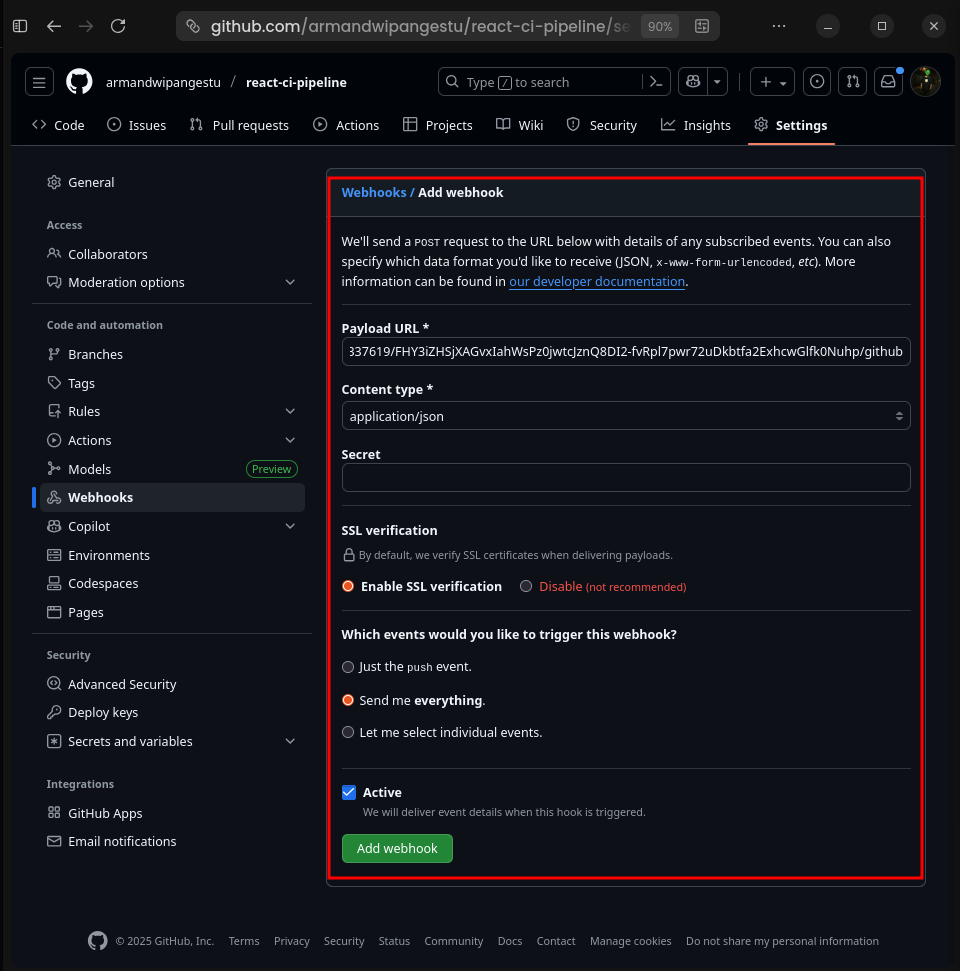 GitHub Webhook Configuration
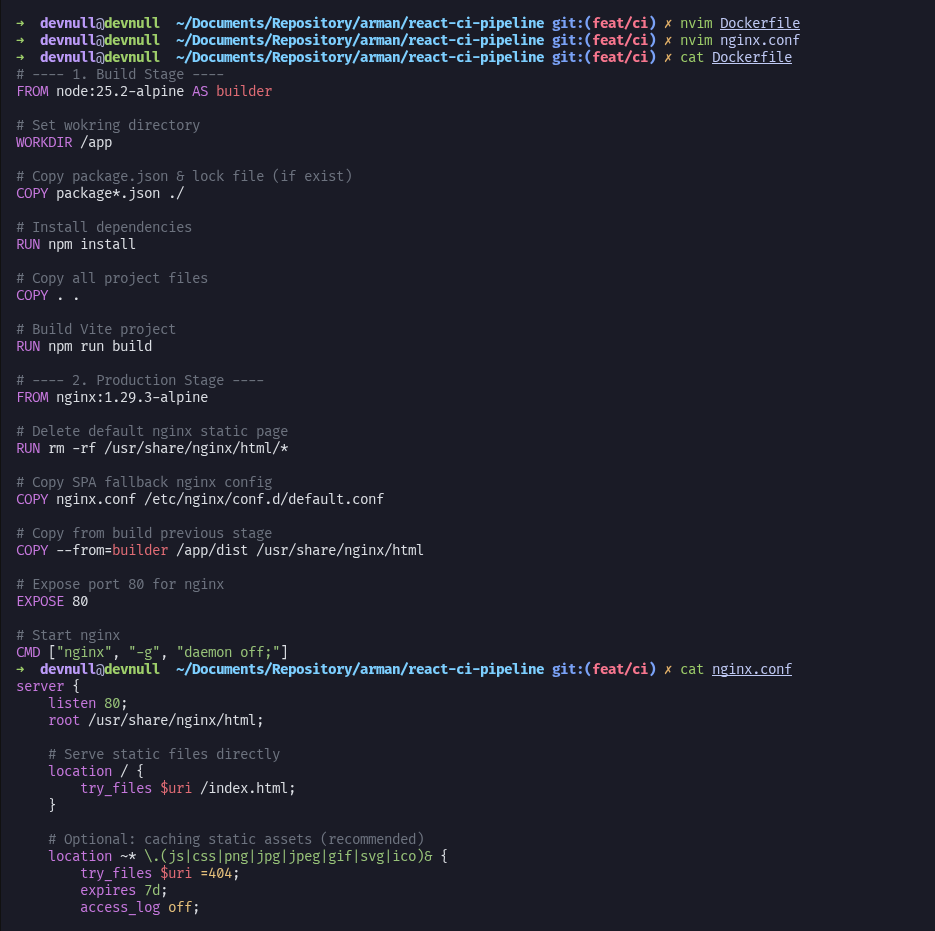 Create Dockerfile
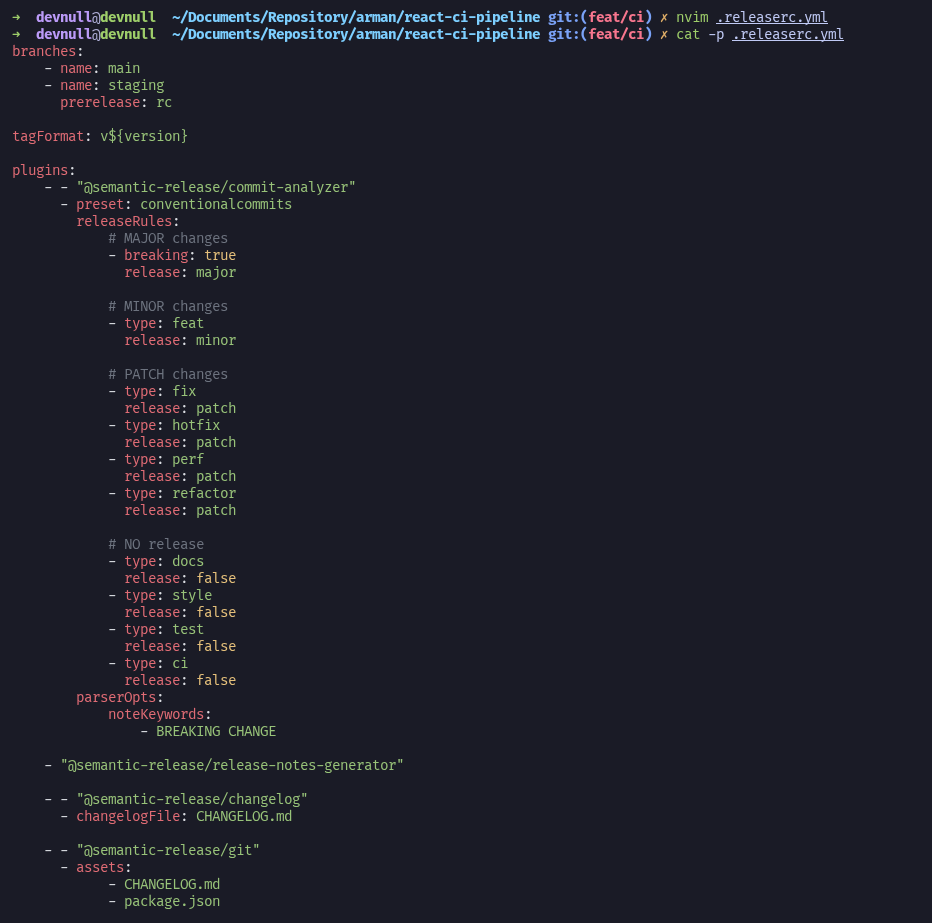 Releaserc YML
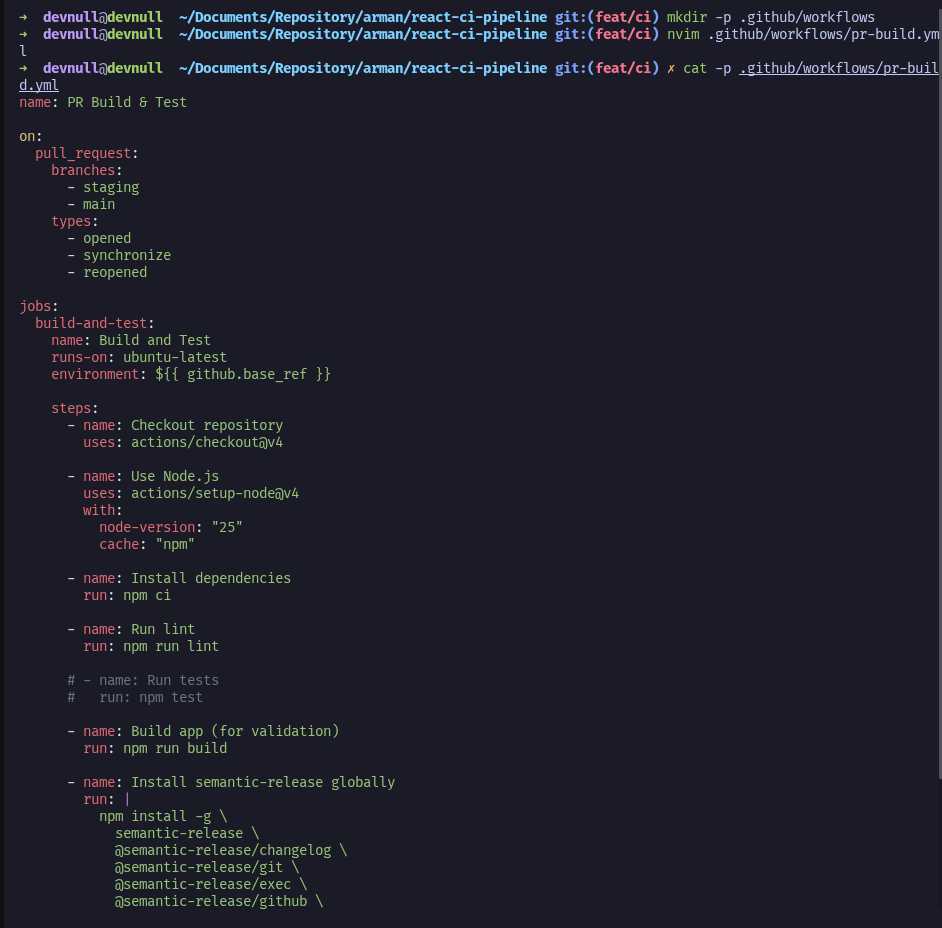 PR Build
 Release
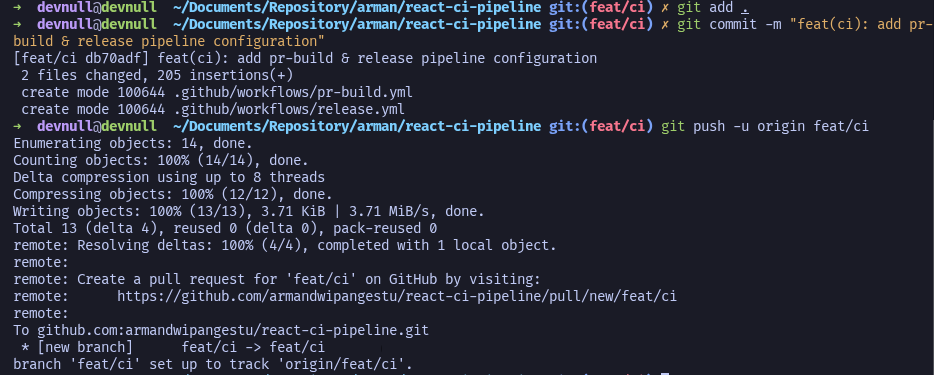 Git Push Feat CI
Discord Webhook First Actions
 GitHub Open PR
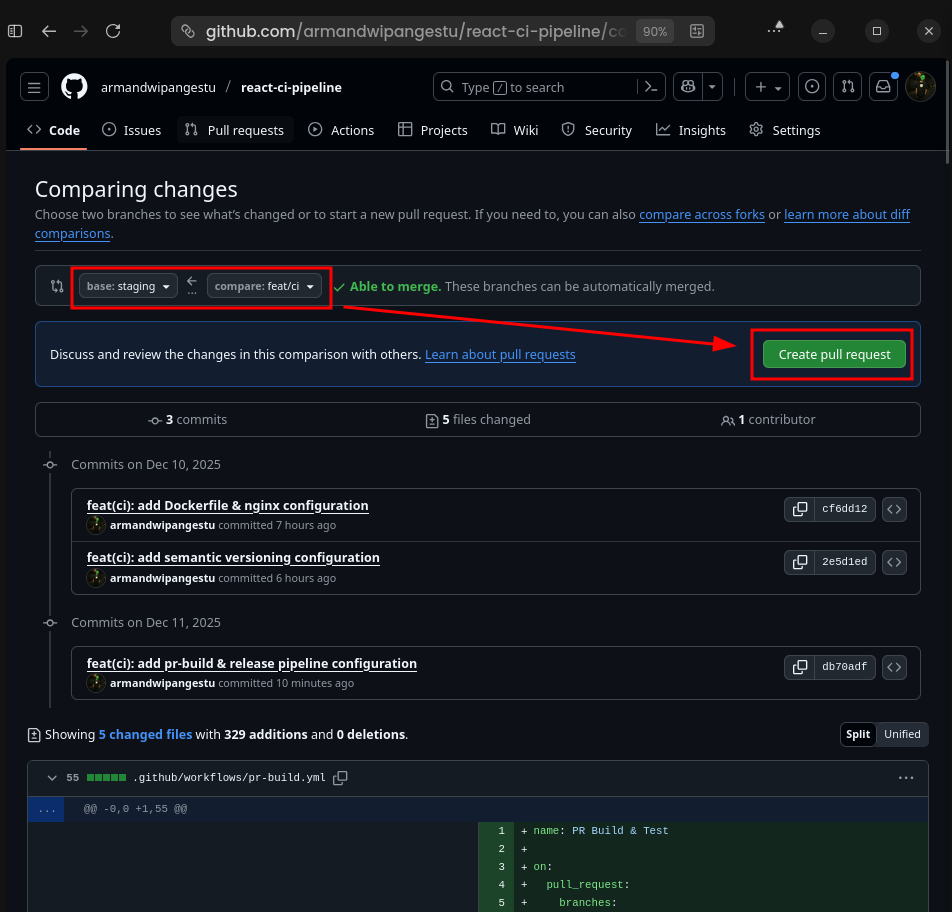 GitHub Create PR
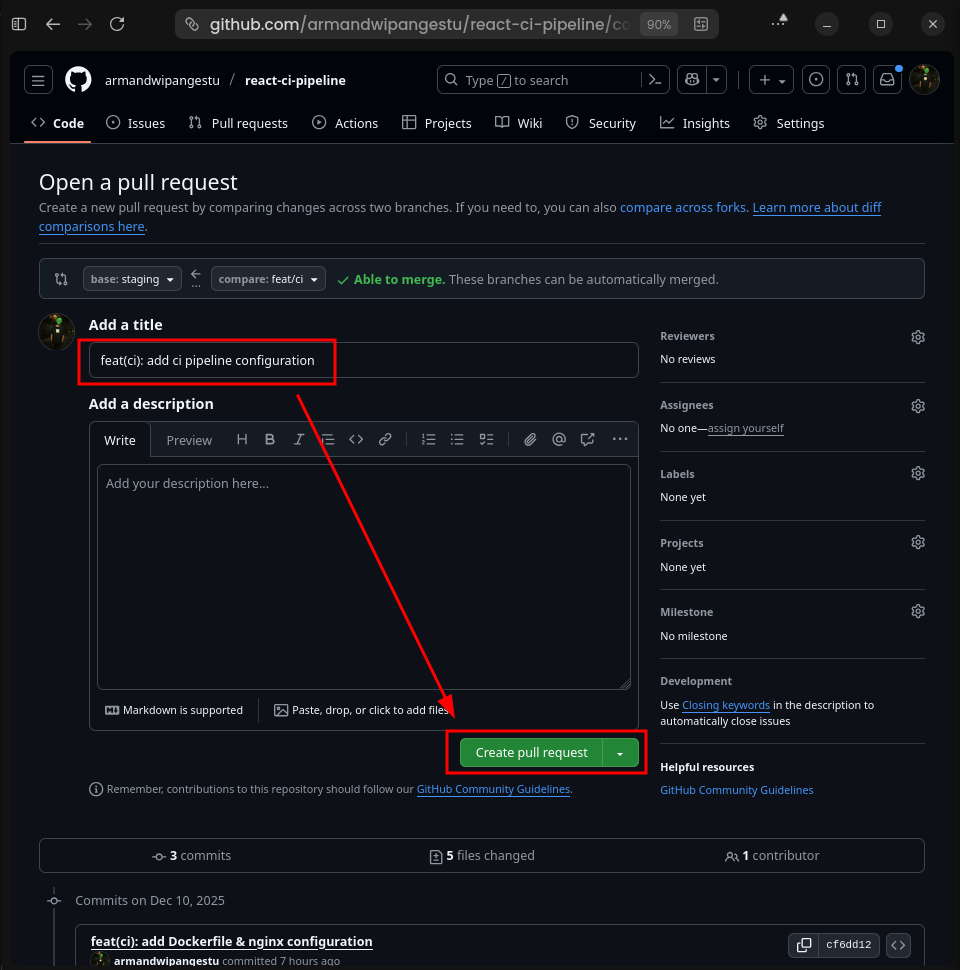 GitHub Create PR 2
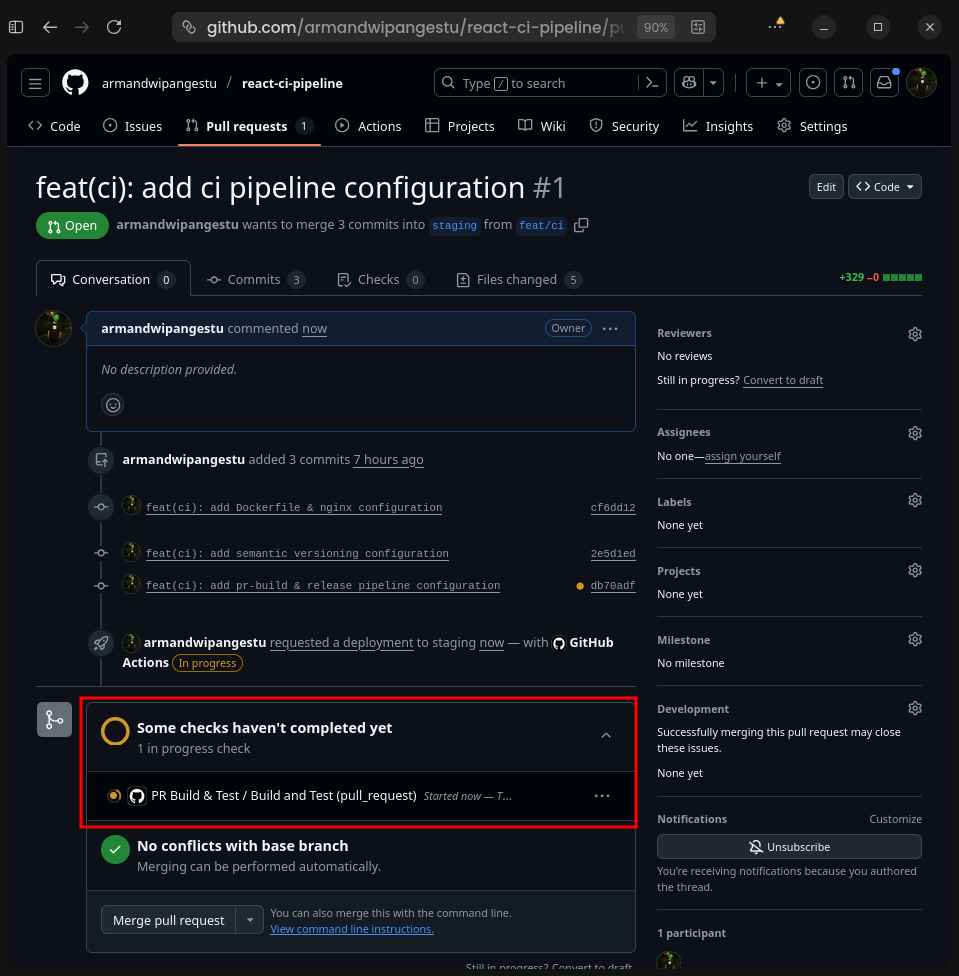 GitHub PR Build Check
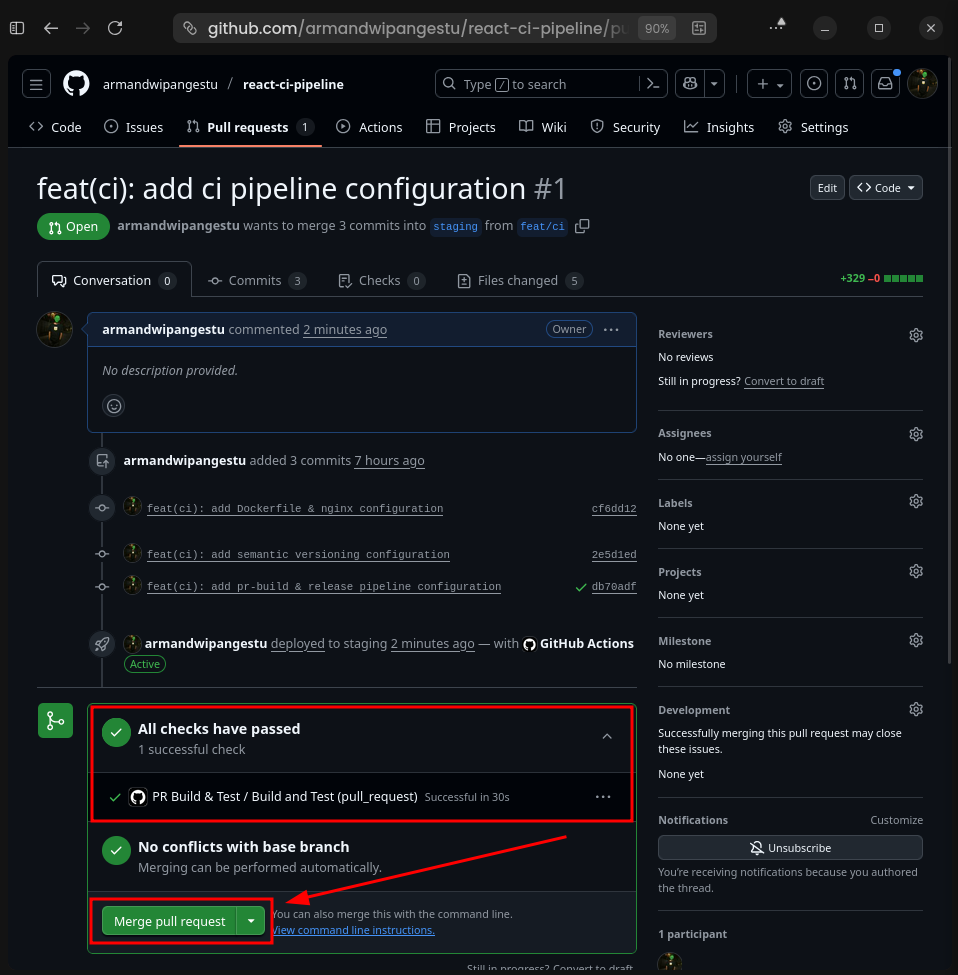 GitHub All Checks Have Passed
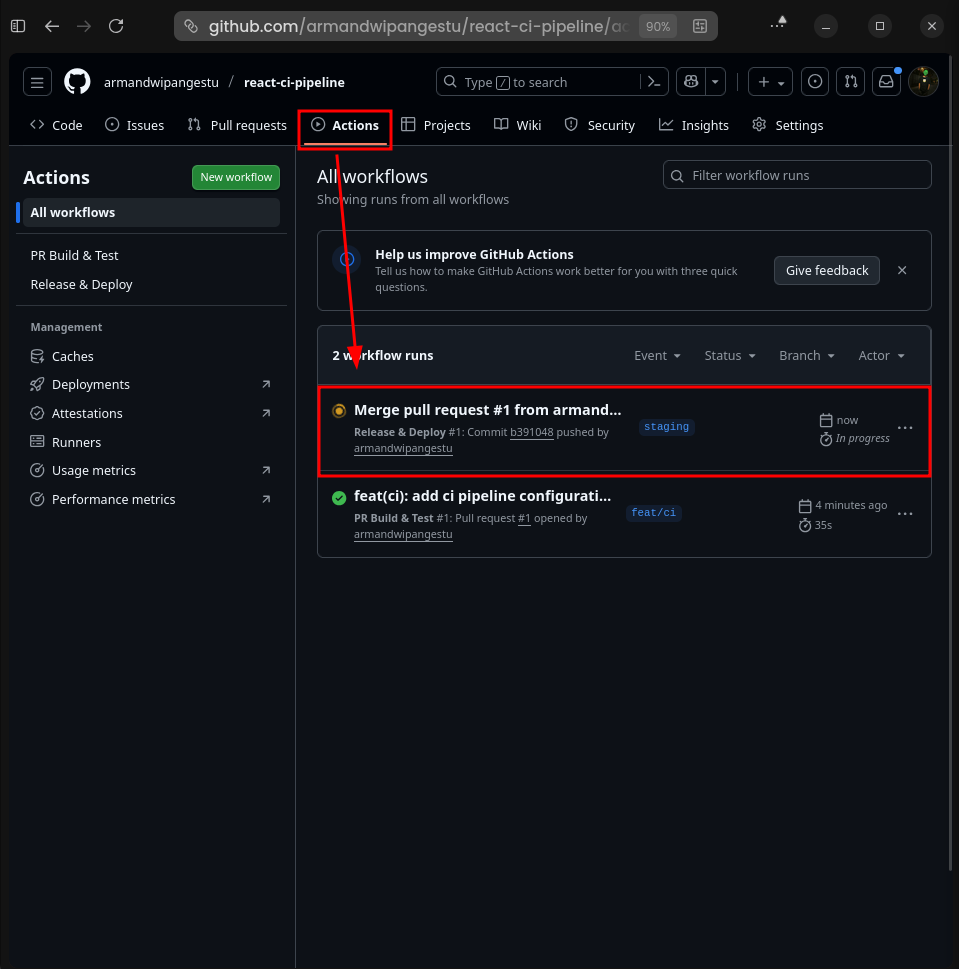 GitHub All Checks Have Passed
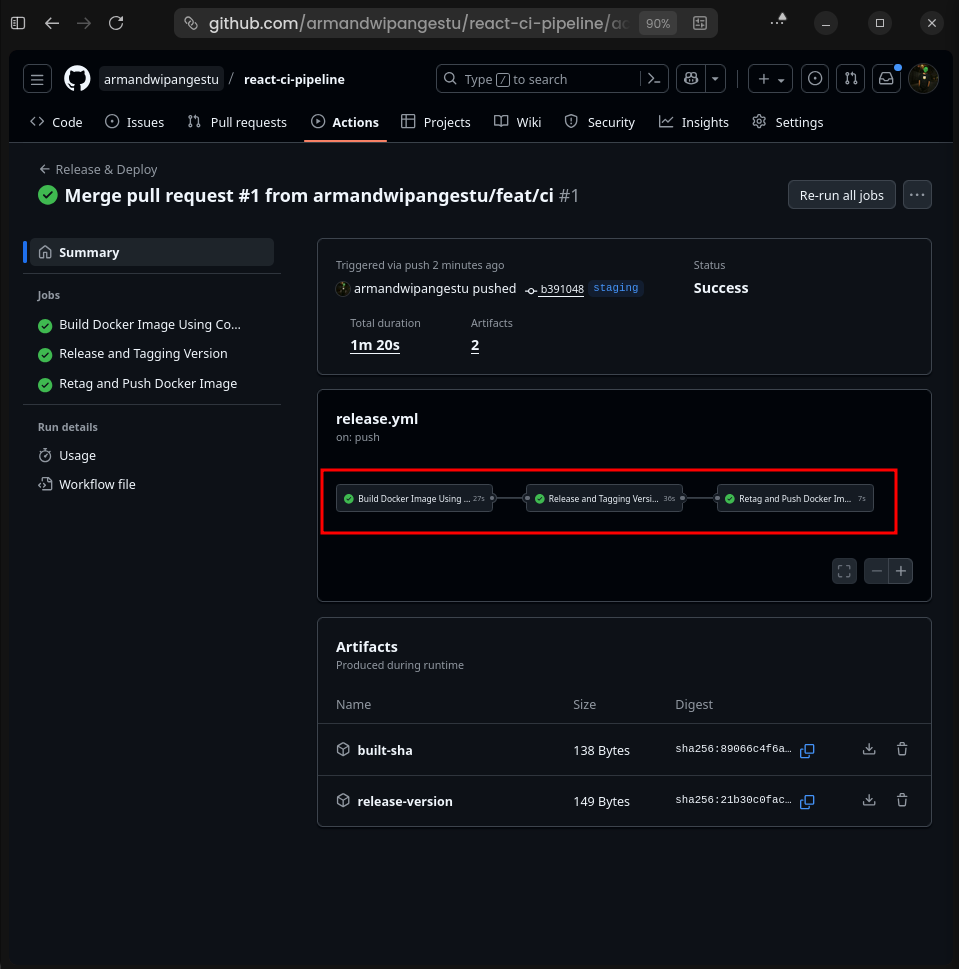 GitHub Actions Summary
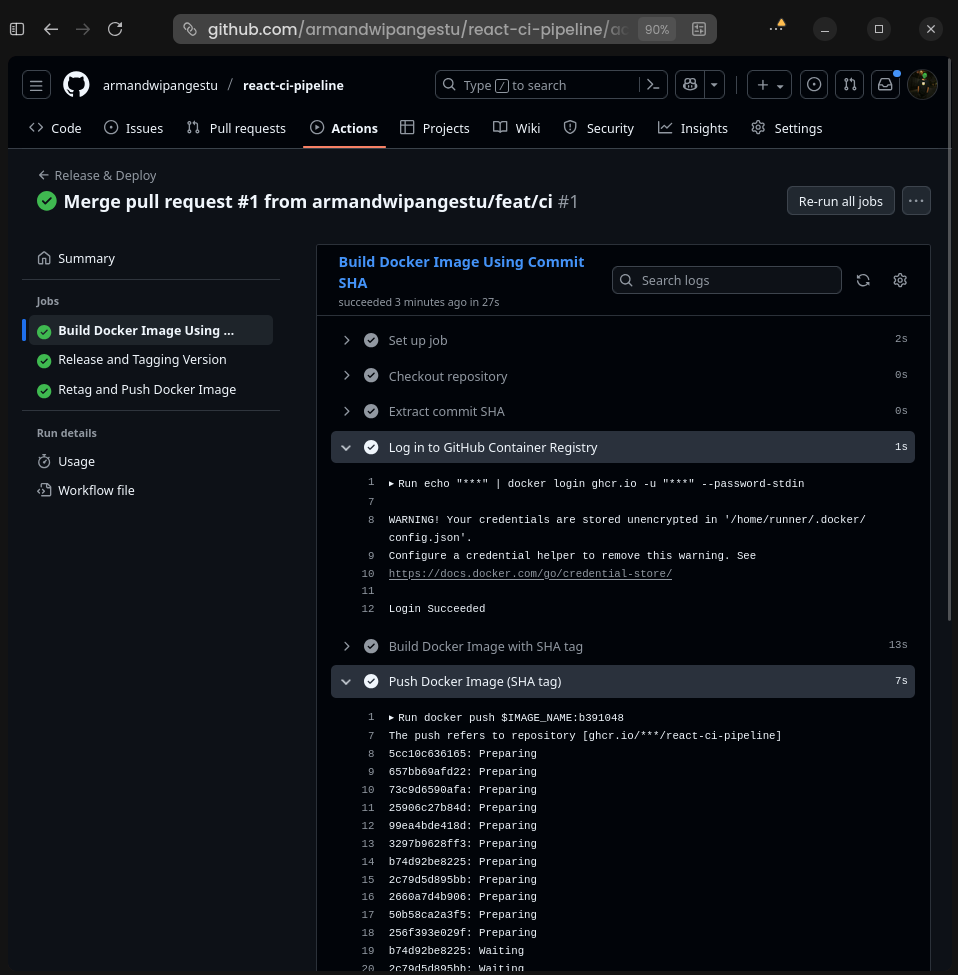 GitHub Actions Jobs Logs
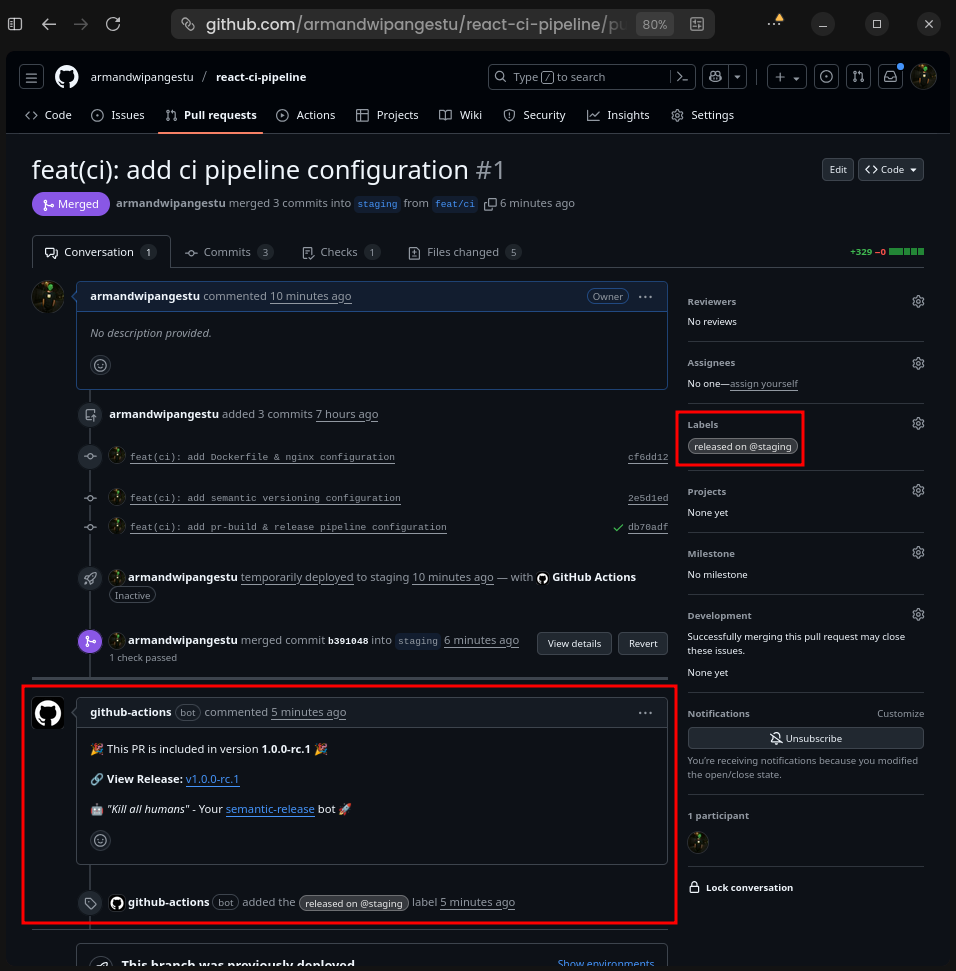 GitHub Auto Comment Label
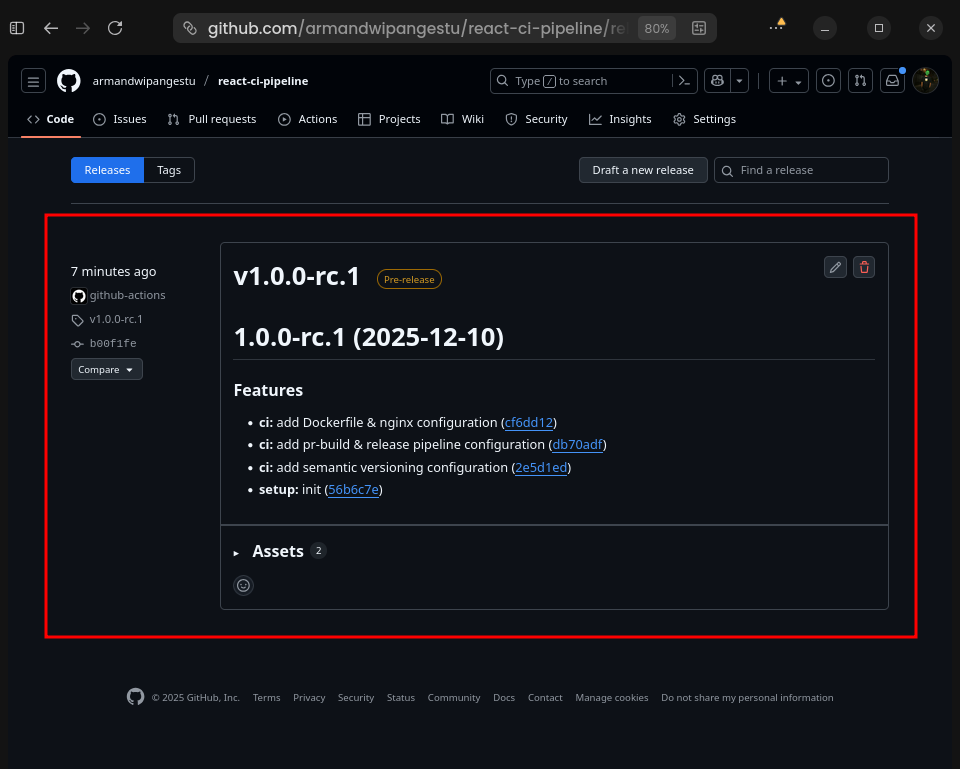 GitHub Tag Release
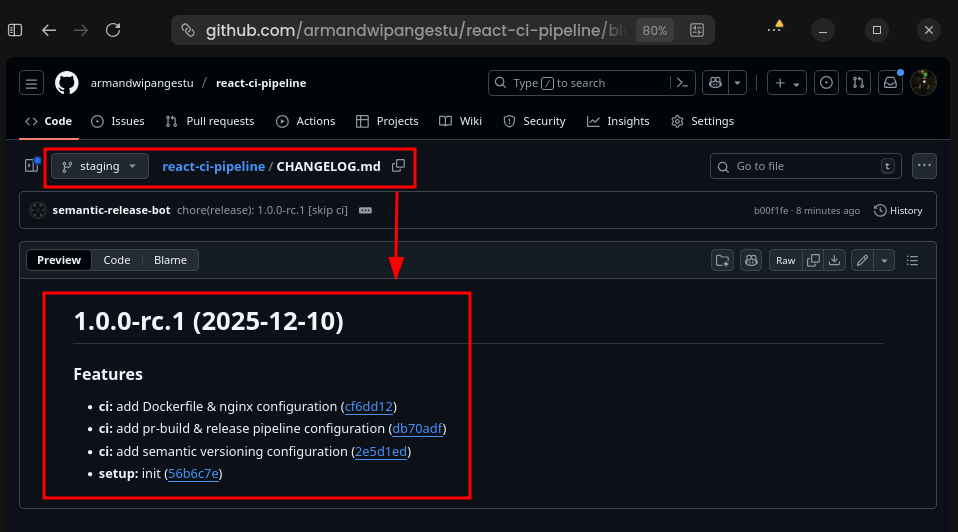 GitHub Changelog
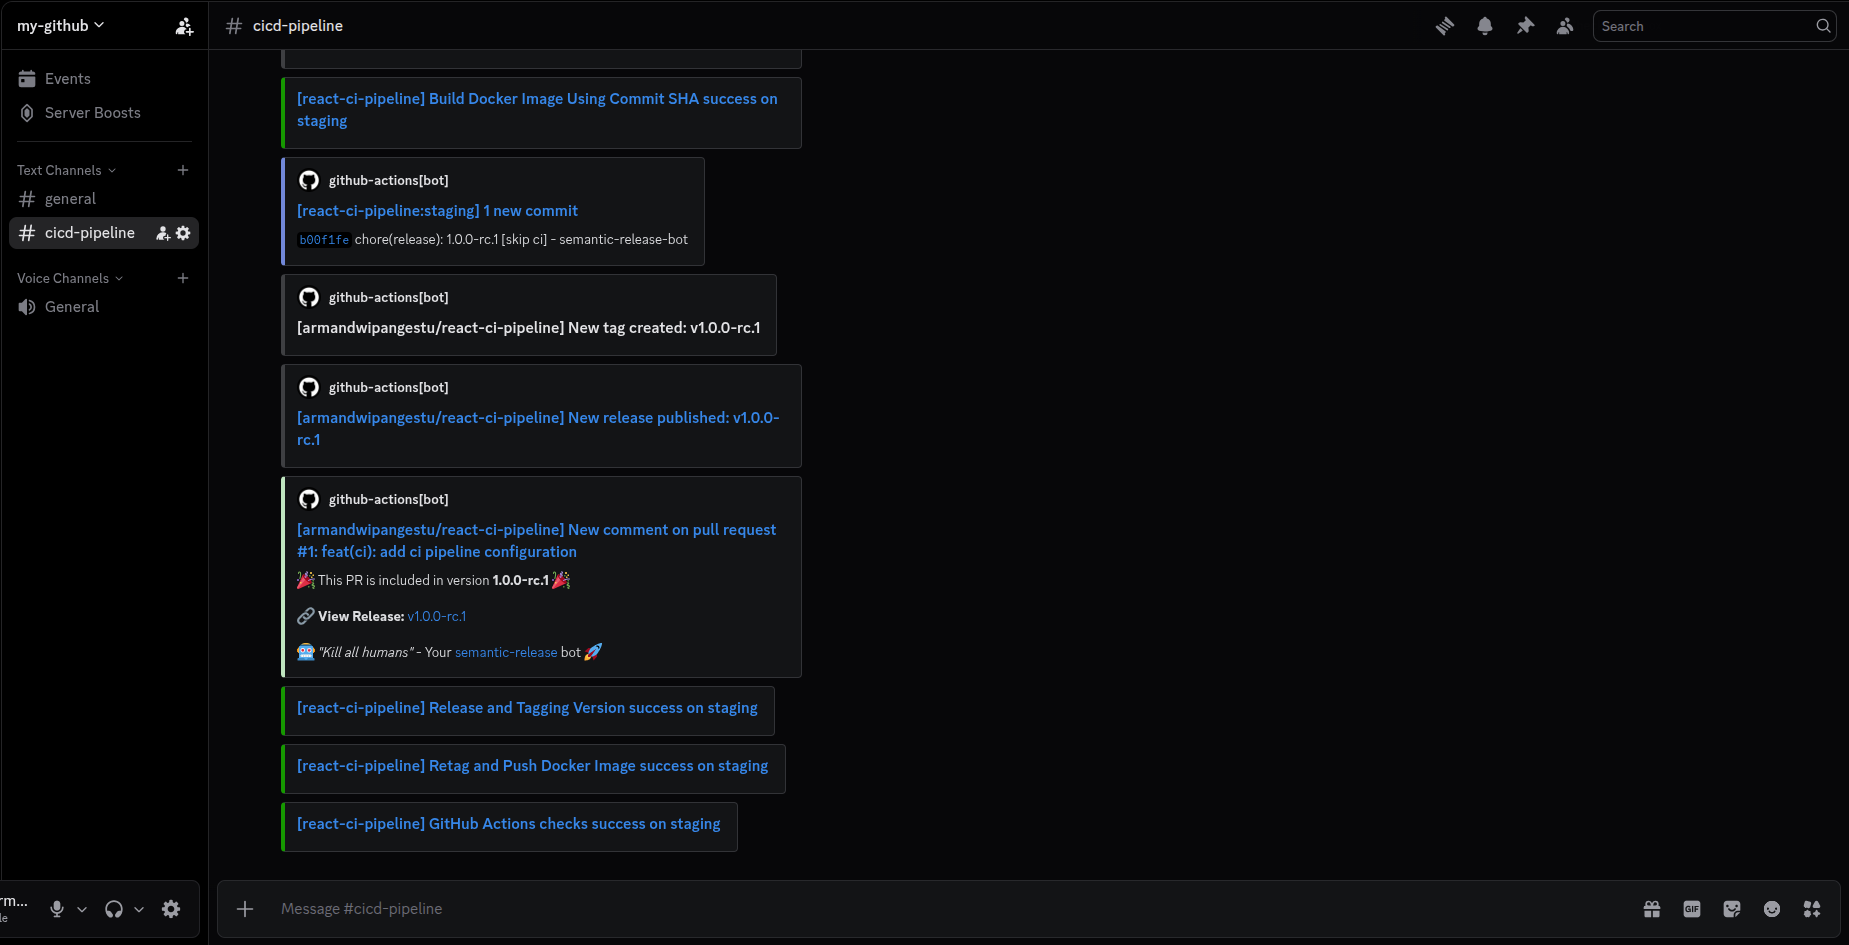 Discord New Message
GitHub Packages
GitHub Packages Connect Repository
GitHub GHCR Visibility
GitHub Packages References
 GitHub GHCR
 GitHub Open PR Main
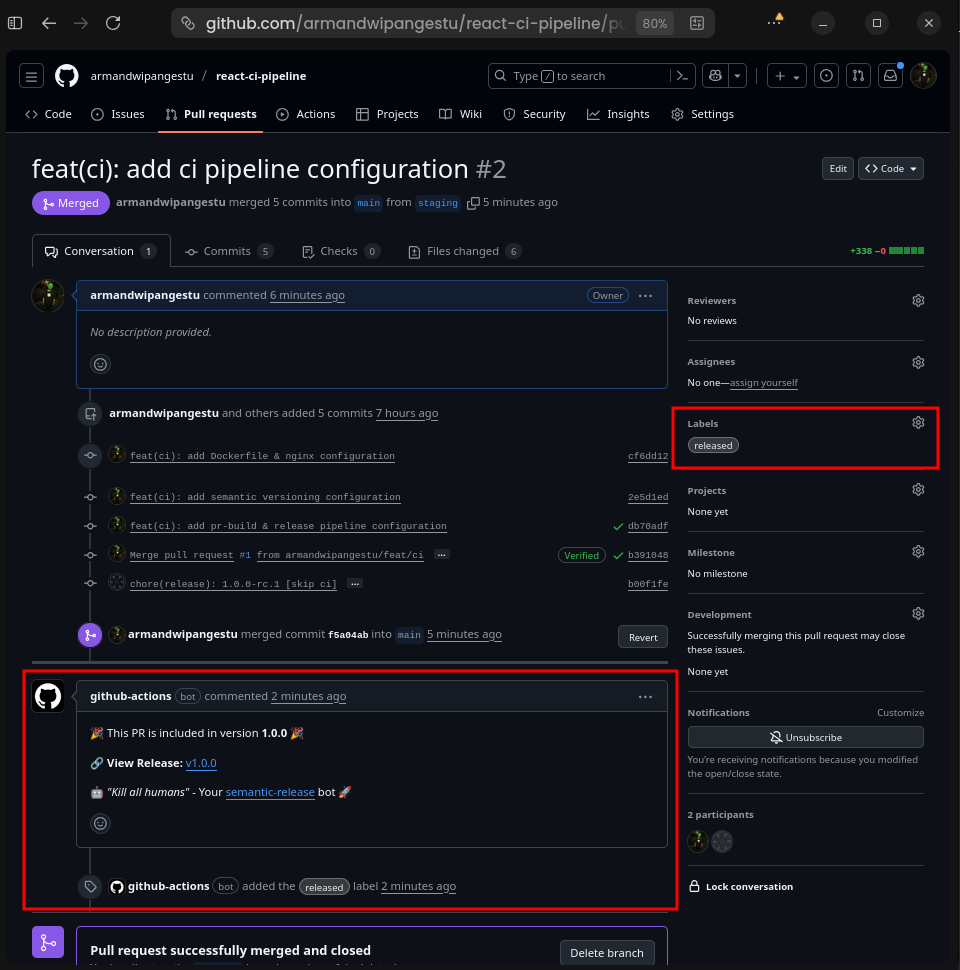 GitHub Auto Comment Label 2
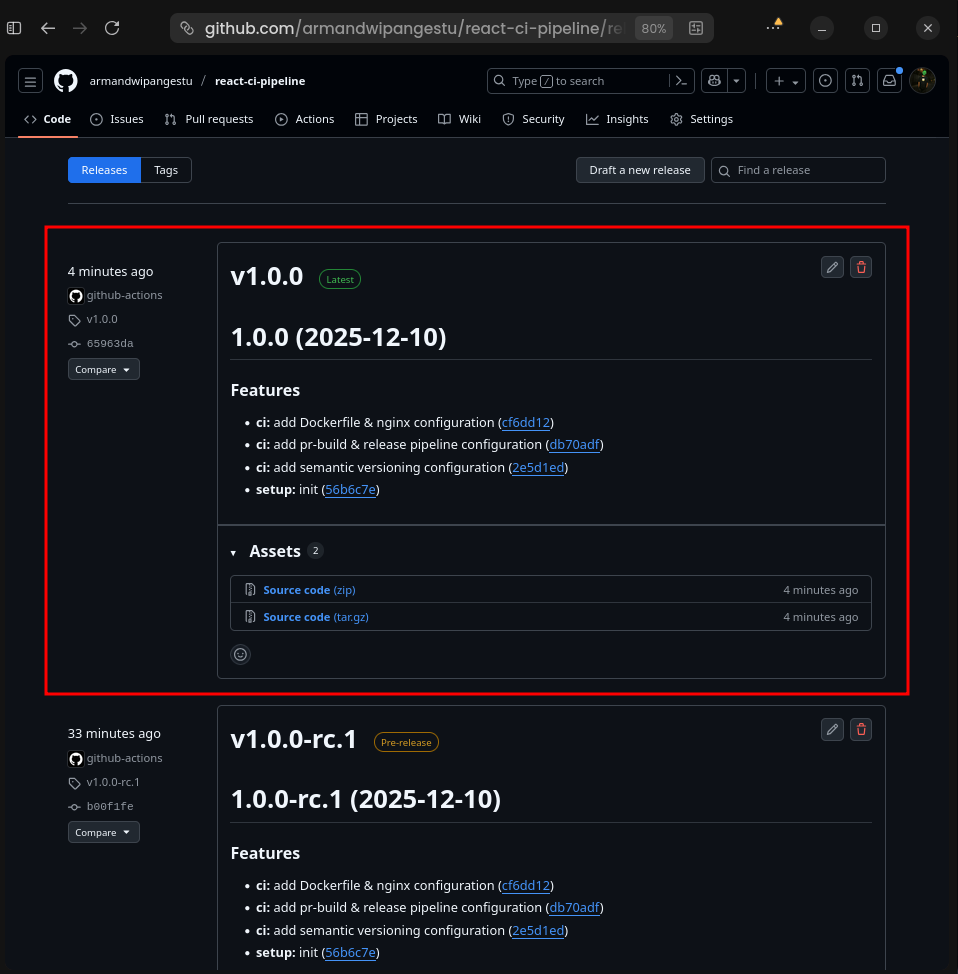 GitHub Tag Release 2
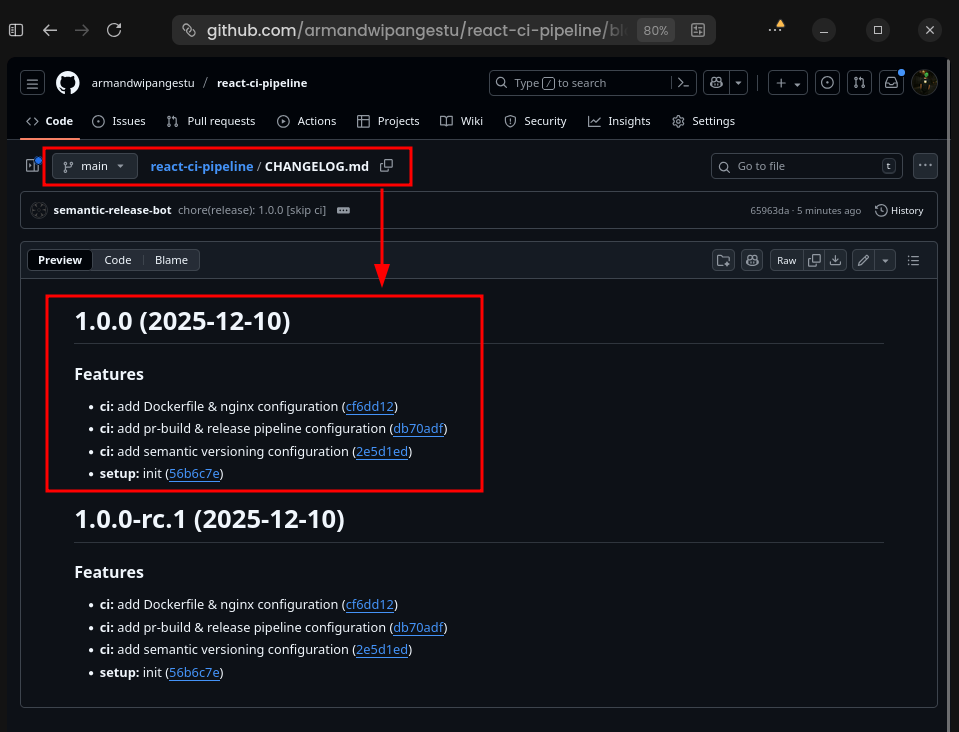 GitHub Changelog 2
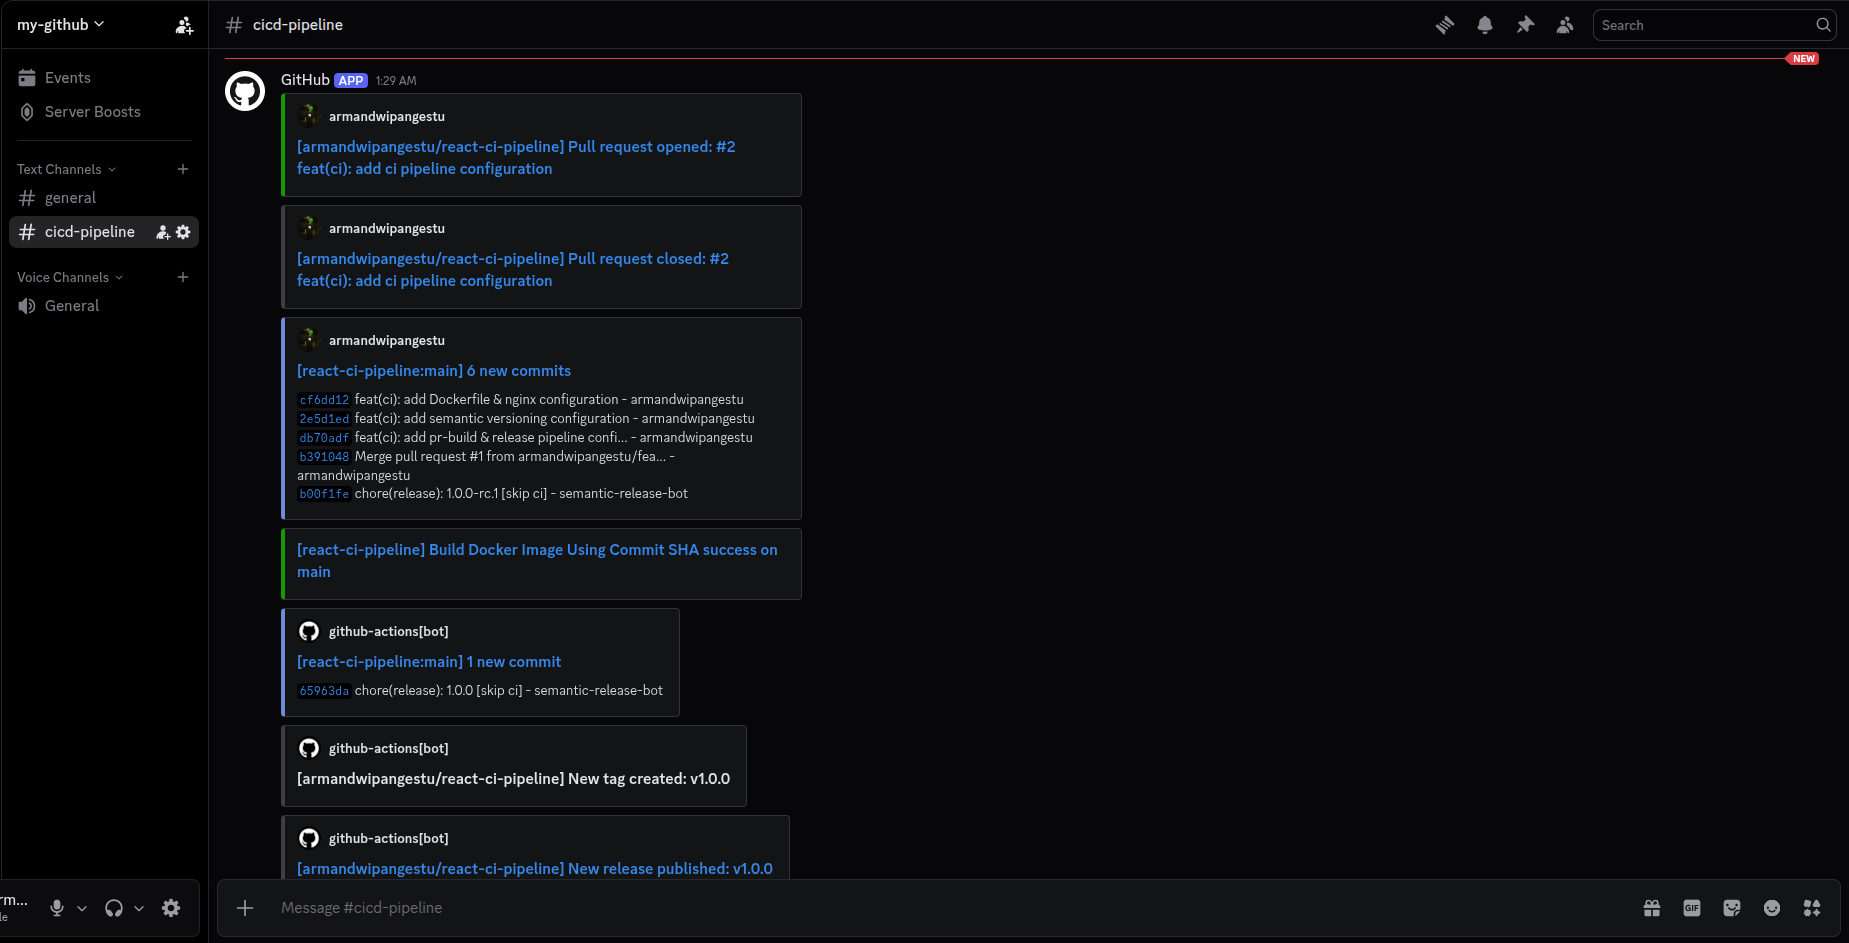 Discord New Message 2
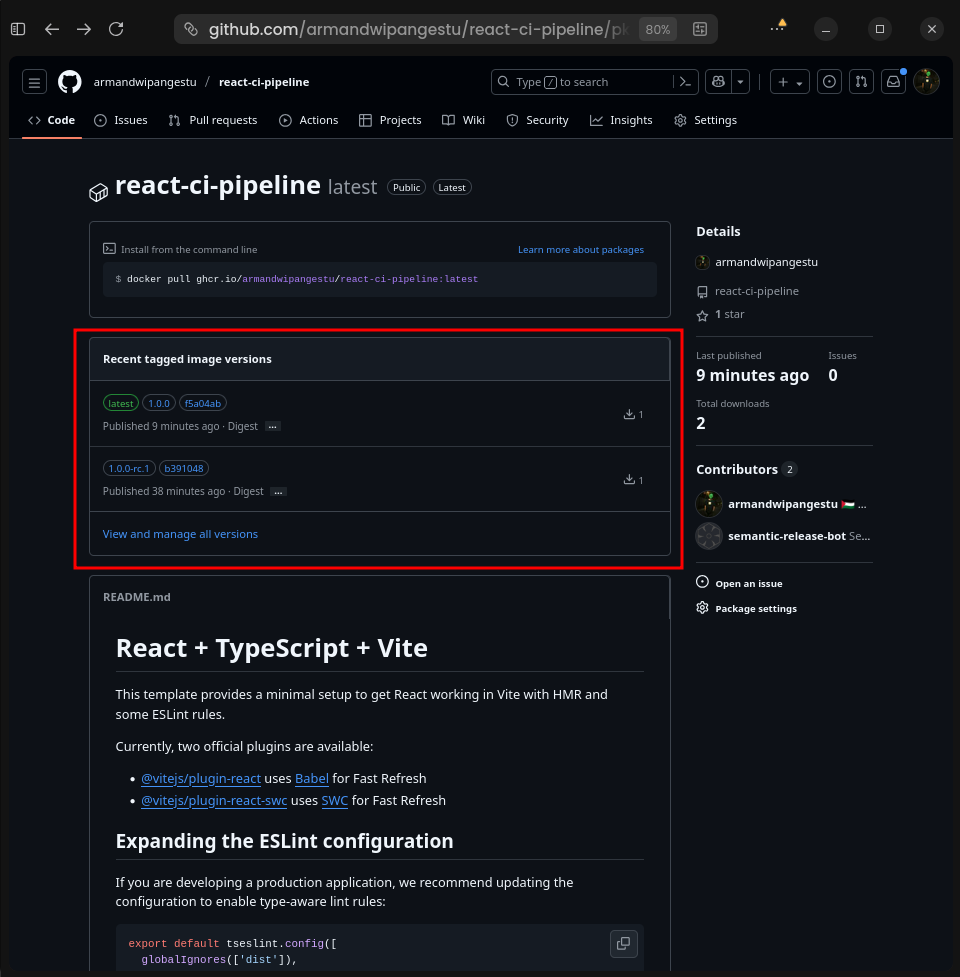 GitHub GHCR 2
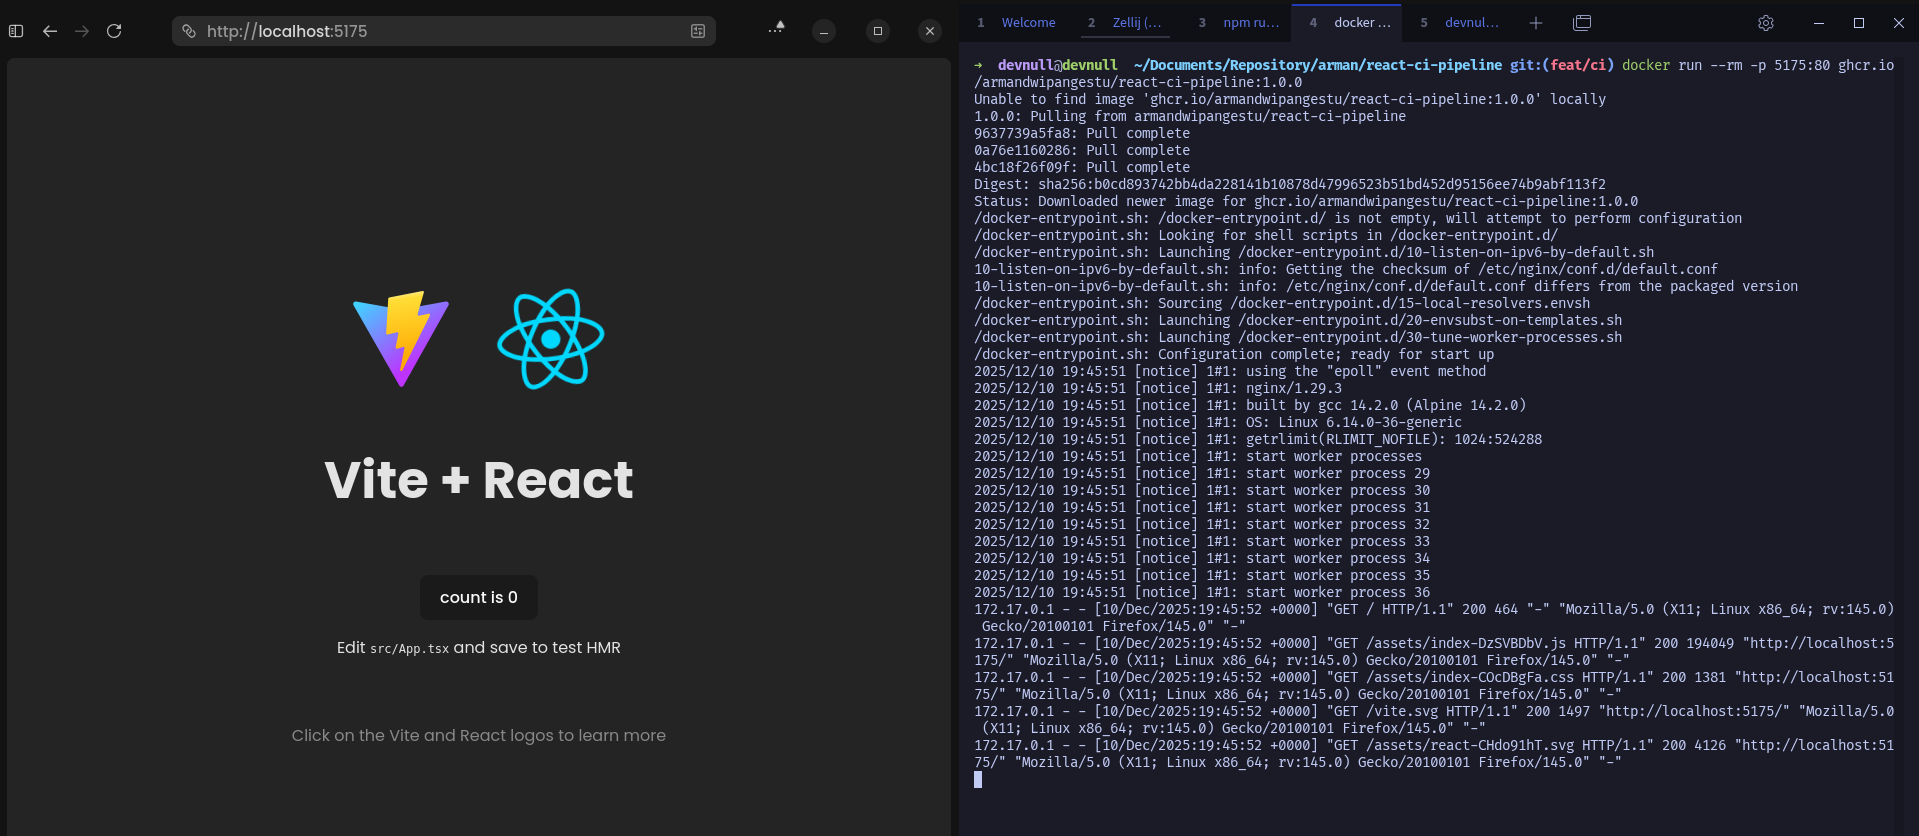 Docker Run GHCR