
Learning Kubernetes - Introduction and Explanation of Probe
In this episode, we'll discuss an important concept in Kubernetes called Probes. We'll learn about Liveness, Readiness, and Startup Probes to ensure application health and availability.

#Introduction
In the previous episode, we learned about various methods for deleting Pods in Kubernetes. In episode 10, we'll discuss an important concept for ensuring application health and availability: Probes.
Note: Here I'll be using a Kubernetes Cluster installed through K3s.
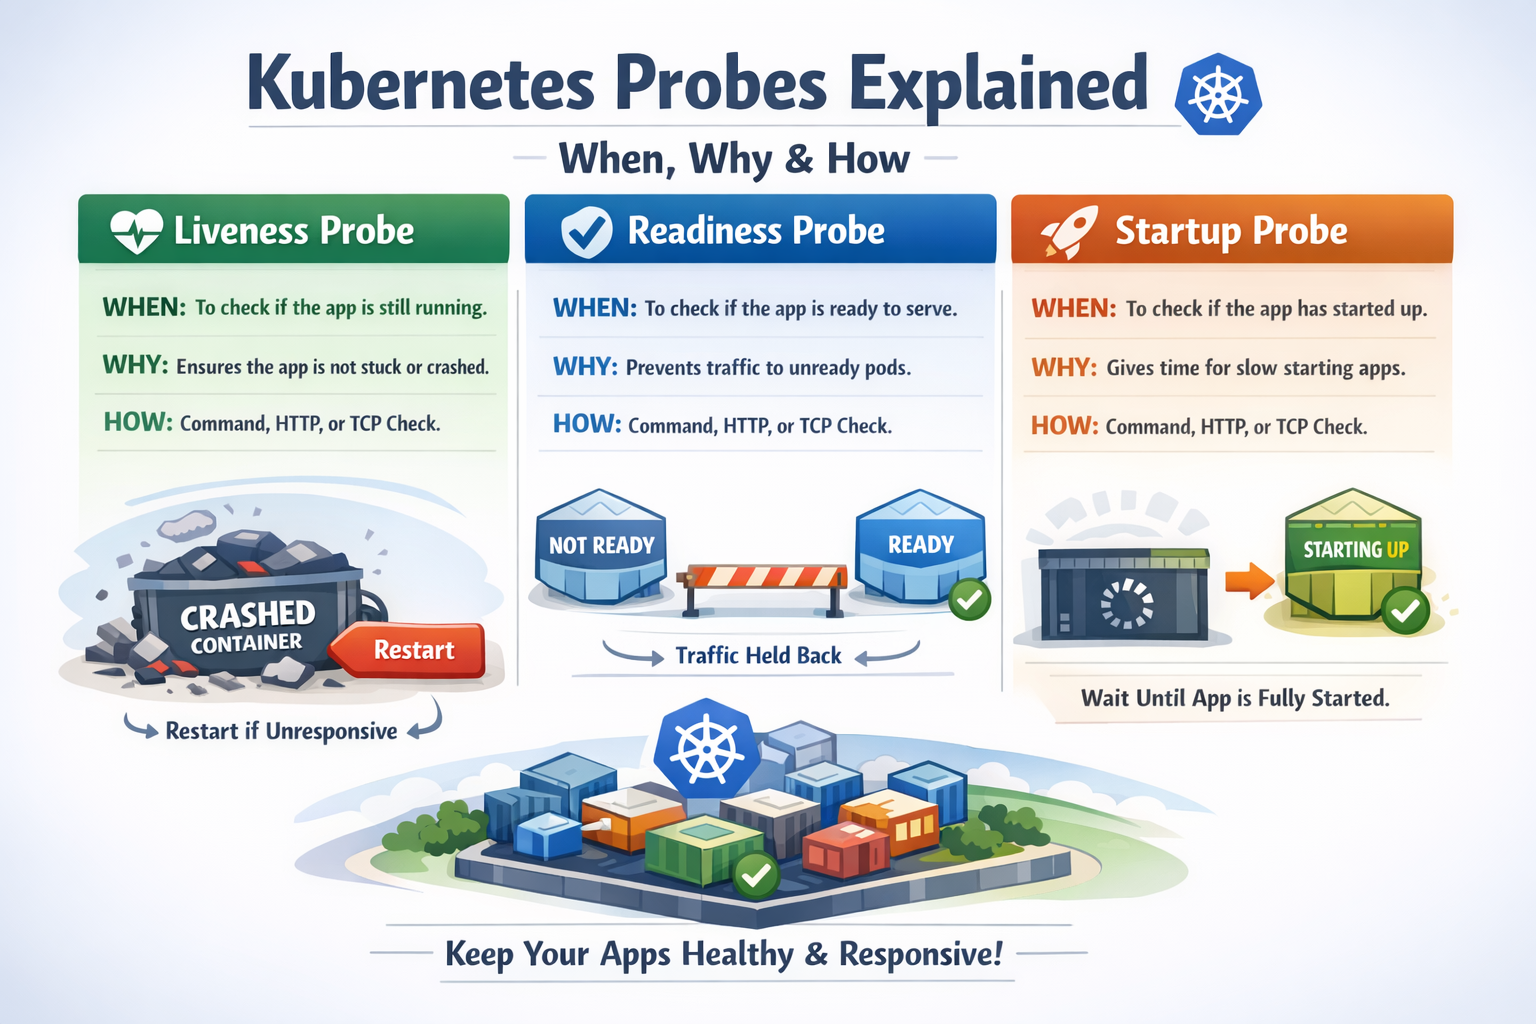
Probes are health checks that Kubernetes uses to determine if your application is running correctly. They help Kubernetes make intelligent decisions about when to restart containers, when to send traffic to Pods, and when applications are ready to accept requests. Understanding Probes is crucial for building resilient and highly available applications in Kubernetes.
#What Are Probes?
Probes are diagnostic checks that Kubernetes performs on containers to determine their health status. Think of Probes like a doctor checking your vital signs - they periodically check if your application is healthy and functioning correctly.
Kubernetes provides three types of Probes:
- Liveness Probe - Checks if the container is alive and running
- Readiness Probe - Checks if the container is ready to accept traffic
- Startup Probe - Checks if the application has started successfully
Each Probe type serves a different purpose and helps Kubernetes manage your application lifecycle effectively.
#Why Do We Need Probes?
Without Probes, Kubernetes has no way to know if your application is actually working correctly. A container might be running, but the application inside could be:
- Deadlocked - The process is running but not responding
- Crashed - The application crashed but the container is still running
- Overloaded - The application is too busy to handle new requests
- Starting up - The application is still initializing and not ready
Probes help Kubernetes detect these situations and take appropriate action:
- Restart unhealthy containers - Automatically recover from failures
- Remove unhealthy Pods from load balancing - Prevent sending traffic to broken Pods
- Wait for slow-starting applications - Give applications time to initialize
#Types of Probes
 List Probe
Let's explore each type of Probe in detail:
#Liveness Probe
A Liveness Probe determines if a container is running properly. If the Liveness Probe fails, Kubernetes will kill the container and restart it according to the Pod's restart policy.
Use cases for Liveness Probe:
- Detect deadlocked applications
- Recover from application crashes
- Restart containers that are in a broken state
- Handle memory leaks by restarting containers periodically
Example scenario: Your application has a memory leak and becomes unresponsive after running for a while. A Liveness Probe can detect this and restart the container automatically.
#Readiness Probe
A Readiness Probe determines if a container is ready to accept traffic. If the Readiness Probe fails, Kubernetes will remove the Pod from Service endpoints, preventing traffic from being sent to it.
Use cases for Readiness Probe:
- Wait for dependencies to be available (database, cache, etc.)
- Temporarily remove overloaded Pods from load balancing
- Prevent traffic during application updates or maintenance
- Handle graceful shutdown scenarios
Example scenario: Your application needs to connect to a database before it can serve requests. A Readiness Probe ensures traffic is only sent after the database connection is established.
Key difference from Liveness Probe: Readiness Probe failures don't restart the container - they just stop sending traffic to it.
#Startup Probe
A Startup Probe is used for containers that take a long time to start. It disables Liveness and Readiness Probes until the application has started successfully.
Use cases for Startup Probe:
- Applications with slow initialization
- Legacy applications that take time to start
- Applications that need to load large datasets on startup
- Prevent premature restarts during initialization
Example scenario: Your application needs to load a 5GB dataset into memory on startup, which takes 2 minutes. A Startup Probe gives it time to initialize without being killed by the Liveness Probe.
#Probe Mechanisms
Kubernetes supports three mechanisms for performing Probes:
#HTTP GET Request
Kubernetes sends an HTTP GET request to a specified path and port. The Probe succeeds if the response status code is between 200 and 399.
livenessProbe:
    httpGet:
        path: /healthz
        port: 8080
    initialDelaySeconds: 3
    periodSeconds: 3
Best for: Web applications, REST APIs, HTTP services
#TCP Socket
Kubernetes attempts to open a TCP connection to a specified port. The Probe succeeds if the connection is established.
livenessProbe:
    tcpSocket:
        port: 3306
    initialDelaySeconds: 5
    periodSeconds: 10
Best for: Databases, TCP services, applications without HTTP endpoints
#Exec Command
Kubernetes executes a command inside the container. The Probe succeeds if the command exits with status code 0.
livenessProbe:
    exec:
        command:
            - cat
            - /tmp/healthy
    initialDelaySeconds: 5
    periodSeconds: 5
Best for: Custom health checks, file-based checks, complex validation logic
#Probe Configuration Parameters
All Probes support these configuration parameters:
#initialDelaySeconds
Time to wait before performing the first Probe after the container starts.
initialDelaySeconds: 10 # Wait 10 seconds before first checkDefault: 0 seconds
#periodSeconds
How often to perform the Probe.
periodSeconds: 5 # Check every 5 secondsDefault: 10 seconds
#timeoutSeconds
How long to wait for the Probe to complete before considering it failed.
timeoutSeconds: 3 # Probe must complete within 3 secondsDefault: 1 second
#successThreshold
Minimum consecutive successes for the Probe to be considered successful after a failure.
successThreshold: 1 # One success is enoughDefault: 1 (must be 1 for Liveness and Startup Probes)
#failureThreshold
Number of consecutive failures before taking action (restarting container or removing from Service).
failureThreshold: 3 # Fail 3 times before taking actionDefault: 3
#Practical Examples
Let's create practical examples for each type of Probe:
#Example 1: HTTP Liveness Probe
Create a Pod with an HTTP Liveness Probe:
apiVersion: v1
kind: Pod
metadata:
    name: liveness-http
    labels:
        app: liveness-demo
spec:
    containers:
        - name: nginx
          image: nginx:1.25
          ports:
              - containerPort: 80
          livenessProbe:
              httpGet:
                  path: /
                  port: 80
              initialDelaySeconds: 3
              periodSeconds: 3
              timeoutSeconds: 1
              failureThreshold: 3
Apply the configuration:
sudo kubectl apply -f liveness-http.ymlVerify the Pod is running:
sudo kubectl get podsCheck the Probe status:
sudo kubectl describe pod liveness-httpYou'll see events showing the Liveness Probe is working:
Events:
  Type    Reason     Age   From               Message
  ----    ------     ----  ----               -------
  Normal  Scheduled  30s   default-scheduler  Successfully assigned default/liveness-http to node1
  Normal  Pulled     29s   kubelet            Container image "nginx:1.25" already present on machine
  Normal  Created    29s   kubelet            Created container nginx
Normal Started 29s kubelet Started container nginx#Example 2: Simulating Liveness Probe Failure
Let's create a Pod that will fail the Liveness Probe:
apiVersion: v1
kind: Pod
metadata:
    name: liveness-failure
spec:
    containers:
        - name: liveness-test
          image: busybox
          args:
              - /bin/sh
              - -c
              - touch /tmp/healthy; sleep 30; rm -f /tmp/healthy; sleep 600
          livenessProbe:
              exec:
                  command:
                      - cat
                      - /tmp/healthy
              initialDelaySeconds: 5
              periodSeconds: 5
This Pod:
- Creates
/tmp/healthyfile - Sleeps for 30 seconds
- Deletes
/tmp/healthyfile - The Liveness Probe will fail after the file is deleted
- Kubernetes will restart the container
Apply and watch:
sudo kubectl apply -f liveness-failure.yml
sudo kubectl get pods -w
After about 30 seconds, you'll see the container restart:
NAME               READY   STATUS    RESTARTS   AGE
liveness-failure   1/1     Running   0          20s
liveness-failure   1/1     Running   1          45s
liveness-failure   1/1     Running   2          70s
Check the events:
sudo kubectl describe pod liveness-failureYou'll see events showing the Liveness Probe failed and the container was restarted:
Events:
  Type     Reason     Age                From               Message
  ----     ------     ----               ----               -------
  Normal   Scheduled  2m                 default-scheduler  Successfully assigned default/liveness-failure to node1
  Normal   Pulled     2m                 kubelet            Container image "busybox" already present on machine
  Normal   Created    2m                 kubelet            Created container liveness-test
  Normal   Started    2m                 kubelet            Started container liveness-test
  Warning  Unhealthy  90s (x3 over 100s) kubelet            Liveness probe failed: cat: can't open '/tmp/healthy': No such file or directory
Normal Killing 90s kubelet Container liveness-test failed liveness probe, will be restarted#Example 3: Readiness Probe
Create a Pod with both Liveness and Readiness Probes:
apiVersion: v1
kind: Pod
metadata:
    name: readiness-demo
    labels:
        app: readiness-demo
spec:
    containers:
        - name: nginx
          image: nginx:1.25
          ports:
              - containerPort: 80
          livenessProbe:
              httpGet:
                  path: /
                  port: 80
              initialDelaySeconds: 3
              periodSeconds: 3
          readinessProbe:
              httpGet:
                  path: /
                  port: 80
              initialDelaySeconds: 5
              periodSeconds: 5
              failureThreshold: 3
Create a Service to see how Readiness Probe affects traffic:
apiVersion: v1
kind: Service
metadata:
    name: readiness-service
spec:
    selector:
        app: readiness-demo
    ports:
        - protocol: TCP
          port: 80
          targetPort: 80
Apply both:
sudo kubectl apply -f readiness-probe.yml
sudo kubectl apply -f readiness-service.yml
Check the endpoints:
sudo kubectl get endpoints readiness-serviceYou'll see the Pod IP is added to endpoints only after the Readiness Probe succeeds:
NAME                ENDPOINTS         AGE
readiness-service 10.42.0.15:80 30s#Example 4: Startup Probe for Slow-Starting Applications
Create a Pod with a Startup Probe:
apiVersion: v1
kind: Pod
metadata:
    name: startup-demo
spec:
    containers:
        - name: slow-app
          image: nginx:1.25
          ports:
              - containerPort: 80
          startupProbe:
              httpGet:
                  path: /
                  port: 80
              initialDelaySeconds: 0
              periodSeconds: 10
              failureThreshold: 30  # 30 * 10 = 300 seconds (5 minutes) to start
          livenessProbe:
              httpGet:
                  path: /
                  port: 80
              initialDelaySeconds: 0
              periodSeconds: 10
          readinessProbe:
              httpGet:
                  path: /
                  port: 80
              initialDelaySeconds: 0
              periodSeconds: 10
This configuration:
- Gives the application up to 5 minutes to start (30 failures × 10 seconds)
- Liveness and Readiness Probes are disabled until Startup Probe succeeds
- After startup, Liveness and Readiness Probes take over
#Example 5: TCP Socket Probe for Database
Create a Pod with TCP Socket Probe:
apiVersion: v1
kind: Pod
metadata:
    name: mysql-pod
spec:
    containers:
        - name: mysql
          image: mysql:8.0
          env:
              - name: MYSQL_ROOT_PASSWORD
                value: "password123"
          ports:
              - containerPort: 3306
          livenessProbe:
              tcpSocket:
                  port: 3306
              initialDelaySeconds: 30
              periodSeconds: 10
          readinessProbe:
              tcpSocket:
                  port: 3306
              initialDelaySeconds: 10
              periodSeconds: 5
This checks if MySQL is accepting connections on port 3306.
#Example 6: Exec Command Probe
Create a Pod with custom health check script:
apiVersion: v1
kind: Pod
metadata:
    name: exec-probe-demo
spec:
    containers:
        - name: app
          image: busybox
          command:
              - /bin/sh
              - -c
              - |
                  # Create health check script
                  cat > /usr/local/bin/health-check.sh << 'EOF'
                  #!/bin/sh
                  # Custom health check logic
                  if [ -f /tmp/healthy ]; then
                      exit 0
                  else
                      exit 1
                  fi
                  EOF
                  chmod +x /usr/local/bin/health-check.sh

                  # Keep container running and create healthy file
                  touch /tmp/healthy
                  sleep 3600
          livenessProbe:
              exec:
                  command:
                      - /usr/local/bin/health-check.sh
              initialDelaySeconds: 5
periodSeconds: 5#Combining Multiple Probes
In production, you typically use all three Probe types together:
apiVersion: v1
kind: Pod
metadata:
    name: complete-probes
    labels:
        app: web-app
spec:
    containers:
        - name: app
          image: nginx:1.25
          ports:
              - containerPort: 80
          # Startup Probe - for slow-starting applications
          startupProbe:
              httpGet:
                  path: /healthz
                  port: 80
              initialDelaySeconds: 0
              periodSeconds: 10
              failureThreshold: 30  # 5 minutes to start
          # Liveness Probe - restart if unhealthy
          livenessProbe:
              httpGet:
                  path: /healthz
                  port: 80
              initialDelaySeconds: 0
              periodSeconds: 10
              timeoutSeconds: 5
              failureThreshold: 3
          # Readiness Probe - remove from load balancer if not ready
          readinessProbe:
              httpGet:
                  path: /ready
                  port: 80
              initialDelaySeconds: 0
              periodSeconds: 5
              timeoutSeconds: 3
failureThreshold: 3#Best Practices for Probes
#Use Different Endpoints for Different Probes
Create separate endpoints for Liveness and Readiness:
/healthz- Liveness check (basic health)/ready- Readiness check (dependencies ready)
livenessProbe:
    httpGet:
        path: /healthz
        port: 8080
readinessProbe:
    httpGet:
        path: /ready
port: 8080#Keep Probe Checks Lightweight
Probe checks should be fast and not consume significant resources:
# Good - simple check
livenessProbe:
    httpGet:
        path: /healthz
        port: 8080
    timeoutSeconds: 1  # Fast timeout

# Bad - complex check that might timeout
livenessProbe:
    exec:
        command:
            - /bin/sh
            - -c
            - "complex-database-query.sh"  # Too slow!
timeoutSeconds: 1#Set Appropriate Timeouts
Give Probes enough time to complete, but not too much:
livenessProbe:
    httpGet:
        path: /healthz
        port: 8080
    timeoutSeconds: 3      # Reasonable timeout
    periodSeconds: 10      # Check every 10 seconds
failureThreshold: 3 # Fail 3 times before restart#Use Startup Probe for Slow Applications
Don't make Liveness Probe wait too long - use Startup Probe instead:
# Good approach
startupProbe:
    httpGet:
        path: /healthz
        port: 8080
    periodSeconds: 10
    failureThreshold: 30  # 5 minutes to start
livenessProbe:
    httpGet:
        path: /healthz
        port: 8080
    periodSeconds: 10
failureThreshold: 3 # Quick failure after startup#Don't Check External Dependencies in Liveness Probe
Liveness Probe should only check if the application itself is healthy:
# Bad - checks external database
livenessProbe:
    exec:
        command:
            - check-database-connection.sh  # Don't do this!

# Good - checks only application health
livenessProbe:
    httpGet:
        path: /healthz  # Returns 200 if app is running
        port: 8080
Check external dependencies in Readiness Probe instead:
# Good - Readiness checks dependencies
readinessProbe:
    exec:
        command:
- check-database-connection.sh # OK for readiness#Set initialDelaySeconds Appropriately
Give your application time to start before the first Probe:
livenessProbe:
    httpGet:
        path: /healthz
        port: 8080
    initialDelaySeconds: 30  # Wait 30 seconds before first check
periodSeconds: 10#Use Readiness Probe for Zero-Downtime Deployments
Readiness Probe ensures traffic is only sent to ready Pods:
readinessProbe:
    httpGet:
        path: /ready
        port: 8080
    initialDelaySeconds: 5
    periodSeconds: 5
failureThreshold: 1 # Remove from load balancer immediately#Common Mistakes and Pitfalls
#Mistake 1: No Probes at All
Running Pods without Probes means Kubernetes can't detect failures.
Problem: Application crashes but container keeps running. Kubernetes doesn't know and keeps sending traffic.
Solution: Always implement at least Liveness and Readiness Probes.
#Mistake 2: Using Same Endpoint for Liveness and Readiness
Using the same endpoint doesn't distinguish between "app is alive" and "app is ready".
Problem: Database is down, Readiness fails, but Liveness also fails and restarts the container unnecessarily.
Solution: Use different endpoints with different logic.
#Mistake 3: Probe Timeout Too Short
Setting timeout too short causes false failures.
Problem: Probe times out during normal operation, causing unnecessary restarts.
Solution: Set realistic timeouts based on your application's response time.
#Mistake 4: Checking External Dependencies in Liveness Probe
Liveness Probe should only check the application itself.
Problem: Database is temporarily unavailable, Liveness fails, container restarts, but database is still unavailable - restart loop.
Solution: Check external dependencies only in Readiness Probe.
#Mistake 5: Not Using Startup Probe for Slow Applications
Using high initialDelaySeconds on Liveness Probe delays failure detection.
Problem: Application crashes after startup, but Liveness Probe waits 5 minutes before checking.
Solution: Use Startup Probe for initialization, keep Liveness Probe responsive.
#Mistake 6: Probe Checks Too Expensive
Heavy Probe checks consume resources and slow down the application.
Problem: Liveness Probe runs complex database query every 5 seconds, overloading the database.
Solution: Keep Probe checks lightweight and fast.
#Monitoring Probe Status
#Check Probe Status in Pod Description
sudo kubectl describe pod <pod-name>Look for the Probes section:
Containers:
  app:
    Liveness:     http-get http://:8080/healthz delay=0s timeout=1s period=10s #success=1 #failure=3
    Readiness:    http-get http://:8080/ready delay=0s timeout=1s period=5s #success=1 #failure=3
Startup: http-get http://:8080/healthz delay=0s timeout=1s period=10s #success=1 #failure=30#Check Events for Probe Failures
sudo kubectl get events --sort-by='.lastTimestamp'Look for events like:
Warning  Unhealthy  Liveness probe failed: HTTP probe failed with statuscode: 500
Warning Unhealthy Readiness probe failed: Get http://10.42.0.15:8080/ready: dial tcp 10.42.0.15:8080: connect: connection refused#Watch Pod Restarts
sudo kubectl get pods -wFrequent restarts indicate Liveness Probe failures:
NAME      READY   STATUS    RESTARTS   AGE
app-pod 1/1 Running 5 10m#Conclusion
In episode 10, we've explored Probes in Kubernetes in depth. We've learned about the three types of Probes (Liveness, Readiness, and Startup), their purposes, and how to configure them effectively.
Key takeaways:
- Liveness Probe - Restarts unhealthy containers
- Readiness Probe - Controls traffic routing to Pods
- Startup Probe - Handles slow-starting applications
- Use different endpoints for different Probe types
- Keep Probe checks lightweight and fast
- Don't check external dependencies in Liveness Probe
- Use appropriate timeouts and failure thresholds
- Combine all three Probes for production applications
Probes are essential for building resilient, self-healing applications in Kubernetes. By properly configuring Probes, you ensure that Kubernetes can automatically detect and recover from failures, maintain high availability, and provide a better experience for your users.
Are you getting a clearer understanding of Probes in Kubernetes? Probes are essential for building resilient, self-healing applications in Kubernetes. By properly configuring probes, you allow Kubernetes to automatically detect unhealthy containers, control when traffic should reach a pod, and restart applications when something goes wrong. With the right probe strategy, your system becomes far more reliable and predictable in production.
Are you getting a clearer understanding of probes in Kubernetes? In the next episode (Episode 11), we’ll move to another fundamental concept that brings Kubernetes closer to its core promise of self-healing infrastructure: ReplicationController.
ReplicationController is one of the earliest mechanisms in Kubernetes designed to ensure that a specified number of pod replicas are always running. Instead of manually creating and monitoring individual pods, you declare the desired number of replicas, and Kubernetes continuously works to maintain that state. If a pod crashes, gets deleted, or a node fails, the ReplicationController automatically creates a new pod to replace it.
In other words, ReplicationController introduces an important idea in Kubernetes:
Declarative desired state.
You don’t tell Kubernetes how to recover when something breaks—you simply declare how many pods should exist, and Kubernetes ensures the system always converges to that state.