Learning Kubernetes - Multi-Container Pod Patterns
In this episode, we'll discuss multi-container Pods in Kubernetes and common design patterns. We'll learn about sidecar, ambassador, adapter patterns, and how containers share resources within a Pod.

#Introduction
In the previous episode, we learned about Ingress for sophisticated HTTP/HTTPS, gRPC, and TCP/UDP routing. In episode 20, we'll discuss Multi-Container Pods, an important architectural pattern where multiple containers run together in a single Pod.
Note: Here I'll be using a Kubernetes Cluster installed through K3s.
While most Pods run a single container, Kubernetes supports running multiple containers in one Pod. These containers share the same network namespace, storage volumes, and lifecycle, enabling powerful design patterns for building modular, maintainable applications.
#What Are Multi-Container Pods?
A Multi-Container Pod is a Pod that runs two or more containers that work together as a single unit. All containers in the Pod share the same network namespace (IP address and ports), can communicate via localhost, and can share storage volumes.
Think of a Pod like a logical host - just as multiple processes can run on the same server and communicate via localhost, multiple containers in a Pod can communicate efficiently while remaining isolated from containers in other Pods.
Key characteristics of Multi-Container Pods:
- Shared network - All containers share the same IP and port space
- Shared storage - Containers can share volumes
- Shared lifecycle - Containers start and stop together
- Localhost communication - Containers communicate via 127.0.0.1
- Atomic scheduling - All containers scheduled on the same node
- Tightly coupled - Containers depend on each other
#Why Use Multi-Container Pods?
Multi-container Pods solve several architectural challenges:
- Separation of concerns - Split functionality into specialized containers
- Reusability - Use standard sidecar containers across applications
- Independent scaling - Update sidecar without changing main app
- Technology diversity - Use different languages/tools per container
- Shared resources - Efficient resource sharing via localhost
- Simplified deployment - Deploy related components together
- Enhanced functionality - Add capabilities without modifying main app
Without multi-container Pods, you would need to:
- Build all functionality into one container
- Use complex inter-Pod networking
- Duplicate sidecar logic across applications
- Manage separate deployments for related components
#Container Communication
Containers in a Pod can communicate in several ways:
#Via Localhost
Containers share the network namespace:
apiVersion: v1
kind: Pod
metadata:
    name: multi-container-pod
spec:
    containers:
        - name: web-app
          image: nginx:1.25
          ports:
              - containerPort: 80
        - name: log-agent
          image: busybox:1.36
          command:
              - sh
              - -c
              - while true; do wget -q -O- http://localhost:80; sleep 5; done
The log-agent container accesses web-app via localhost:80.
#Via Shared Volumes
Containers can share files through volumes:
apiVersion: v1
kind: Pod
metadata:
    name: shared-volume-pod
spec:
    containers:
        - name: writer
          image: busybox:1.36
          command:
              - sh
              - -c
              - while true; do date >> /data/log.txt; sleep 5; done
          volumeMounts:
              - name: shared-data
                mountPath: /data
        - name: reader
          image: busybox:1.36
          command:
              - sh
              - -c
              - tail -f /data/log.txt
          volumeMounts:
              - name: shared-data
                mountPath: /data
    volumes:
        - name: shared-data
          emptyDir: {}
Both containers read/write to the same volume.
#Via Environment Variables
Share configuration through environment:
apiVersion: v1
kind: Pod
metadata:
    name: env-pod
spec:
    containers:
        - name: app
          image: nginx:1.25
          env:
              - name: APP_PORT
                value: "80"
        - name: sidecar
          image: busybox:1.36
          env:
              - name: APP_PORT
value: "80"#Multi-Container Pod Patterns
There are three common design patterns for multi-container Pods:
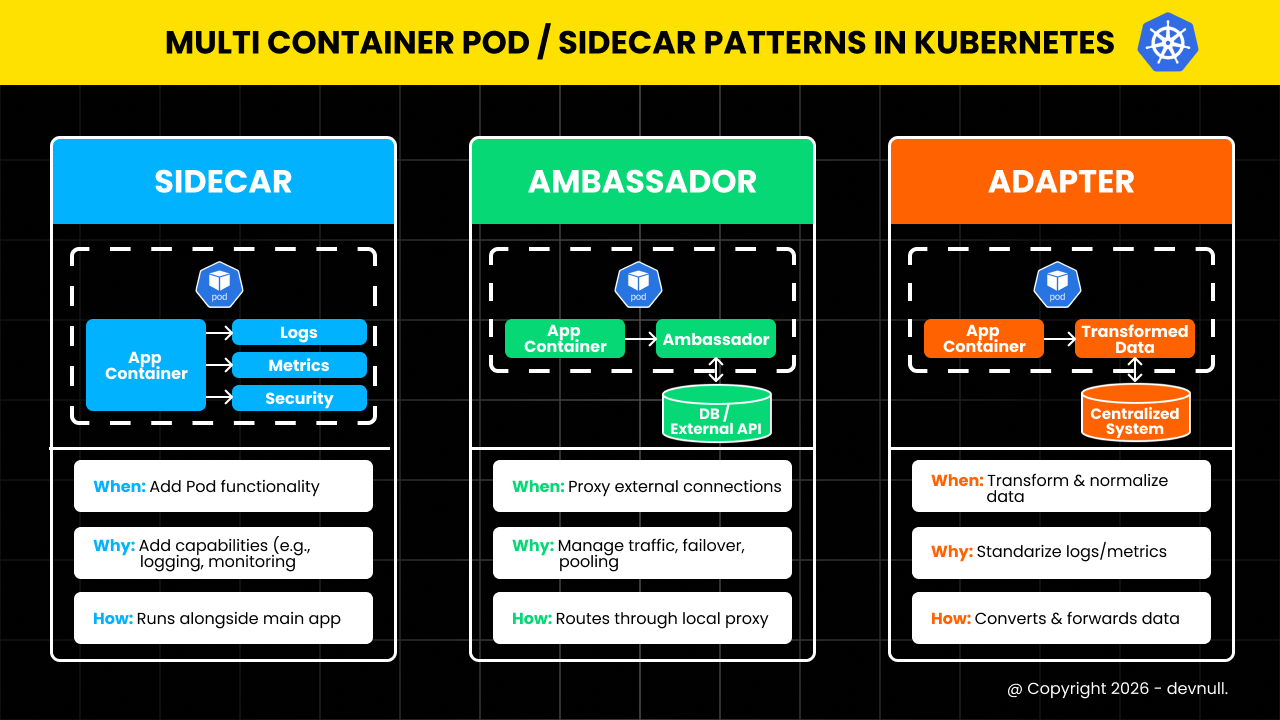 Multi Container or Sidecar Patterns
#1. Sidecar Pattern
A sidecar container enhances or extends the main container's functionality.
Use cases:
- Log shipping and aggregation
- Monitoring and metrics collection
- Configuration synchronization
- Security proxies
- Service mesh proxies
Example: Log Sidecar
apiVersion: v1
kind: Pod
metadata:
    name: web-with-logging
spec:
    containers:
        # Main application container
        - name: web-app
          image: nginx:1.25
          ports:
              - containerPort: 80
          volumeMounts:
              - name: logs
                mountPath: /var/log/nginx
        # Sidecar container for log shipping
        - name: log-shipper
          image: fluent/fluentd:v1.16
          volumeMounts:
              - name: logs
                mountPath: /var/log/nginx
          env:
              - name: FLUENTD_CONF
                value: fluent.conf
    volumes:
        - name: logs
          emptyDir: {}
The log-shipper sidecar reads logs from the shared volume and ships them to a central logging system.
Example: Metrics Sidecar
apiVersion: v1
kind: Pod
metadata:
    name: app-with-metrics
spec:
    containers:
        # Main application
        - name: application
          image: myapp:latest
          ports:
              - containerPort: 8080
        # Metrics exporter sidecar
        - name: metrics-exporter
          image: prom/nginx-exporter:latest
          ports:
              - containerPort: 9113
          args:
- -nginx.scrape-uri=http://localhost:8080/metrics#2. Ambassador Pattern
An ambassador container proxies network connections for the main container.
Use cases:
- Database connection pooling
- Circuit breaking
- Retry logic
- Protocol translation
- Service discovery
Example: Database Ambassador
apiVersion: v1
kind: Pod
metadata:
    name: app-with-db-ambassador
spec:
    containers:
        # Main application
        - name: application
          image: myapp:latest
          env:
              - name: DATABASE_HOST
                value: "localhost"
              - name: DATABASE_PORT
                value: "5432"
        # Ambassador for database connection
        - name: db-ambassador
          image: haproxy:2.8
          ports:
              - containerPort: 5432
          volumeMounts:
              - name: config
                mountPath: /usr/local/etc/haproxy
    volumes:
        - name: config
          configMap:
              name: haproxy-config
The application connects to localhost:5432, and the ambassador proxies to the actual database with connection pooling and retry logic.
Example: Service Mesh Ambassador
apiVersion: v1
kind: Pod
metadata:
    name: app-with-proxy
spec:
    containers:
        # Main application
        - name: application
          image: myapp:latest
          ports:
              - containerPort: 8080
        # Envoy proxy ambassador
        - name: envoy-proxy
          image: envoyproxy/envoy:v1.28
          ports:
              - containerPort: 9901
          volumeMounts:
              - name: envoy-config
                mountPath: /etc/envoy
    volumes:
        - name: envoy-config
          configMap:
name: envoy-configuration#3. Adapter Pattern
An adapter container transforms the main container's output to match external requirements.
Use cases:
- Log format standardization
- Metrics format conversion
- Data transformation
- Protocol adaptation
Example: Log Adapter
apiVersion: v1
kind: Pod
metadata:
    name: app-with-log-adapter
spec:
    containers:
        # Main application (writes custom log format)
        - name: application
          image: legacy-app:latest
          volumeMounts:
              - name: logs
                mountPath: /var/log/app
        # Adapter to convert logs to standard format
        - name: log-adapter
          image: log-transformer:latest
          volumeMounts:
              - name: logs
                mountPath: /var/log/app
              - name: transformed-logs
                mountPath: /var/log/transformed
          command:
              - sh
              - -c
              - |
                  while true; do
                    if [ -f /var/log/app/app.log ]; then
                      tail -f /var/log/app/app.log | \
                      awk '{print "{\"timestamp\":\""$1"\",\"level\":\""$2"\",\"message\":\""$3"\"}"}' \
                      > /var/log/transformed/app.json
                    fi
                    sleep 1
                  done
    volumes:
        - name: logs
          emptyDir: {}
        - name: transformed-logs
          emptyDir: {}
Example: Metrics Adapter
apiVersion: v1
kind: Pod
metadata:
    name: app-with-metrics-adapter
spec:
    containers:
        # Application exposing custom metrics
        - name: application
          image: myapp:latest
          ports:
              - containerPort: 8080
        # Adapter to convert to Prometheus format
        - name: metrics-adapter
          image: metrics-converter:latest
          ports:
              - containerPort: 9090
          env:
              - name: SOURCE_METRICS_URL
                value: "http://localhost:8080/stats"
              - name: TARGET_FORMAT
value: "prometheus"#Init Containers
Init containers run before main containers and must complete successfully.
#Basic Init Container
apiVersion: v1
kind: Pod
metadata:
    name: pod-with-init
spec:
    initContainers:
        - name: init-setup
          image: busybox:1.36
          command:
              - sh
              - -c
              - |
                  echo "Initializing..."
                  sleep 5
                  echo "Setup complete" > /work-dir/ready.txt
          volumeMounts:
              - name: workdir
                mountPath: /work-dir
    containers:
        - name: main-app
          image: nginx:1.25
          volumeMounts:
              - name: workdir
                mountPath: /work-dir
    volumes:
        - name: workdir
emptyDir: {}#Multiple Init Containers
Init containers run sequentially:
apiVersion: v1
kind: Pod
metadata:
    name: multi-init-pod
spec:
    initContainers:
        # First init container
        - name: download-config
          image: curlimages/curl:latest
          command:
              - sh
              - -c
              - curl -o /config/app.conf https://config-server/app.conf
          volumeMounts:
              - name: config
                mountPath: /config
        # Second init container (runs after first completes)
        - name: validate-config
          image: busybox:1.36
          command:
              - sh
              - -c
              - |
                  if [ -f /config/app.conf ]; then
                    echo "Config valid"
                  else
                    echo "Config missing" && exit 1
                  fi
          volumeMounts:
              - name: config
                mountPath: /config
    containers:
        - name: application
          image: myapp:latest
          volumeMounts:
              - name: config
                mountPath: /etc/app
    volumes:
        - name: config
emptyDir: {}#Practical Examples
#Example 1: Web Application with Logging and Metrics
apiVersion: v1
kind: Pod
metadata:
    name: web-app-complete
    labels:
        app: web
spec:
    containers:
        # Main web application
        - name: nginx
          image: nginx:1.25
          ports:
              - containerPort: 80
          volumeMounts:
              - name: logs
                mountPath: /var/log/nginx
              - name: html
                mountPath: /usr/share/nginx/html
          resources:
              requests:
                  memory: "128Mi"
                  cpu: "100m"
              limits:
                  memory: "256Mi"
                  cpu: "200m"
        # Log shipping sidecar
        - name: log-shipper
          image: fluent/fluentd:v1.16
          volumeMounts:
              - name: logs
                mountPath: /var/log/nginx
          resources:
              requests:
                  memory: "64Mi"
                  cpu: "50m"
              limits:
                  memory: "128Mi"
                  cpu: "100m"
        # Metrics exporter sidecar
        - name: nginx-exporter
          image: nginx/nginx-prometheus-exporter:latest
          ports:
              - containerPort: 9113
          args:
              - -nginx.scrape-uri=http://localhost:80/stub_status
          resources:
              requests:
                  memory: "32Mi"
                  cpu: "25m"
              limits:
                  memory: "64Mi"
                  cpu: "50m"
    volumes:
        - name: logs
          emptyDir: {}
        - name: html
emptyDir: {}#Example 2: Application with Database Proxy
apiVersion: v1
kind: Pod
metadata:
    name: app-with-db-proxy
spec:
    containers:
        # Main application
        - name: application
          image: myapp:latest
          env:
              - name: DB_HOST
                value: "127.0.0.1"
              - name: DB_PORT
                value: "5432"
          ports:
              - containerPort: 8080
        # Cloud SQL Proxy sidecar
        - name: cloud-sql-proxy
          image: gcr.io/cloudsql-docker/gce-proxy:latest
          command:
              - /cloud_sql_proxy
              - -instances=project:region:instance=tcp:5432
          securityContext:
runAsNonRoot: true#Example 3: Git Sync Sidecar
apiVersion: v1
kind: Pod
metadata:
    name: web-with-git-sync
spec:
    initContainers:
        # Clone repository initially
        - name: git-clone
          image: alpine/git:latest
          command:
              - git
              - clone
              - https://github.com/user/repo.git
              - /git
          volumeMounts:
              - name: git-repo
                mountPath: /git
    containers:
        # Web server serving git content
        - name: nginx
          image: nginx:1.25
          ports:
              - containerPort: 80
          volumeMounts:
              - name: git-repo
                mountPath: /usr/share/nginx/html
        # Git sync sidecar
        - name: git-sync
          image: k8s.gcr.io/git-sync:v3.6.3
          env:
              - name: GIT_SYNC_REPO
                value: "https://github.com/user/repo.git"
              - name: GIT_SYNC_DEST
                value: "repo"
              - name: GIT_SYNC_WAIT
                value: "60"
          volumeMounts:
              - name: git-repo
                mountPath: /tmp/git
    volumes:
        - name: git-repo
emptyDir: {}#Container Lifecycle
Understanding container startup order and dependencies:
#Startup Order
- Init containers run sequentially (one after another)
- Main containers start in parallel after all init containers complete
- Readiness probes determine when container is ready
- Liveness probes monitor container health
#Example with Lifecycle Hooks
apiVersion: v1
kind: Pod
metadata:
    name: lifecycle-pod
spec:
    containers:
        - name: main-app
          image: nginx:1.25
          lifecycle:
              postStart:
                  exec:
                      command:
                          - sh
                          - -c
                          - echo "Container started" > /usr/share/message
              preStop:
                  exec:
                      command:
                          - sh
                          - -c
                          - nginx -s quit; sleep 10
        - name: sidecar
          image: busybox:1.36
          command:
              - sh
              - -c
- while true; do sleep 3600; done#Resource Management
Set resources for each container:
apiVersion: v1
kind: Pod
metadata:
    name: resource-managed-pod
spec:
    containers:
        - name: main-app
          image: myapp:latest
          resources:
              requests:
                  memory: "512Mi"
                  cpu: "500m"
              limits:
                  memory: "1Gi"
                  cpu: "1000m"
        - name: sidecar
          image: sidecar:latest
          resources:
              requests:
                  memory: "128Mi"
                  cpu: "100m"
              limits:
                  memory: "256Mi"
                  cpu: "200m"
Total Pod resources = sum of all container resources.
#Common Mistakes and Pitfalls
#Mistake 1: Port Conflicts
Problem: Multiple containers trying to use the same port.
Solution: Use different ports for each container:
containers:
    - name: app1
      ports:
          - containerPort: 8080
    - name: app2
      ports:
- containerPort: 8081 # Different port#Mistake 2: Not Sharing Volumes
Problem: Containers can't access shared data.
Solution: Mount the same volume in both containers:
volumeMounts:
    - name: shared-data
mountPath: /data#Mistake 3: Tight Coupling
Problem: Containers too dependent on each other.
Solution: Use multi-container Pods only when containers truly need to be co-located.
#Mistake 4: Resource Starvation
Problem: One container consuming all resources.
Solution: Set resource limits for each container.
#Mistake 5: Complex Debugging
Problem: Hard to troubleshoot multi-container issues.
Solution: Check logs for each container:
sudo kubectl logs <pod-name> -c <container-name>#Best Practices
#Use Multi-Container Pods Sparingly
Only when containers must be co-located:
# Good: Tightly coupled (app + log shipper)
# Bad: Loosely coupled (frontend + backend)#Set Resource Limits
Always define resources for each container:
resources:
    requests:
        memory: "128Mi"
        cpu: "100m"
    limits:
        memory: "256Mi"
cpu: "200m"#Use Init Containers for Setup
Separate initialization from runtime:
initContainers:
    - name: setup
      # Setup tasks
containers:
    - name: app
# Main application#Implement Health Checks
Add probes for each container:
livenessProbe:
    httpGet:
        path: /health
        port: 8080
readinessProbe:
    httpGet:
        path: /ready
port: 8080#Use Meaningful Container Names
Choose descriptive names:
# Good
- name: web-server
- name: log-shipper
- name: metrics-exporter

# Avoid
- name: container1
- name: sidecar
- name: c2#Viewing Multi-Container Pod Details
#Get Pod with Container Info
sudo kubectl get pod <pod-name> -o jsonpath='{.spec.containers[*].name}'#View Logs from Specific Container
sudo kubectl logs <pod-name> -c <container-name>#Execute Command in Specific Container
sudo kubectl exec -it <pod-name> -c <container-name> -- sh#Describe Pod
sudo kubectl describe pod <pod-name>Shows all containers, init containers, and their states.
#Conclusion
In episode 20, we've explored Multi-Container Pods in Kubernetes. We've learned about common design patterns, container communication, and best practices for building modular applications.
Key takeaways:
- Multi-container Pods run multiple containers as a single unit
- Containers share network namespace and storage volumes
- Three main patterns: Sidecar, Ambassador, Adapter
- Init containers run before main containers
- Containers communicate via localhost and shared volumes
- Each container should have resource limits
- Use multi-container Pods for tightly coupled components only
- Sidecar enhances main container (logging, monitoring)
- Ambassador proxies connections (database, service mesh)
- Adapter transforms output (log format, metrics)
- Always set resource requests and limits per container
Multi-container Pods enable powerful architectural patterns in Kubernetes. By understanding these patterns, you can build modular, maintainable applications with clear separation of concerns while maintaining tight integration where needed.
Are you getting a clearer understanding of Multi-Container Pods in Kubernetes? Keep your learning momentum going and look forward to the next episode!