In this episode, we'll start hands-on practice by installing a Kubernetes Cluster using various methods: Minikube, Kind, K3s, and manual K8s installation using kubeadm.
After discussing Kubernetes concepts and architecture in the previous episode, in episode 3 we'll start hands-on practice by installing a Kubernetes Cluster for both Master Node and Worker Node. To install a Kubernetes Cluster for development, testing, or learning purposes, there are several methods using the following tools:
As container orchestration continues to evolve, developers have many tools available for developing Kubernetes locally. Among these tools, Minikube, Kind, K3s, and K8s stand out as popular choices for developers who want to test, develop, and run Kubernetes applications locally.
Minikube is a widely adopted tool designed to run a Kubernetes Cluster on various operating systems, including macOS, Linux, and Windows. Minikube provides a simple way for developers to run Kubernetes locally and is ideal for testing applications in a controlled environment. Minikube supports several hypervisors like VirtualBox, VMware, and HyperKit, making it flexible for various infrastructures. Additionally, Minikube offers features like the ability to enable or disable certain Kubernetes components, allowing developers to customize their environment to match production settings. This flexibility is crucial for debugging and ensuring applications behave as expected before deployment.
Kind, short for Kubernetes in Docker, is another option that allows users to create a Kubernetes Cluster using Docker containers as nodes. This approach follows containerized principles, enabling quick cluster setup and teardown. Kind is very useful for testing Kubernetes itself and is typically used by developers in CI/CD pipelines. Its ability to run clusters in Docker means developers can easily replicate their production environment in a lightweight way, making it an excellent choice for continuous integration workflows. Additionally, Kind supports multi-node clusters, which can be beneficial for simulating more complex scenarios that developers might encounter in real-world applications.
K3s, on the other hand, is a lightweight Kubernetes distribution developed by Rancher Labs. This distribution aims to provide a simplified version of Kubernetes, making it suitable for environments with limited resources. K3s is very useful for edge computing, IoT applications, and scenarios where a full Kubernetes installation cannot be deployed due to hardware limitations. With a binary size under 100 MB, K3s is designed to run on low-power devices like Raspberry Pi and can be deployed quickly and easily. Additionally, K3s comes with built-in Helm support, making it easy to manage applications and services within the cluster, and automatically handles common tasks like certificate and network management, which can significantly reduce operational costs for users.
Kubernetes, often abbreviated as K8s, is an open-source container orchestration platform used for automating deployment, scaling, and management of containerized applications. Unlike Minikube, Kind, and K3s, Kubernetes is more commonly used in production environments, though it can also be used for development and testing.
When comparing the main features of Minikube, Kind, K3s, and K8s, it's important to consider several factors that determine their usefulness and performance:
Minikube generally requires more resources because it runs a full Kubernetes Cluster in a Virtual Machine (depending on the operating system; if Minikube runs on Linux, it can run directly in a container). Kind, while lighter than Minikube, still requires Docker resources. K3s is optimized for minimal resource consumption, while K8s itself is intended for production environments and will consume significantly more resources compared to other tools.
Minikube offers a very easy installation process, although setting up the required Hypervisor can be time-consuming. Kind has simpler setup that only requires Docker. K3s can often be installed with just a few commands, while K8s requires fairly complex installation because each component must be installed manually, such as kubectl, kubeadm, CRI, CNI, and so on.
Minikube provides a full-featured networking stack, including LoadBalancer support. Kind's networking depends on Docker's networking capabilities. K3s includes built-in options for lightweight networking and storage management, while K8s supports all features but still requires more complex setup.
Minikube supports add-ons that can easily enhance functionality. Kind allows users to customize clusters through configuration files like YAML files, and K3s is compatible with Kubernetes, allowing the use of existing Kubernetes extensions and APIs.
Another important aspect to consider is the use case scenario for each tool. Minikube is very useful for developers who want to test applications in an environment very similar to a production Kubernetes Cluster. This makes it ideal for those who need to validate their applications against the full Kubernetes API. On the other hand, Kind shines in CI/CD environments where fast cluster spin-up and tear-down are essential for automated testing. Its ability to create clusters in Docker containers makes it a favorite among developers who want to integrate Kubernetes testing into their existing workflows.
Additionally, community support and documentation around these tools can significantly influence their adoption. Minikube has a strong community and extensive documentation, making it easy for newcomers to find resources and solve problems. Kind, while still relatively new, has benefited from Kubernetes community support, ensuring its documentation is continuously updated. K3s, developed by Rancher Labs, also has strong community engagement and offers comprehensive resources, especially for those interested in deploying lightweight Kubernetes Clusters in edge computing or IoT device scenarios.
Evaluating performance across Minikube, Kind, and K3s requires examining various metrics, such as startup time, resource utilization, and operational stability.
Kind is often the fastest to start because it directly uses Docker containers. Minikube can take longer to bootstrap due to the overhead of starting a virtual machine, while K3s offers fast deployment with minimal configuration.
K3s excels in this category because it's designed to run in resource-limited settings. Minikube tends to consume more RAM and CPU, while Kind's Docker container-based approach can be more efficient than traditional virtual machine approaches.
All four have proven stable in various environments. However, K3s includes a lightweight built-in etcd alternative that can improve reliability and performance.
When should you choose Minikube, Kind, K3s, or K8s? Understanding scenarios where each tool excels can significantly influence your decision in selecting the right tool for local Kubernetes development.
Best suited for development seeking an out-of-the-box Kubernetes experience with a complete feature set. Ideal for exploring Kubernetes capabilities, testing robust applications, or when working with various add-ons.
Excellent for continuous integration environments that prioritize speed and efficiency. This type is favored by developers who need to quickly spin up clusters for testing purposes.
The right solution for developers targeting edge computing, IoT devices, or resource-constrained applications. Its lightweight nature makes it the preferred choice when Kubernetes must run smoothly on less powerful hardware.
Highly suitable for production environments, though it can also be used for development or testing. All Kubernetes features are certainly supported, but it requires more complex installation and configuration and consumes more resources compared to other tools.
However, before starting installation and setup, we need some preparation first, including:
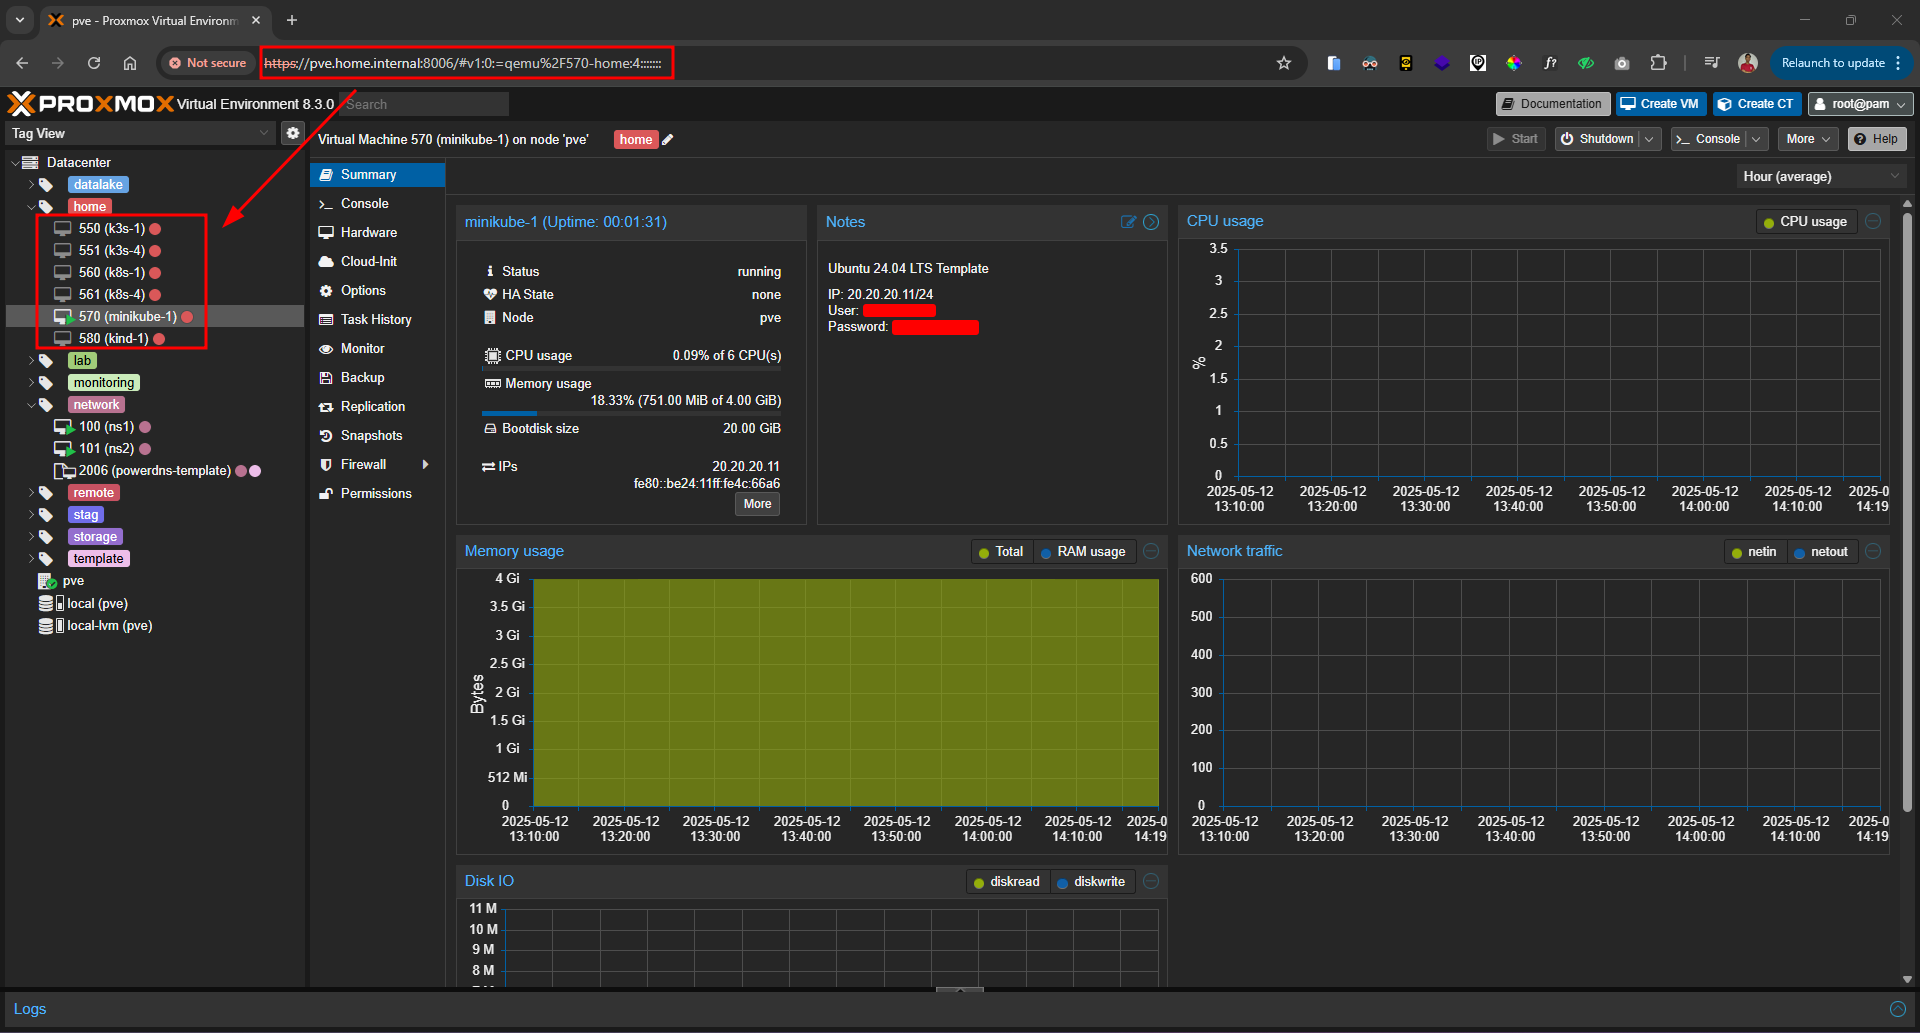
Note: Here I've prepared a Virtual Machine on Proxmox with Ubuntu Server 24.04 LTS, installed Docker / Containerd, and set up local domain pointing on the local Name Server.
Virtual Machine / OS
Pre-Requisites 1
Docker / Containerd (Container Runtime Interface or CRI)
Pre-Requisites 2
Local domain pointing (optional)
Pre-Requisites 3
Note: For those using the same operating system, Ubuntu Server 24.04 LTS, and want to install Docker, you can use the following commands:
After the binary is successfully installed, the next step is to run Minikube. To run it, you can use the following command:
Note: The following command will create a Kubernetes Cluster, and Minikube will download required dependencies like Kubernetes, CNI (Container Networking Interface), and so on. The default Kubernetes Cluster created by Minikube is 1 node, where the Control Plane (Master Node) and Data Plane (Worker Node) will be one component on the same node.
To create a Kubernetes Cluster with more than 1 node in Minikube, you can run the following command:
However, running a Kubernetes Cluster with more than 1 node will certainly consume more resources compared to just 1 node.
If you want to run Minikube with its network directly connected to the Host, you can run Minikube using the following command:
bash
minikube start --vm-drive=none
However, the above command requires additional manual setup for dependencies like CRI and CNI. For more information, you can read this issue: #33
bash
minikube start
Note: Here, since I've allocated considerable hardware resources to the Virtual Machine, I'll run the Minikube Kubernetes Cluster with a total of 3 nodes: 1 Control Plane (Master Node) and 2 Data Plane (Worker Nodes). I'm running it using the following command:
bash
minikube start --nodes 3 -p minikube
If the above command runs successfully, the output will look like this:
bash
😄 minikube v1.35.0 on Ubuntu 24.04 (kvm/amd64)✨ Automatically selected the docker driver. Other choices: ssh, none📌 Using Docker driver with root privileges👍 Starting "minikube" primary control-plane node in "minikube" cluster🚜 Pulling base image v0.0.46 ...💾 Downloading Kubernetes v1.32.0 preload ... > preloaded-images-k8s-v18-v1...: 333.57 MiB / 333.57 MiB 100.00% 1.72 Mi > gcr.io/k8s-minikube/kicbase...: 500.31 MiB / 500.31 MiB 100.00% 1.67 Mi🔥 Creating docker container (CPUs=2, Memory=2200MB) ...🐳 Preparing Kubernetes v1.32.0 on Docker 27.4.1 ... ▪ Generating certificates and keys ... ▪ Booting up control plane ... ▪ Configuring RBAC rules ...🔗 Configuring CNI (Container Networking Interface) ...🔎 Verifying Kubernetes components... ▪ Using image gcr.io/k8s-minikube/storage-provisioner:v5🌟 Enabled addons: storage-provisioner, default-storageclass👍 Starting "minikube-m02" worker node in "minikube" cluster🚜 Pulling base image v0.0.46 ...🔥 Creating docker container (CPUs=2, Memory=2200MB) ...🌐 Found network options: ▪ NO_PROXY=192.168.49.2🐳 Preparing Kubernetes v1.32.0 on Docker 27.4.1 ... ▪ env NO_PROXY=192.168.49.2🔎 Verifying Kubernetes components...👍 Starting "minikube-m03" worker node in "minikube" cluster🚜 Pulling base image v0.0.46 ...🔥 Creating docker container (CPUs=2, Memory=2200MB) ...🌐 Found network options: ▪ NO_PROXY=192.168.49.2,192.168.49.3🐳 Preparing Kubernetes v1.32.0 on Docker 27.4.1 ... ▪ env NO_PROXY=192.168.49.2 ▪ env NO_PROXY=192.168.49.2,192.168.49.3🔎 Verifying Kubernetes components...💡 kubectl not found. If you need it, try: 'minikube kubectl -- get pods -A'🏄 Done! kubectl is now configured to use "minikube" cluster and "default" namespace by default
After the Kubernetes Cluster is successfully created, you can add the following alias to your ~/.bashrc or ~/.zshrc file to make kubectl commands easier:
bash
alias kubectl="minikube kubectl --"
To verify that the Kubernetes Cluster was successfully created, you can run the following command to check which nodes are registered in the cluster:
bash
kubectl get nodes -o wide
If the above command runs successfully, you'll see how many nodes are in the cluster and other information like STATUS, ROLE, VERSION, and so on:
To further verify that the Kubernetes Cluster installation was successful, we can try deploying a default Nginx application. To deploy it, you can create a YAML file using the following command:
Note: If you don't want to write the following YAML configuration manually, you can use the one from the GitHub repository I created:
After that, deploy the YAML file configuration to the Kubernetes Cluster using the following command:
bash
kubectl apply -f nginx-deployment.yml
Next, check if the pod and service are running successfully using the following commands:
bash
kubectl get podskubectl get svc
If the pod and service are running successfully, the output will look like this:
bash
NAME READY STATUS RESTARTS AGEnginx-deployment-96b9d695-546qw 1/1 Running 0 101sNAME TYPE CLUSTER-IP EXTERNAL-IP PORT(S) AGEkubernetes ClusterIP 10.96.0.1 <none> 443/TCP 20mnginx-service NodePort 10.106.176.104 <none> 80:30080/TCP 99s
To further verify that Nginx is running and accessible, you can check using the following command:
Note: Adjust the IP address of the node and the port of the service being used
bash
curl http://192.168.49.2:30080
If the above command runs successfully, the result will look like this:
html
<html> <head> <title>Welcome to nginx!</title> <style> html { color-scheme: light dark; } body { width: 35em; margin: 0 auto; font-family: Tahoma, Verdana, Arial, sans-serif; } </style> </head> <body> <h1>Welcome to nginx!</h1> <p> If you see this page, the nginx web server is successfully installed and working. Further configuration is required. </p> <p> For online documentation and support please refer to <a href="http://nginx.org/">nginx.org</a>. Commercial support is available at <a href="http://nginx.com/">nginx.com</a>. </p> <p><em>Thank you for using nginx.</em></p> </body></html>
After the binary is successfully installed, the next step is to run Kind. To run it, you can use the following command:
Note: The following command will create a Kubernetes Cluster, and Kind will download required dependencies like Kubernetes images, CNI (Container Networking Interface), and so on. The default Kubernetes Cluster created by Kind is 1 node, where the Control Plane (Master Node) and Data Plane (Worker Node) will be one component on the same node.
To create a Kubernetes Cluster with more than 1 node in Kind, you can define a YAML file first like this:
However, running a Kubernetes Cluster with more than 1 node will certainly consume more resources compared to just 1 node.
bash
kind create cluster
Note: Here, since I've allocated considerable hardware resources to the Virtual Machine, I'll run the Kind Kubernetes Cluster with a total of 3 nodes: 1 Control Plane (Master Node) and 2 Data Plane (Worker Nodes). I'm running it using the following command:
To further verify that the Kubernetes Cluster installation was successful, we can try deploying a default Nginx application. To deploy it, you can create a YAML file using the following command:
Note: If you don't want to write the following YAML configuration manually, you can use the one from the GitHub repository I created:
After that, deploy the YAML file configuration to the Kubernetes Cluster using the following command:
bash
kubectl apply -f nginx-deployment.yml
Next, check if the pod and service are running successfully using the following commands:
bash
kubectl get podskubectl get svc
If the pod and service are running successfully, the output will look like this:
bash
NAME READY STATUS RESTARTS AGEnginx-deployment-96b9d695-dp2hw 1/1 Running 0 47sNAME TYPE CLUSTER-IP EXTERNAL-IP PORT(S) AGEkubernetes ClusterIP 10.96.0.1 <none> 443/TCP 2m45snginx-service NodePort 10.96.169.192 <none> 80:30080/TCP 50s
To further verify that Nginx is running and accessible, you can check using the following command:
Note: Adjust the IP address of the node and the port of the service being used
bash
curl http://172.18.0.4:30080
If the above command runs successfully, the result will look like this:
html
<html> <head> <title>Welcome to nginx!</title> <style> html { color-scheme: light dark; } body { width: 35em; margin: 0 auto; font-family: Tahoma, Verdana, Arial, sans-serif; } </style> </head> <body> <h1>Welcome to nginx!</h1> <p> If you see this page, the nginx web server is successfully installed and working. Further configuration is required. </p> <p> For online documentation and support please refer to <a href="http://nginx.org/">nginx.org</a>. Commercial support is available at <a href="http://nginx.com/">nginx.com</a>. </p> <p><em>Thank you for using nginx.</em></p> </body></html>
To install K3s, we can directly fetch the installer script and execute it using the following command:
bash
curl -sfL https://get.k3s.io | sh -
The above command will directly run the K3s installer script automatically, which will download the k3s, kubectl, crictl binaries, and so on. So if the above command runs successfully, the output will look like this:
bash
[INFO] Finding release for channel stable[INFO] Using v1.32.4+k3s1 as release[INFO] Downloading hash https://github.com/k3s-io/k3s/releases/download/v1.32.4+k3s1/sha256sum-amd64.txt[INFO] Skipping binary downloaded, installed k3s matches hash[INFO] Skipping installation of SELinux RPM[INFO] Skipping /usr/local/bin/kubectl symlink to k3s, already exists[INFO] Skipping /usr/local/bin/crictl symlink to k3s, already exists[INFO] Skipping /usr/local/bin/ctr symlink to k3s, command exists in PATH at /usr/bin/ctr[INFO] Creating killall script /usr/local/bin/k3s-killall.sh[INFO] Creating uninstall script /usr/local/bin/k3s-uninstall.sh[INFO] env: Creating environment file /etc/systemd/system/k3s.service.env[INFO] systemd: Creating service file /etc/systemd/system/k3s.service[INFO] systemd: Enabling k3s unitCreated symlink /etc/systemd/system/multi-user.target.wants/k3s.service → /etc/systemd/system/k3s.service[INFO] No change detected so skipping service start
To verify that K3s was successfully installed, we can run the following command:
bash
sudo kubectl get nodes -o wide
The result will look like this:
bash
NAME STATUS ROLES AGE VERSION INTERNAL-IP EXTERNAL-IP OS-IMAGE KERNEL-VERSION CONTAINER-RUNTIMEk3s-1 Ready control-plane,master 103s v1.32.4+k3s1 20.20.20.11 <none> Ubuntu 24.04.1 LTS 6.8.0-51-generic containerd://2.0.4-k3s2
The default Kubernetes Cluster created by K3s is 1 node, where the Control Plane (Master Node) and Data Plane (Worker Node) will be one component on the same node.
To create a Kubernetes Cluster with more than 1 node in K3s, we can join agent nodes (or worker nodes) to the server node (master node). To join them, run the following commands:
Get the token from the server node
Note: Run the following command on the server node (master node)
bash
sudo cat /var/lib/rancher/k3s/server/node-token
Register or join the agent node to the cluster using the following command:
Note: Run the following command on the agent node (worker node) that wants to join the cluster. Replace [server_node] and [server_token] accordingly. For example:
bash
curl -sfL https://get.k3s.io | K3S_URL=https://k3s-1.home.internal:6443 K3S_TOKEN=K10b38a2664587403a2a91c5e62db5e8bd446be0676d83d41faa1625dfb8f4ffd98::server:be12c62352f3e34c487ce809072b87a6 sh -
bash
curl -sfL https://get.k3s.io | K3S_URL=https://[server_node]:6443 K3S_TOKEN=[server_token] sh -
Verify that the agent node has successfully joined the cluster
Note: Run the following kubectl command on the server node (master node).
bash
sudo kubectl get pods -o wide
If the agent node successfully joins, the output will look like this:
bash
NAME STATUS ROLES AGE VERSION INTERNAL-IP EXTERNAL-IP OS-IMAGE KERNEL-VERSION CONTAINER-RUNTIMEk3s-1 Ready control-plane,master 8m17s v1.32.4+k3s1 20.20.20.11 <none> Ubuntu 24.04.1 LTS 6.8.0-51-generic containerd://2.0.4-k3s2k3s-4 Ready <none> 9s v1.32.4+k3s1 20.20.20.14 <none> Ubuntu 24.04.1 LTS 6.8.0-51-generic containerd://2.0.4-k3s2
To further verify that the Kubernetes Cluster installation was successful, we can try deploying a default Nginx application. To deploy it, you can create a YAML file using the following command:
Note: If you don't want to write the following YAML configuration manually, you can use the one from the GitHub repository I created:
After that, deploy the YAML file configuration to the Kubernetes Cluster using the following command:
bash
sudo kubectl apply -f nginx-deployment.yml
Next, check if the pod and service are running successfully using the following commands:
bash
sudo kubectl get podssudo kubectl get svc
If the pod and service are running successfully, the output will look like this:
bash
NAME READY STATUS RESTARTS AGEnginx-deployment-96b9d695-9wzxn 1/1 Running 0 116sNAME TYPE CLUSTER-IP EXTERNAL-IP PORT(S) AGEkubernetes ClusterIP 10.43.0.1 <none> 443/TCP 12mnginx-service NodePort 10.43.159.48 <none> 80:30080/TCP 2m6s
To further verify that Nginx is running and accessible, you can check using the following command:
Note: Adjust the IP address of the node and the port of the service being used
bash
curl http://20.20.20.11:30080
If the above command runs successfully, the result will look like this:
Note: Since K3s runs on the host network, we can directly access the IP 20.20.20.11 from any computer on the same network, like my laptop below.
Nginx K3s
html
<html> <head> <title>Welcome to nginx!</title> <style> html { color-scheme: light dark; } body { width: 35em; margin: 0 auto; font-family: Tahoma, Verdana, Arial, sans-serif; } </style> </head> <body> <h1>Welcome to nginx!</h1> <p> If you see this page, the nginx web server is successfully installed and working. Further configuration is required. </p> <p> For online documentation and support please refer to <a href="http://nginx.org/">nginx.org</a>. Commercial support is available at <a href="http://nginx.com/">nginx.com</a>. </p> <p><em>Thank you for using nginx.</em></p> </body></html>
To install a Kubernetes Cluster using K8s, it's slightly different from the previous tools. We need to manually install starting from adding the repository, installing dependencies like kubeadm, kubelet, kubectl, CRI, and CNI.
After all the above processes are completed, we can create the Kubernetes Cluster by initializing the Master Node or Control Plane using the kubeadm command like this:
Note: Replace [ip_master_node] with the IP address being used. For example:
If the above command runs successfully, you should see output like this:
bash
I0512 13:14:15.500217 3037 version.go:261] remote version is much newer: v1.33.0; falling back to: stable-1.32W0512 13:14:15.780527 3037 version.go:109] could not fetch a Kubernetes version from the internet: unable to get URL "https://dl.k8s.io/release/stable-1.32.txt": Get "https://cdn.dl.k8s.io/release/stable-1.32.txt": dial tcp 146.75.45.55:443: connect: no route to hostW0512 13:14:15.780549 3037 version.go:110] falling back to the local client version: v1.32.4[init] Using Kubernetes version: v1.32.4[preflight] Running pre-flight checks[preflight] Pulling images required for setting up a Kubernetes cluster[preflight] This might take a minute or two, depending on the speed of your internet connection[preflight] You can also perform this action beforehand using 'kubeadm config images pull'W0512 13:14:15.841813 3037 checks.go:846] detected that the sandbox image "registry.k8s.io/pause:3.8" of the container runtime is inconsistent with that used by kubeadm.It is recommended to use "registry.k8s.io/pause:3.10" as the CRI sandbox image.[certs] Using certificateDir folder "/etc/kubernetes/pki"[certs] Generating "ca" certificate and key[certs] Generating "apiserver" certificate and key[certs] apiserver serving cert is signed for DNS names [k8s-1 kubernetes kubernetes.default kubernetes.default.svc kubernetes.default.svc.cluster.local] and IPs [10.96.0.1 20.20.20.11][certs] Generating "apiserver-kubelet-client" certificate and key[certs] Generating "front-proxy-ca" certificate and key[certs] Generating "front-proxy-client" certificate and key[certs] Generating "etcd/ca" certificate and key[certs] Generating "etcd/server" certificate and key[etcd/server serving cert is signed for DNS names [k8s-1 localhost] and IPs [20.20.20.11 127.0.0.1 ::1][certs] Generating "etcd/peer" certificate and key[certs] etcd/peer serving cert is signed for DNS names [k8s-1 localhost] and IPs [20.20.20.11 127.0.0.1 ::1][certs] Generating "etcd/healthcheck-client" certificate and key[certs] Generating "apiserver-etcd-client" certificate and key[certs] Generating "sa" key and public key[kubeconfig] Using kubeconfig folder "/etc/kubernetes"[kubeconfig] Writing "admin.conf" kubeconfig file[kubeconfig] Writing "super-admin.conf" kubeconfig file[kubeconfig] Writing "kubelet.conf" kubeconfig file[kubeconfig] Writing "controller-manager.conf" kubeconfig file[kubeconfig] Writing "scheduler.conf" kubeconfig file[etcd] Creating static Pod manifest for local etcd in "/etc/kubernetes/manifests"[control-plane] Using manifest folder "/etc/kubernetes/manifests"[control-plane] Creating static Pod manifest for "kube-apiserver"[control-plane] Creating static Pod manifest for "kube-controller-manager"[control-plane] Creating static Pod manifest for "kube-scheduler"[kubelet-start] Writing kubelet environment file with flags to file "/var/lib/kubelet/kubeadm-flags.env"[kubelet-start] Writing kubelet configuration to file "/var/lib/kubelet/config.yaml"[kubelet-start] Starting the kubelet[wait-control-plane] Waiting for the kubelet to boot up the control plane as static Pods from directory "/etc/kubernetes/manifests"[kubelet-check] Waiting for a healthy kubelet at http://127.0.0.1:10248/healthz. This can take up to 4m0s[kubelet-check] The kubelet is healthy after 501.293317ms[api-check] Waiting for a healthy API server. This can take up to 4m0s[api-check] The API server is healthy after 6.000748929s[upload-config] Storing the configuration used in ConfigMap "kubeadm-config" in the "kube-system" Namespace[kubelet] Creating a ConfigMap "kubelet-config" in namespace kube-system with the configuration for the kubelets in the cluster[upload-certs] Storing the certificates in Secret "kubeadm-certs" in the "kube-system" Namespace[upload-certs] Using certificate key:43d861fb4825a3ba2477f045569bf8f8f80c41c66c9fee6e245e55b67e29c1cc[mark-control-plane] Marking the node k8s-1 as control-plane by adding the labels: [node-role.kubernetes.io/control-plane node.kubernetes.io/exclude-from-external-load-balancers][mark-control-plane] Marking the node k8s-1 as control-plane by adding the taints [node-role.kubernetes.io/control-plane:NoSchedule][bootstrap-token] Using token: ajrbck.gadjppj7nq122dde[bootstrap-token] Configuring bootstrap tokens, cluster-info ConfigMap, RBAC Roles[bootstrap-token] Configured RBAC rules to allow Node Bootstrap tokens to get nodes[bootstrap-token] Configured RBAC rules to allow Node Bootstrap tokens to post CSRs in order for nodes to get long term certificate credentials[bootstrap-token] Configured RBAC rules to allow the csrapprover controller automatically approve CSRs from a Node Bootstrap Token[bootstrap-token] Configured RBAC rules to allow certificate rotation for all node client certificates in the cluster[bootstrap-token] Creating the "cluster-info" ConfigMap in the "kube-public" namespace[kubelet-finalize] Updating "/etc/kubernetes/kubelet.conf" to point to a rotatable kubelet client certificate and key[addons] Applied essential addon: CoreDNS[addons] Applied essential addon: kube-proxyYour Kubernetes control-plane has initialized successfully!To start using your cluster, you need to run the following as a regular user: mkdir -p $HOME/.kube sudo cp -i /etc/kubernetes/admin.conf $HOME/.kube/config sudo chown $(id -u):$(id -g) $HOME/.kube/configAlternatively, if you are the root user, you can run: export KUBECONFIG=/etc/kubernetes/admin.confYou should now deploy a pod network to the cluster.Run "kubectl apply -f [podnetwork].yaml" with one of the options listed at: https://kubernetes.io/docs/concepts/cluster-administration/addons/You can now join any number of control-plane nodes running the following command on each as root: kubeadm join 20.20.20.11:6443 --token ajrbck.gadjppj7nq122dde \ --discovery-token-ca-cert-hash sha256:a2cfd158e6346f9ca75589ad98e0fcc76d89f03e89b2b5f84e7fe87a4328fdc9 \ --control-plane --certificate-key 43d861fb4825a3ba2477f045569bf8f8f80c41c66c9fee6e245e55b67e29c1ccPlease note that the certificate-key gives access to cluster sensitive data, keep it secret!As a safeguard, uploaded-certs will be deleted in two hours; If necessary, you can use"kubeadm init phase upload-certs --upload-certs" to reload certs afterward.Then you can join any number of worker nodes by running the following on each as root:kubeadm join 20.20.20.11:6443 --token ajrbck.gadjppj7nq122dde \ --discovery-token-ca-cert-hash sha256:a2cfd158e6346f9ca75589ad98e0fcc76d89f03e89b2b5f84e7fe87a4328fdc9
Note: The default Kubernetes Cluster created by K8s is 1 node, where the Control Plane (Master Node) and Data Plane (Worker Node) will be one component on the same node.
To create a Kubernetes Cluster with more than 1 node in K8s, we can join worker nodes (data plane) to the master node (control plane). To join them, run the following command:
If the above command runs successfully, the output will look like this:
bash
[preflight] Running pre-flight checks[preflight] Reading configuration from the "kubeadm-config" ConfigMap in namespace "kube-system"...[preflight] Use 'kubeadm init phase upload-config --config your-config.yaml' to re-upload it.[kubelet-start] Writing kubelet configuration to file "/var/lib/kubelet/config.yaml"[kubelet-start] Writing kubelet environment file with flags to file "/var/lib/kubelet/kubeadm-flags.env"[kubelet-start] Starting the kubelet[kubelet-check] Waiting for a healthy kubelet at http://127.0.0.1:10248/healthz. This can take up to 4m0s[kubelet-check] The kubelet is healthy after 501.725345ms[kubelet-start] Waiting for the kubelet to perform the TLS BootstrapThis node has joined the cluster:* Certificate signing request was sent to apiserver and a response was received.* The Kubelet was informed of the new secure connection details.Run 'kubectl get nodes' on the control-plane to see this node join the cluster.
Make sure the steps like adding the repository, installing dependency packages, configuring the network, and so on are also completed on the node that will join the cluster.
After the Kubernetes Cluster is successfully created, configure kubectl so we can interact with the cluster. To do this, run the following command on the Master Node (Control Plane):
After successfully installing and setting up the Kubernetes Cluster using K8s, we need to install a CNI or Container Networking Interface. Here I'll use Calico as the CNI. To install it, run the following command:
To further verify that the Kubernetes Cluster installation was successful, we can try deploying a default Nginx application. To deploy it, you can create a YAML file using the following command:
Note: If you don't want to write the following YAML configuration manually, you can use the one from the GitHub repository I created:
After that, deploy the YAML file configuration to the Kubernetes Cluster using the following command:
bash
kubectl apply -f nginx-deployment.yml
Next, check if the pod and service are running successfully using the following commands:
bash
kubectl get podskubectl get svc
If the pod and service are running successfully, the output will look like this:
bash
NAME READY STATUS RESTARTS AGEnginx-deployment-96b9d695-bqcpz 1/1 Running 0 21mNAME TYPE CLUSTER-IP EXTERNAL-IP PORT(S) AGEkubernetes ClusterIP 10.96.0.1 <none> 443/TCP 34mnginx-service NodePort 10.107.141.163 <none> 80:30080/TCP 21m
To further verify that Nginx is running and accessible, you can check using the following command:
Note: Adjust the IP address of the node and the port of the service being used
bash
curl http://20.20.20.11:30080
If the above command runs successfully, the result will look like this:
Note: Since K8s runs on the host network, we can directly access the IP 20.20.20.11 from any computer on the same network, like my laptop below.
Nginx K8s
html
<html> <head> <title>Welcome to nginx!</title> <style> html { color-scheme: light dark; } body { width: 35em; margin: 0 auto; font-family: Tahoma, Verdana, Arial, sans-serif; } </style> </head> <body> <h1>Welcome to nginx!</h1> <p> If you see this page, the nginx web server is successfully installed and working. Further configuration is required. </p> <p> For online documentation and support please refer to <a href="http://nginx.org/">nginx.org</a>. Commercial support is available at <a href="http://nginx.com/">nginx.com</a>. </p> <p><em>Thank you for using nginx.</em></p> </body></html>
After learning about various tools like Minikube, Kind, K3s, and K8s, we now know that each tool has its own advantages and use cases, whether for local development, CI/CD, or lightweight production environments.
By understanding these tools, we can make wiser choices about which one suits our needs and available resources.
Was episode 3 interesting? We've practiced setting up a Kubernetes Cluster, learned about various tools we can use, and even tried deploying a default Nginx application that we could access. In the next episode 4, we'll explore one of the Kubernetes Objects called Node. So keep your learning spirit alive.


 Pre-Requisites 1
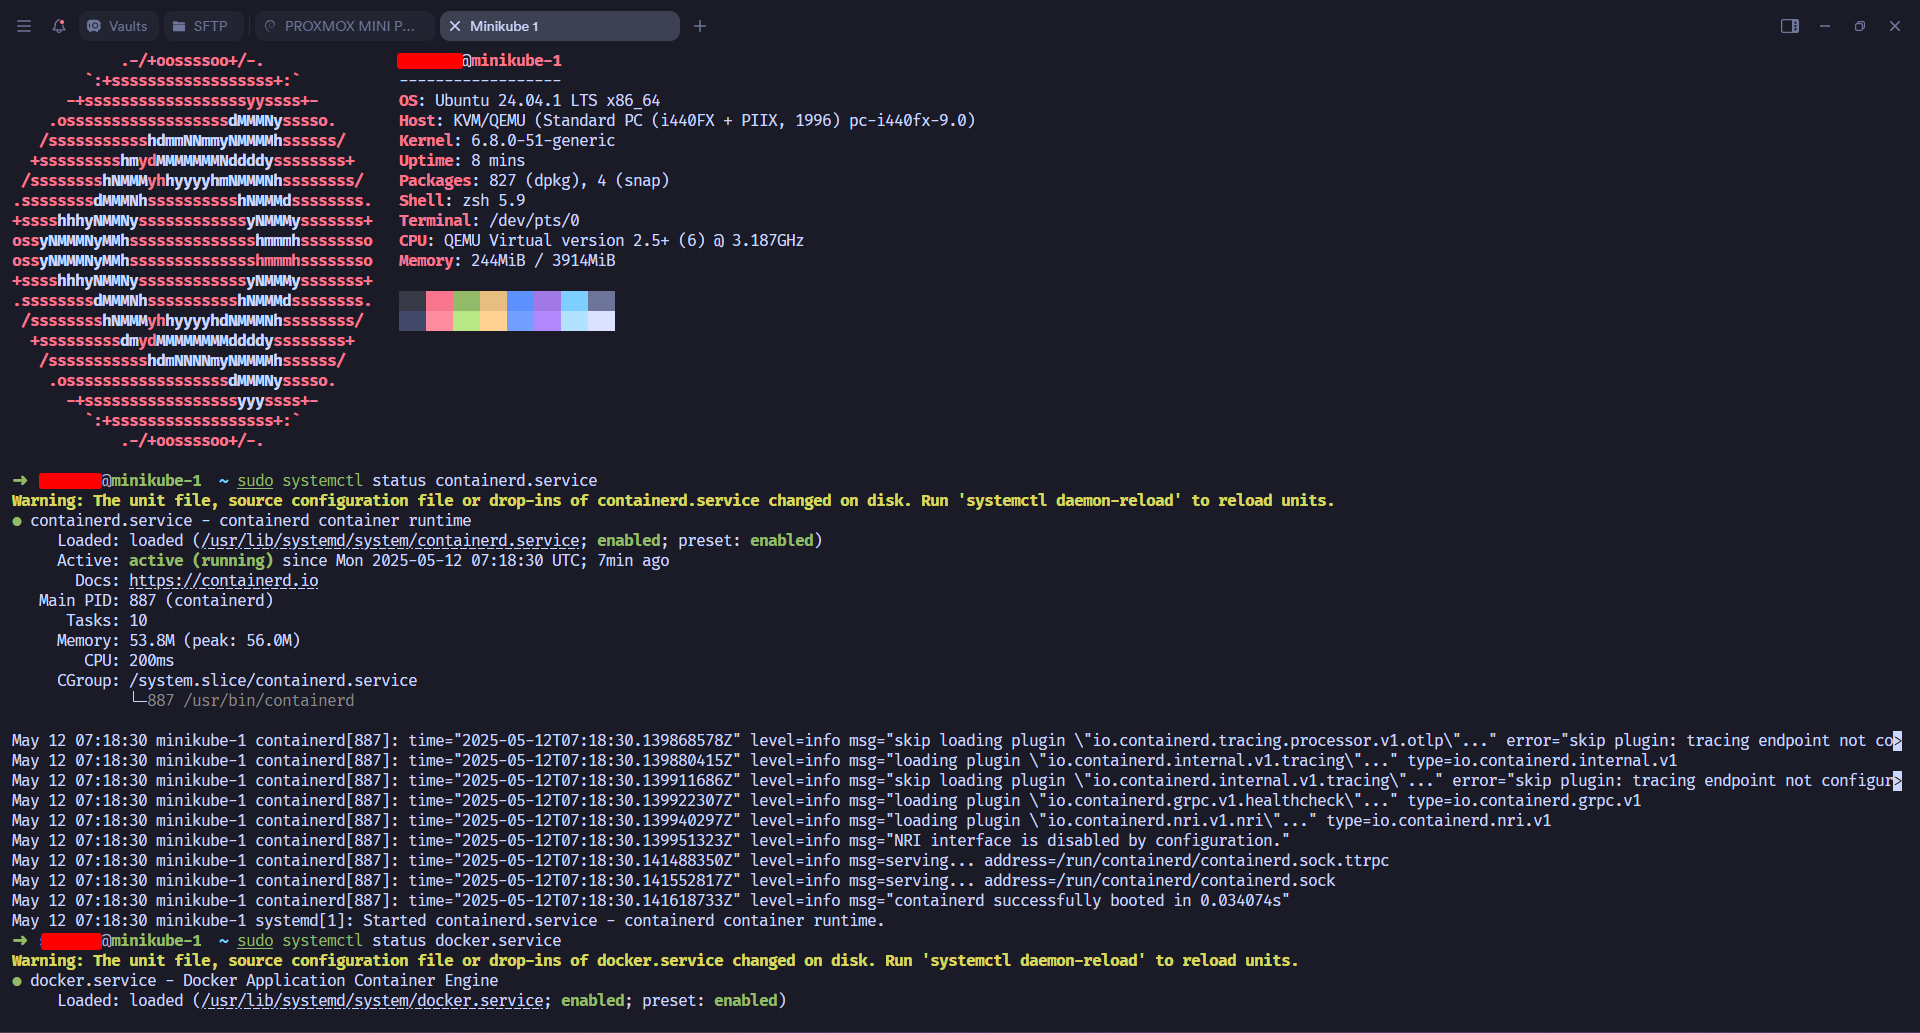 Pre-Requisites 2
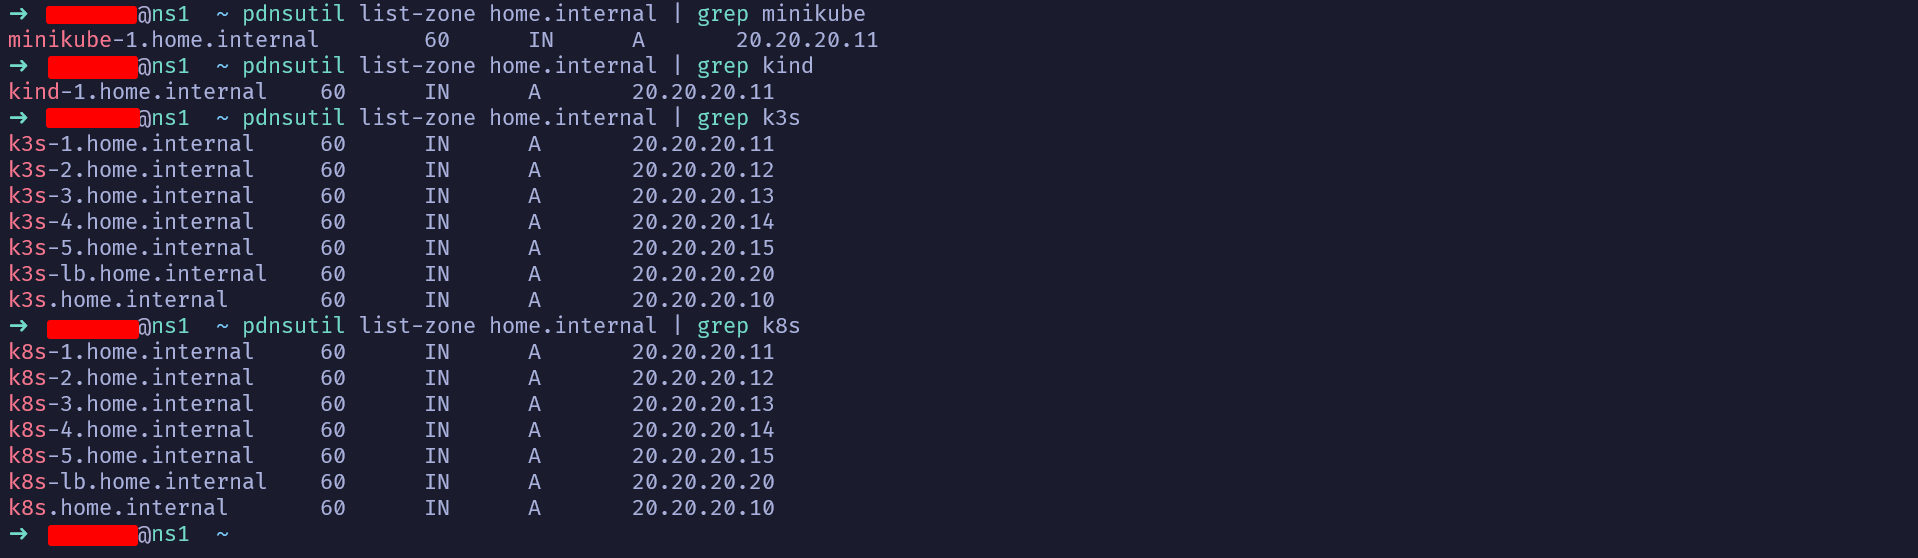 Pre-Requisites 3
Nginx K3s
Nginx K8s