
Migrating Blog to MDX with Shiki and Rehype
The journey of migrating my personal portfolio & blog website to MDX with Shiki and Rehype

#Introduction
For the past two years, I've relied on Next.js, TailwindCSS, and standard Markdown to power my personal portfolio and blog. While it served me well, I often found myself frustrated by the limitations of my code blocks. Adding advanced features—the kind we see in top-tier documentation—felt like an uphill battle. I was missing:
- Accurate syntax highlighting that actually understands the code.
- Line numbers and line/word highlighting for better readability.
- Custom titles or window-like bars for a premium feel.
- Code groups to show multiple files or options together.
- Diff notations, focused lines, and inline code that pops.
- "Copy" and "Wrap" buttons to enhance the user experience.
The root of the problem was highlight.js. While popular, it's quite limited; it relies on regex for highlighting, which often misses the nuances of modern syntax.
At the end of 2025, I finally had some breathing room to optimize my site. After diving into how modern documentation sites—like Nextra, Code Hike, Expressive Code, and Vite Press—handle content, a clear winner emerged: MDX combined with Shiki and Rehype.
The shift wasn't just about syntax highlighting, though. I needed the ability to embed interactive React components directly within my posts. Standard Markdown just couldn't keep up.
#Execution: Trial and Error
The road to implementation was far from smooth. Initially, I struggled to piece together the Shiki and Rehype ecosystem. However, everything clicked when I stumbled upon a fantastic guide by Jolly Coding.
The video introduced me to a gem called Velite. If you haven't heard of it, Velite is a powerful content pipeline that doesn't just "read" files—it ingests, validates, transforms, and enriches your content into strictly typed data.
#Rethinking the Content Flow
Before Velite, my flow was simple but fragile:
Markdown file -> Render directlyWith Velite, it transformed into a robust, structured pipeline:
Markdown/MDX
    ↓
Parse Frontmatter
    ↓
Validate Schema (Zod)
    ↓
Transform Fields
    ↓
Add Computed Fields
    ↓
Generate Types
    ↓
Export Structured Content
Here's a visual breakdown of how Velite handles the heavy lifting:
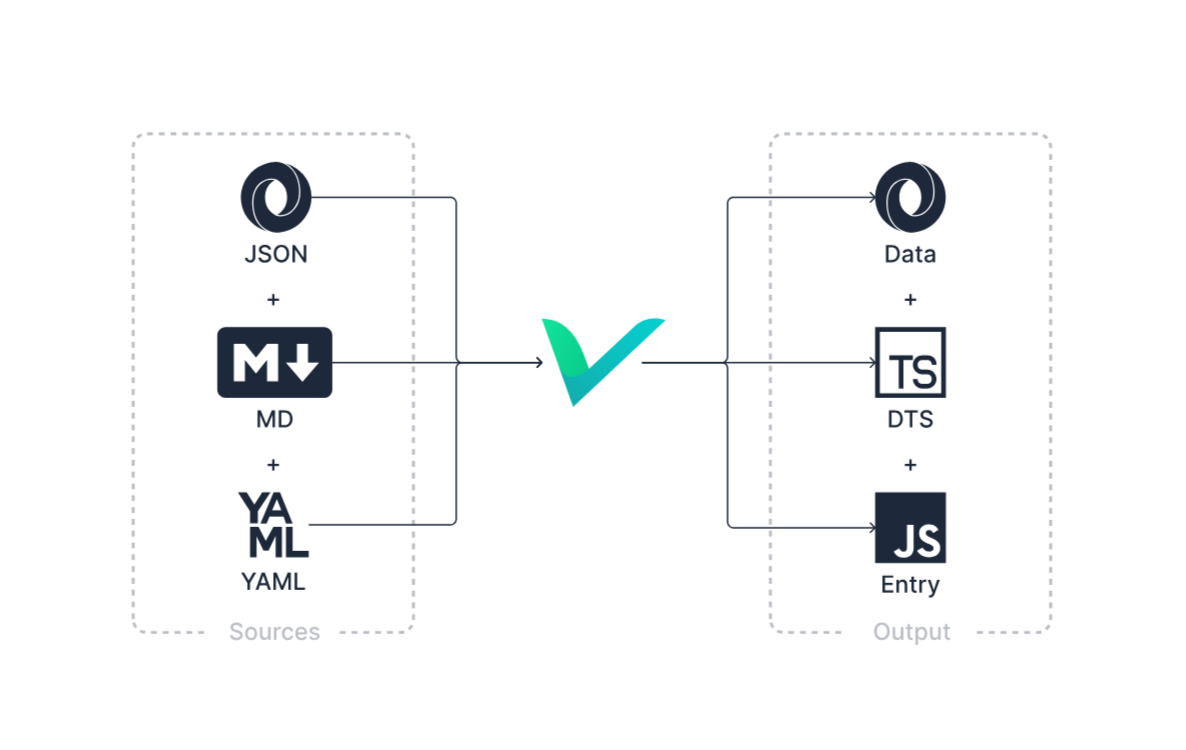 Official Velite Workflow
Beyond the automation, Velite makes content type-safe by using Zod schemas. This meant no more "undefined" errors or broken frontmatter. Here's a glimpse of the configuration I used for this very blog:
#The Result: A Reimagined Blog
After some fine-tuning, I successfully built a static blog with features that rival professional documentation. Here are some of the highlights:
#Interactive Callouts
Visual cues are essential for a good reading experience. I implemented a Callout component—inspired by GitHub's blockquotes—to highlight notes, tips, and warnings.
How it looks in MDX:
<Callout type="note" descriptionColor="normal">
    <p>This is a note callout example.</p>
</Callout>
How it renders:
Note
This is a note callout example.
#Premium Code Experiences
By leveraging Shiki and Rehype Pretty Code, code blocks are no longer static text—they're interactive workspaces.
Tip
In the example below, I'm using bash as the language to show the MDX raw code without it being executed by the renderer. But the in the real implementation is used tsx as the language.
MDX Syntax:
```bash icon="iTsx" title="Counter.tsx" caption="Example reactive counter" showLineNumbers /useState/#v /useEffect/#s /React/#i /{count}/ wrap=false wrapToggleButton
// [!code focus:1]
import React, { useState, useEffect } from 'react';

function Counter() {
  // [!code focus:2]
   // [!code --:1]
   const [count, setCount] = useState(0);
   // [!code ++:1]
   const [count, setCount] = useState<number>(0);

  // [!code focus:3]
  useEffect(() => {
    document.title = `Count: ${count}`;
  }, [count]);

  return <button onClick={() => setCount(c => c + 1)}>Count: {count}</button>;
}
```
The Outcome:
import React, { useState, useEffect } from 'react';

function Counter() {
   const [count, setCount] = useState(0);
   const [count, setCount] = useState<number>(0);

  useEffect(() => {
    document.title = `Count: ${count}`;
  }, [count]);

  return <button onClick={() => setCount(c => c + 1)}>Count: {count}</button>;
}#TypeScript Intelligence with Twoslash
One of the coolest additions is Twoslash integration. It brings the power of the TypeScript compiler directly into your blog posts.
Tip
Try it out: Hover over the underlined code below to see the type definitions!
interface Todo {
Todo.title: stringtitle: string
}
const const todo: Readonly<Todo>todo: type Readonly<T> = { readonly [P in keyof T]: T[P]; }Make all properties in T readonlyReadonly<Todo> = {
title: stringtitle: 'Delete inactive users'.String.toUpperCase(): stringConverts all the alphabetic characters in a string to uppercase.toUpperCase(),
}
const todo: Readonly<Todo>todo.title = 'Hello'
var Number: NumberConstructorAn object that represents a number of any kind. All JavaScript numbers are 64-bit floating-point numbers.Number.p- parseFloat
- parseInt
- prototype
NumberConstructor.parseInt(string: string, radix?: number): numberConverts A string to an integer.arseInt('123', 10)
#Wrapping Up
#Going Open Source
While my portfolio site is closed source, I wanted to give back to the community. I've created an open-source template called Velora that includes all these features.
- Demo: velora-example.vercel.app
- Source: github.com/armandwipangestu/velora
The repository comes with full documentation and a CI/CD pipeline, making it a great starting point for your own project.
#Why Shiki & Rehype Won Me Over
After exploring alternatives like highlight.js, Prism.js, and Code Hike, Shiki stood out for one primary reason: Accuracy.
Shiki uses TextMate Grammars, the same engine that powers VS Code. This ensures that what you see in your editor is exactly what your readers see on the blog. Plus, Shiki is static. Unlike highlight.js or Prism.js, which run in the browser and can slow things down, Shiki does all the work during the build process.
Rehype Pretty Code takes that raw highlighting and adds the "polish"—line numbers, highlighting, and custom attributes. Combined with transformers and Twoslash, it's a world-class setup for any technical blog.
If you're looking to elevate your content game, migrating to MDX is an investment that pays off every time a reader clicks "copy", hovers over a type definition, and interactive to the code block.