Learning Kubernetes - Introduction and Explanation of Node Object
In this episode, we'll discuss one of the objects in Kubernetes called Node. We'll learn more deeply about what a Node is in the context of Kubernetes.
Previously, we learned about different tools for installing Kubernetes Clusters locally, from Minikube, Kind, K3s, to K8s, as well as the installation steps for each tool. In episode 4, we'll discuss one of the objects in Kubernetes more deeply: Node.
Note: Here I'll be using a Kubernetes Cluster installed through K3s.
Note: There are several terms related to the Node object in Kubernetes over time:
Old Term
New / Current Term
Master Node
Control Plane
Minion / Worker Node
Node (Data Plane)
So if you encounter various terms like these in documentation, blogs, and so on, they might be using the old terminology.
A Node is a worker machine in Kubernetes. Simply put, a Node is what does the work, runs applications, and essentially, where our applications run is all within the Node (Data Plane). So the Master (Control Plane) only manages (orchestrates) the Nodes in Kubernetes.
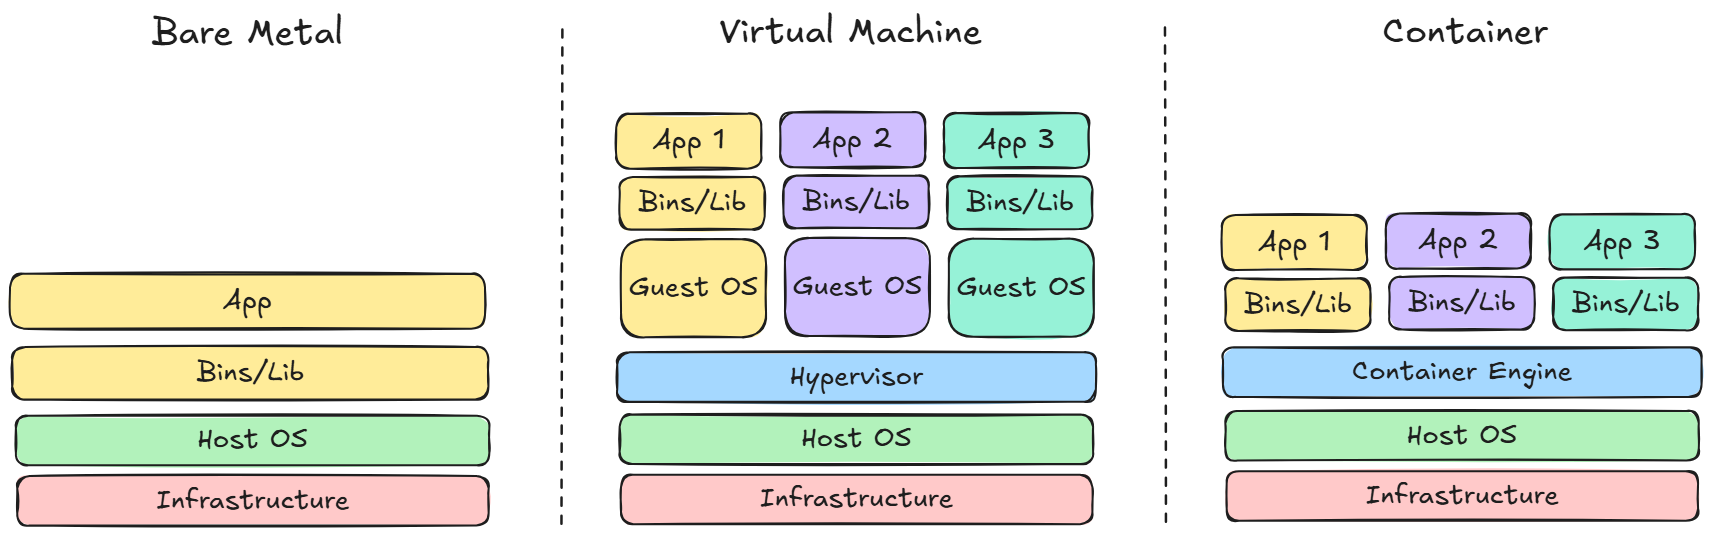
You might wonder what a Node actually looks like. Well, a Node is essentially a VM (Virtual Machine) in the end. So if we're using cloud computing services, we'll run a VM in the cloud, then register or add that VM to the Kubernetes Cluster as a Node (Data Plane) role. Or if we have our own servers in a data center, whether on-premise or colocation, it might not be a VM but a physical machine directly (commonly called Bare Metal) on a server rack, without an additional hypervisor layer for Kubernetes.
kubelet, kubeproxy, and container runtime are the 3 main applications that will definitely exist in a Node. So even if we add hundreds of Nodes or even thousands of Nodes, each of these Nodes will always have these three applications.
Later, when we want to deploy applications in a Kubernetes Cluster, we don't need to specify which Node the application will run on. No matter how many Nodes exist, Kubernetes will automatically manage application placement. Once a Node joins (registers) the Cluster, we can consider all those Nodes as one unified resource, making the deployment process easier and more flexible without having to think about specific Node locations.
If we want to run multiple identical applications simultaneously on those machines, we can easily scale the application. So we no longer need to worry about how many Nodes are in the Kubernetes cluster.
As time goes on, server resources will inevitably become limited, such as insufficient RAM, storage, CPU, and so on. All of this will be handled by the infrastructure or DevOps team.
After understanding what a Node is and the 3 main applications that must exist in every Node, let's try to see how to view the list of Nodes in the Kubernetes Cluster. To view it, you can use the following kubectl command:
Note: You can also run the following command in shorter versions or several variations like:
bash
sudo kubectl get nosudo kubectl get no -o widesudo kubectl get nodesudo kubectl get nodes
All the above commands are valid and will run successfully.
bash
sudo kubectl get nodes -o wide
The result will look like this:
bash
NAME STATUS ROLES AGE VERSION INTERNAL-IP EXTERNAL-IP OS-IMAGE KERNEL-VERSION CONTAINER-RUNTIMEk3s-1 Ready control-plane,master 32d v1.32.4+k3s1 20.20.20.11 <none> Ubuntu 24.04.1 LTS 6.8.0-60-generic containerd://2.0.4-k3s2k3s-4 Ready <none> 32d v1.32.4+k3s1 20.20.20.14 <none> Ubuntu 24.04.1 LTS 6.8.0-60-generic containerd://2.0.4-k3s2
From the Node check in my Kubernetes Cluster above, there are 2 Nodes registered in the cluster, where 1 acts as master (Control Plane), and the other as Node (Data Plane).
If you want to see more detailed information about one of the registered Nodes above, you can check it using the following command:
Note: Replace <node_name> with the name registered in the Kubernetes Cluster. In this example, I want to check the Node named k3s-4, so the command is:
bash
sudo kubectl describe node k3s-4
bash
sudo kubectl describe node <node_name>
If the above command runs successfully, you'll see output like this:
Note: There will be a lot of information displayed. You can read through it in detail. For example, there's information like:
Node name
Its role
Labels
Annotations
Memory
Disk
IP Address
Hostname
CPU
Operating System
And so on
Information about Labels and Annotations will be discussed in more detail in future episodes about those objects.
bash
Name: k3s-4Roles: <none>Labels: beta.kubernetes.io/arch=amd64 beta.kubernetes.io/instance-type=k3s beta.kubernetes.io/os=linux kubernetes.io/arch=amd64 kubernetes.io/hostname=k3s-4 kubernetes.io/os=linux node.kubernetes.io/instance-type=k3sAnnotations: alpha.kubernetes.io/provided-node-ip: 20.20.20.14 flannel.alpha.coreos.com/backend-data: {"VNI":1,"VtepMAC":"fa:a1:5d:2e:04:c3"} flannel.alpha.coreos.com/backend-type: vxlan flannel.alpha.coreos.com/kube-subnet-manager: true flannel.alpha.coreos.com/public-ip: 20.20.20.14 k3s.io/hostname: k3s-4 k3s.io/internal-ip: 20.20.20.14 k3s.io/node-args: ["agent"] k3s.io/node-config-hash: 3KNQLTBXA74TAVRJ7E44VDXDEPIWPHOZBIOTNHQ5V2AGNS2LEHJA==== k3s.io/node-env: {"K3S_TOKEN":"********","K3S_URL":"https://k3s-1.home.internal:6443"} node.alpha.kubernetes.io/ttl: 0 volumes.kubernetes.io/controller-managed-attach-detach: trueCreationTimestamp: Mon, 12 May 2025 12:26:54 +0000Taints: <none>Unschedulable: falseLease: HolderIdentity: k3s-4 AcquireTime: <unset> RenewTime: Sat, 14 Jun 2025 08:10:40 +0000Conditions: Type Status LastHeartbeatTime LastTransitionTime Reason Message ---- ------ ----------------- ------------------ ------ ------- MemoryPressure False Sat, 14 Jun 2025 08:08:00 +0000 Fri, 23 May 2025 16:26:51 +0000 KubeletHasSufficientMemory kubelet has sufficient memory available DiskPressure False Sat, 14 Jun 2025 08:08:00 +0000 Fri, 23 May 2025 16:26:51 +0000 KubeletHasNoDiskPressure kubelet has no disk pressure PIDPressure False Sat, 14 Jun 2025 08:08:00 +0000 Fri, 23 May 2025 16:26:51 +0000 KubeletHasSufficientPID kubelet has sufficient PID available Ready True Sat, 14 Jun 2025 08:08:00 +0000 Fri, 23 May 2025 16:26:51 +0000 KubeletReady kubelet is posting ready statusAddresses: InternalIP: 20.20.20.14 Hostname: k3s-4Capacity: cpu: 1 ephemeral-storage: 19221248Ki hugepages-2Mi: 0 memory: 984664Ki pods: 110Allocatable: cpu: 1 ephemeral-storage: 18698430040 hugepages-2Mi: 0 memory: 984664Ki pods: 110System Info: Machine ID: 66757c96469b49babccd2de1522a71b6 System UUID: 0f93b646-89e0-4562-909c-631149480756 Boot ID: a9a0c304-7c2b-46bc-b736-21a540c93c54 Kernel Version: 6.8.0-60-generic OS Image: Ubuntu 24.04.1 LTS Operating System: linux Architecture: amd64 Container Runtime Version: containerd://2.0.4-k3s2 Kubelet Version: v1.32.4+k3s1 Kube-Proxy Version: v1.32.4+k3s1PodCIDR: 10.42.1.0/24PodCIDRs: 10.42.1.0/24ProviderID: k3s://k3s-4Non-terminated Pods: (2 in total) Namespace Name CPU Requests CPU Limits Memory Requests Memory Limits Age --------- ---- ------------ ---------- --------------- ------------- --- default nginx-deployment-96b9d695-9wzxn 0 (0%) 0 (0%) 0 (0%) 0 (0%) 32d kube-system svclb-traefik-06f3ce18-cw6kn 0 (0%) 0 (0%) 0 (0%) 0 (0%) 32dAllocated resources: (Total limits may be over 100 percent, i.e., overcommitted.) Resource Requests Limits -------- -------- ------ cpu 0 (0%) 0 (0%) memory 0 (0%) 0 (0%) ephemeral-storage 0 (0%) 0 (0%) hugepages-2Mi 0 (0%) 0 (0%)Events: Type Reason Age From Message ---- ------ ---- ---- ------- Normal Starting 39m kube-proxy Normal RegisteredNode 39m node-controller Node k3s-4 event: Registered Node k3s-4 in Controller Normal Starting 39m kubelet Starting kubelet. Normal NodeAllocatableEnforced 39m kubelet Updated Node Allocatable limit across pods Normal NodeHasSufficientMemory 39m kubelet Node k3s-4 status is now: NodeHasSufficientMemory Normal NodeHasNoDiskPressure 39m kubelet Node k3s-4 status is now: NodeHasNoDiskPressure Normal NodeHasSufficientPID 39m kubelet Node k3s-4 status is now: NodeHasSufficientPID Warning Rebooted 39m kubelet Node k3s-4 has been rebooted, boot id: a9a0c304-7c2b-46bc-b736-21a540c93c54
In episode 4, we've discussed the Node object in Kubernetes specifically, from its definition, role, to the main applications that always exist on every Node like kubelet, kubeproxy, and container runtime. We've also seen how to check the list of Nodes and the detailed information within them.
By understanding the Node concept, we now know how Kubernetes manages resources and runs applications automatically without having to think about placement details manually. This knowledge is very important as a foundation before learning other more complex Kubernetes objects.
I hope the explanation in this episode helps you understand the role of Nodes in Kubernetes architecture. Don't hesitate to experiment directly on your own cluster to understand better.
Are you getting a better understanding of Nodes in Kubernetes? In the next episode, we'll discuss another equally important Kubernetes object: Pod. So keep your learning spirit alive.

 Architecture & Deployment Models
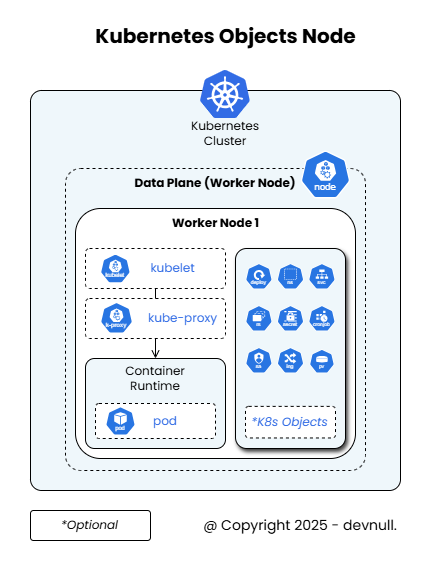 Kubernetes Object Node