In the previous episode, we learned more deeply about the Node object in Kubernetes. In episode 5, we'll discuss one of the objects in Kubernetes more deeply: Pod.
Note: Here I'll be using a Kubernetes Cluster installed through K3s.
You might be encountering the term Pod for the first time. If you've previously worked with Docker, you're probably familiar with terms like Image and Container. Now there's a new term in Kubernetes called Pod. You might wonder what Pod is?
A Pod is the smallest unit that we can deploy into a Kubernetes Cluster. In Docker, when we want to deploy an application, we take an Image and run it as a Container in Docker. However, this is different when we want to deploy an application to a Kubernetes Cluster.
When we run an application in a Kubernetes Cluster, the application runs within a Pod. You might ask why not a container? Why is there a new term called Pod? That's because in Kubernetes, a Pod can contain one or more containers (multi-container) that share resources like CPU, RAM, Network, and so on.
If you're used to running applications in Docker where one application equals one Container, it's different in Kubernetes. Kubernetes has the capability to wrap a deployed application into a Pod, and within that Pod, we can place more than one Container. Although in reality, you might rarely deploy multiple containers in a single Pod, there might be specific use cases or requirements that require multiple containers in one Pod, such as Proxy, Exporter, or Sidecar.
In essence, simply put, a Pod is an application running in a Kubernetes Cluster. So if our application wants to run in a Kubernetes Cluster, it will run in the form of a Pod.
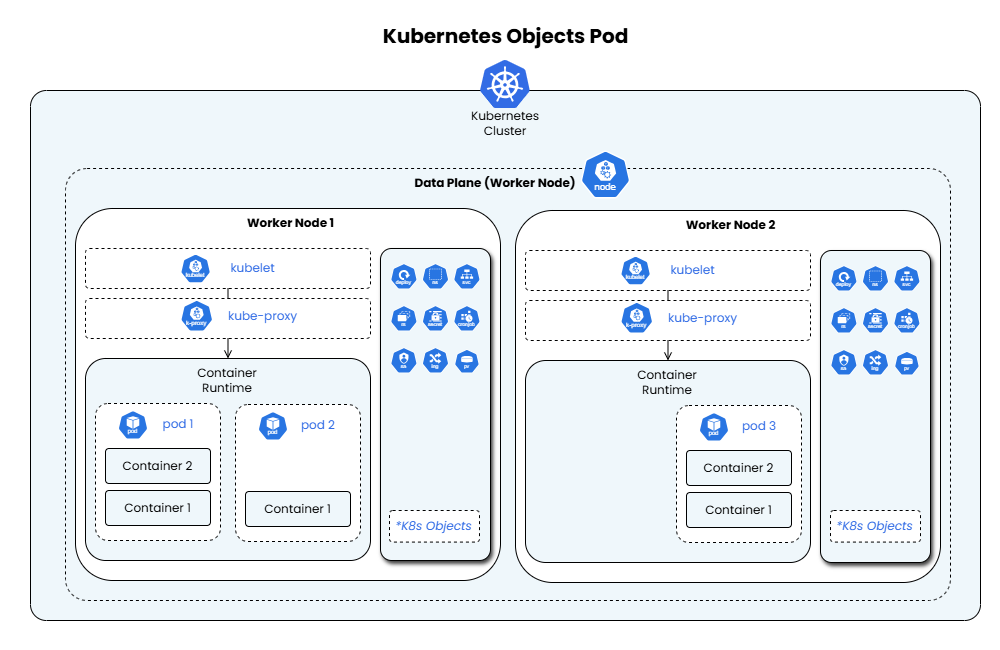
To help you visualize this, you can see the architecture of the Pod object below:
Architecture Pod
Based on the architecture diagram above, suppose we have 2 Worker Nodes / Data Planes in a Kubernetes Cluster. When we deploy an application, it will run within the Node. For example:
On the first Node, we run 2 Pods, and on the second Node, we run 1 Pod. When running the application, Pod 1 might contain 2 Containers running, and Pod 2 might contain only 1 Container running.
Then on the second Node, we run Pod 3, which also runs 2 Containers.
So that's what the term Pod means. Previously in Docker, 1 application equals 1 Container, but in Kubernetes, 1 Pod can contain more than 1 Container, or even 2, 3, or unlimited, depending on requirements.
You might wonder if it's possible in Kubernetes to deploy a Pod that runs across multiple Nodes simultaneously or is distributed, or in other words, partial? Well, this cannot be done in Kubernetes. To help you visualize this, you can see the diagram below:
Architecture Pod Parsial
So it's certain that 1 Pod only runs on 1 Node. There's no concept of a partial or half Pod running across various Nodes (like the runtime being on Node 1 and Node 2). To visualize this, suppose you have 1GB of Memory left on Node 1, and 5GB of Memory left on Node 2. Then you want to deploy a Pod that requires 6GB of Memory and want to deploy it across both Nodes. Well, this cannot be done.
So when creating a Pod, try not to make the hardware specifications too small. If possible, make them reasonably large so that if there's a need like that later, you can still optimize the use of the Pod within that Node.
After understanding the Pod object in a Kubernetes Cluster, you might wonder why we need Pod? Why not just run or use Container directly? Well, here's the issue. If we directly use Container, the answer is that Kubernetes doesn't require using a specific Container Runtime A or Container Runtime B. There's a separate abstraction layer where Kubernetes uses the term Pod. So within the Pod, we can use different Container Runtimes according to what we choose or use, such as Containerd, CRI-O, Docker Engine, and so on.
So if Kubernetes directly used Container, we would only be able to use one specific Container Runtime, like Docker Engine only. This is done because Kubernetes itself uses the CRI (Container Runtime Interface) standardization. So if in the future there's something more popular than Docker Engine and it supports CRI standardization, it can be done easily.
Fun Fact: Kubernetes used to only use Docker as its Container Manager or Runtime. However, Docker is a complete platform and not a pure runtime, while Kubernetes only needs a runtime. Docker didn't support CRI-compatible, requiring a special adapter like dockershim.
Because of this, CRI (Container Runtime Interface) was introduced as a standardization for runtime. CRI was created so Kubernetes could be interoperable or agnostic to many container runtimes.
You might also wonder what the specific reason is for running multiple containers in 1 Pod. Well, since a Pod can run more than 1 Container, this is very suitable if there's a need to run an application where that application depends on or is dependent on another application. Then if you want to scale that application, you need to scale the application along with its dependent applications. Well, this is very suitable to deploy in 1 Pod, so if you need to scale to 2 or 3 Pods, the applications inside will scale along with it because they're in 1 Pod.
Or another example is when deploying an application, there's a monitoring agent for that application or a proxy. Well, this is also suitable to run in 1 Pod.
After understanding the explanation about the Pod object in a Kubernetes Cluster, let's try to see how to view the Pods in our Kubernetes Cluster. The method is actually similar to viewing Nodes in episode 4 earlier. You can use the following command:
bash
sudo kubectl get pod
Note: If you previously deployed a Nginx application to the Kubernetes Cluster in episode 3 earlier, you'll see output like mine below. However, if you haven't deployed any application yet, you'll see output like this: No resources found in default namespace.
If the above command is run, the output will look like this:
bash
NAME READY STATUS RESTARTS AGEnginx-deployment-96b9d695-9wzxn 1/1 Running 4 (93m ago) 43d
Just like viewing Node details in episode 4 earlier, we can see more detailed information about Pods. To view it, you can run the following command:
Note: Replace <pod_name> with the name registered in the Kubernetes Cluster. In this example, I want to check the Pod named nginx-deployment-96b9d695-9wzxn, so the command is:
bash
sudo kubectl describe pod nginx-deployment-96b9d695-9wzxn
bash
sudo kubectl describe pod <pod_name>
If the above command runs successfully, you'll see output like this:
Note: There will be a lot of information displayed. You can read through it in detail. For example, there's information like:
Pod name
Namespace
Priority
Service Account
Node (which node it's running on)
Start Time
Labels
Annotations
Status
IP
And so on
Information about Namespace will be discussed in more detail in future episodes about the Namespace object.
bash
Name: nginx-deployment-96b9d695-9wzxnNamespace: defaultPriority: 0Service Account: defaultNode: k3s-4/20.20.20.14Start Time: Tue, 24 Jun 2025 16:25:25 +0000Labels: app=nginx pod-template-hash=96b9d695Annotations: <none>Status: RunningIP: 10.42.1.12IPs: IP: 10.42.1.12Controlled By: ReplicaSet/nginx-deployment-96b9d695Containers: nginx: Container ID: containerd://668f3969bc6a845f57865e79c784c870d4e37d630b00a7d06e7f75ebf623c1ea Image: nginx:latest Image ID: docker.io/library/nginx@sha256:6784fb0834aa7dbbe12e3d7471e69c290df3e6ba810dc38b34ae33d3c1c05f7d Port: 80/TCP Host Port: 0/TCP State: Running Started: Tue, 24 Jun 2025 16:25:27 +0000 Ready: True Restart Count: 0 Environment: <none> Mounts: /var/run/secrets/kubernetes.io/serviceaccount from kube-api-access-6b5ck (ro)Conditions: Type Status PodReadyToStartContainers True Initialized True Ready True ContainersReady True PodScheduled TrueVolumes: kube-api-access-6b5ck: Type: Projected (a volume that contains injected data from multiple sources) TokenExpirationSeconds: 3607 ConfigMapName: kube-root-ca.crt ConfigMapOptional: <nil> DownwardAPI: trueQoS Class: BestEffortNode-Selectors: <none>Tolerations: node.kubernetes.io/not-ready:NoExecute op=Exists for 300s node.kubernetes.io/unreachable:NoExecute op=Exists for 300sEvents: Type Reason Age From Message ---- ------ ---- ---- ------- Normal Scheduled 2m13s default-scheduler Successfully assigned default/nginx-deployment-96b9d695-9wzxn to k3s-4 Normal Pulling 2m13s kubelet Pulling image "nginx:latest" Normal Pulled 2m11s kubelet Successfully pulled image "nginx:latest" in 2.237s (2.237s including waiting). Image size: 72406859 bytes. Normal Created 2m11s kubelet Created container: nginx Normal Started 2m11s kubelet Started container nginx
As explained in Episode 2 - Understanding Kubernetes Concepts and Architecture#Simple Kubernetes Workflow, when we want to create a Pod or any object in our Kubernetes Cluster, we create it in a configuration file. This configuration file will then be submitted through the Kubernetes API Server. After that, the API Server will create the resource from the submitted configuration file.
Actually, there are several ways to create a Pod, but the most common way is to create 1 configuration in YAML format (it can also be in JSON format, but most commonly use YAML format). For example, you can see the YAML template example for a Pod like this:
Here's an explanation of the parts of the configuration above:
apiVersion specifies the version of the Kubernetes API used for that object.
kind indicates the type of resource to be created, in this case Pod.
metadata contains metadata information such as the Pod name.
spec defines the Pod specification, including the list of containers to run within the Pod.
Each container within a Pod is defined in the containers section, where we can specify the container name, image used, port used, environment variables, volume mounts, and other configurations.
If you want to create a Pod with more than one container (multi-container Pod), simply add a new container definition in the containers array, like the following example:
Note: Multi-container Pods are usually used for cases where multiple containers need to run together and communicate directly with each other, for example for sidecar pattern (logging, proxy, monitoring agent, etc.).
After learning how to create a Pod, let's try running a Pod with a Nginx container image. To create it, you can try creating a nginx.yml file like this:
The reason I chose to run from the Nginx image as an example is because the image is small and suitable for the learning process, so you don't need to wait long for the image download and so on.
After successfully creating the YAML configuration file above, we'll submit the configuration file to the Kubernetes Cluster by running the following command:
Note: Replace <file_name>.yml with the name of the file created earlier. For example, here I'll submit the configuration from the file name nginx.yml, so the command becomes:
bash
sudo kubectl create -f nginx.yml
bash
sudo kubectl create -f <file_name>.yml
If the above command runs successfully, you'll see output like this:
bash
pod/nginx created
To view or verify that the Pod was successfully run, you can run some of the following commands:
Note: If you want more detailed information, you can run the following command:
bash
sudo kubectl get pod -o wide
The output will look like this:
bash
NAME READY STATUS RESTARTS AGE IP NODE NOMINATED NODE READINESS GATESnginx 1/1 Running 0 5m41s 10.42.1.15 k3s-4 <none> <none>nginx-deployment-96b9d695-8lml5 1/1 Running 1 (123m ago) 16d 10.42.1.13 k3s-4 <none> <none>
Or if you want more specific details of a single pod like this:
bash
sudo kubectl describe pod <pod_name>
The output will look like this:
bash
Name: nginxNamespace: defaultPriority: 0Service Account: defaultNode: k3s-4/20.20.20.14Start Time: Fri, 11 Jul 2025 14:10:49 +0000Labels: <none>Annotations: <none>Status: RunningIP: 10.42.1.15IPs: IP: 10.42.1.15Containers: nginx: Container ID: containerd://12754ece1a837e881b0852a9c3f1841193afe08dc3e9fe24f8b79872faa700d2 Image: nginx Image ID: docker.io/library/nginx@sha256:93230cd54060f497430c7a120e2347894846a81b6a5dd2110f7362c5423b4abc Port: 80/TCP Host Port: 0/TCP State: Running Started: Fri, 11 Jul 2025 14:10:51 +0000 Ready: True Restart Count: 0 Environment: <none> Mounts: /var/run/secrets/kubernetes.io/serviceaccount from kube-api-access-f5pcn (ro)Conditions: Type Status PodReadyToStartContainers True Initialized True Ready True ContainersReady True PodScheduled TrueVolumes: kube-api-access-f5pcn: Type: Projected (a volume that contains injected data from multiple sources) TokenExpirationSeconds: 3607 ConfigMapName: kube-root-ca.crt ConfigMapOptional: <nil> DownwardAPI: trueQoS Class: BestEffortNode-Selectors: <none>Tolerations: node.kubernetes.io/not-ready:NoExecute op=Exists for 300s node.kubernetes.io/unreachable:NoExecute op=Exists for 300sEvents: Type Reason Age From Message ---- ------ ---- ---- ------- Normal Scheduled 110s default-scheduler Successfully assigned default/nginx to k3s-4 Normal Pulling 110s kubelet Pulling image "nginx" Normal Pulled 108s kubelet Successfully pulled image "nginx" in 2.079s (2.079s including waiting). Image size: 72225394 bytes. Normal Created 108s kubelet Created container: nginx Normal Started 108s kubelet Started container nginx
bash
sudo kubectl get pod
The result will roughly look like this:
bash
NAME READY STATUS RESTARTS AGEnginx 1/1 Running 0 95snginx-deployment-96b9d695-8lml5 1/1 Running 1 (119m ago) 16d
After we successfully run a Pod, sometimes we want to test by accessing the Pod to verify it's truly running. To do this, we can create a port-forward or port mapping from the Host to the Pod object by running the following command:
Note: Replace <pod_name>, <host_port>, and <pod_port> according to the Pod and port being used. For example, since we're running a Pod named nginx and the application or container is running on port 80, we can do it like this:
bash
sudo kubectl port-forward nginx 8888:80
Or if you want to bind to all networks, you can use the following command:
If the above command runs successfully, you'll see output like this:
bash
Forwarding from 0.0.0.0:8888 -> 80Handling connection for 8888Handling connection for 8888Handling connection for 8888
Let's try accessing port 8888 in a browser, and the default Nginx page will appear like this:
Note: I've already set up domain pointing for the VMs on my home server, so I can access using domain names like k3s-1.home.internal. If you haven't done this, you can access using the IP Address of the Node in the browser search bar or localhost directly in the curl command if accessing from the Node's shell directly.
Pod Port Forward
Or access with curl command like this:
bash
curl http://k3s-1.home.internal:8888
html
<html> <head> <title>Welcome to nginx!</title> <style> html { color-scheme: light dark; } body { width: 35em; margin: 0 auto; font-family: Tahoma, Verdana, Arial, sans-serif; } </style> </head> <body> <h1>Welcome to nginx!</h1> <p> If you see this page, the nginx web server is successfully installed and working. Further configuration is required. </p> <p> For online documentation and support please refer to <a href="http://nginx.org/">nginx.org</a>. Commercial support is available at <a href="http://nginx.com/">nginx.com</a>. </p> <p><em>Thank you for using nginx.</em></p> </body></html>
In episode 5, we've discussed the Pod object in Kubernetes in depth, from its definition, architecture, reasons for using Pod, to practical experience creating and running Pods in a cluster. We've also seen how to view the list of Pods, detailed Pod information, and how to do port-forwarding for testing applications within a Pod.
By understanding the Pod concept, we now know that a Pod is the smallest unit that can be deployed in Kubernetes, and how a Pod can contain one or more containers that share resources. This knowledge is very important as a foundation before learning other more complex Kubernetes objects.
I hope the explanation in this episode helps you understand the role and function of Pods in Kubernetes architecture. Don't hesitate to try it directly on your own cluster to understand better.
Are you getting a clearer understanding of Pods in Kubernetes? In the next episode 6, we'll discuss another equally important Kubernetes object: Label. So keep your learning spirit alive and look forward to the next episode!

 Architecture Pod
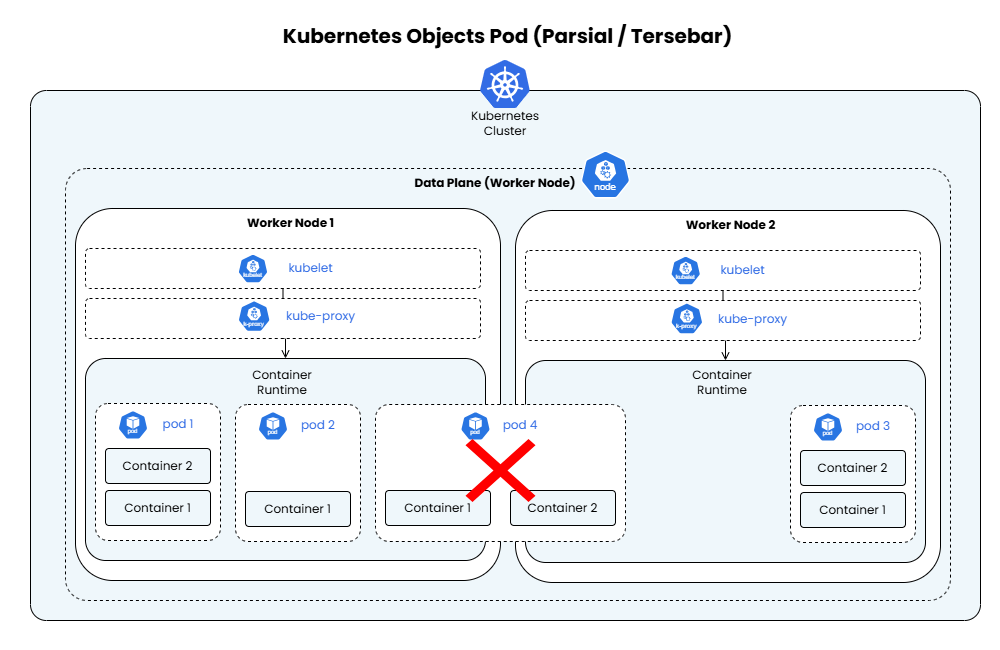 Architecture Pod Parsial
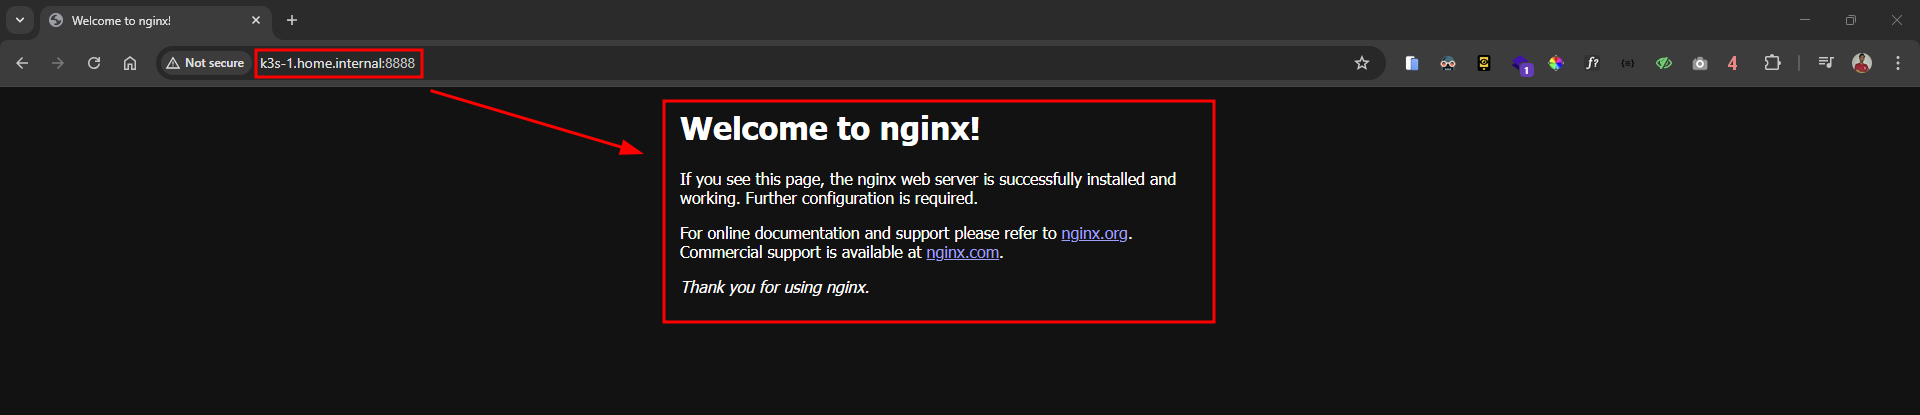 Pod Port Forward